
|
I have a new block for you today -- which I am calling Twinkle Stars.
The block essentially is friendship stars in two corners with a couple of squares that intersect the friendship stars.. Super simple to draft and to piece. The block is asymmetrical -- which opens up the design possibilities. With asymmetrical blocks, I always like to experiment with the Serendipity>Shrink and Flip option. You can find this option on the block worktable. You also have the option to with the Symmetry Option on the quilt worktable.
The real fun was playing with rotation options. There are two ways to add rotation:
Here are the Shrink and Flip Blocks created in the video.
Also consider playing with coloration of the blocks as well.
For my blocks and quilts I used the At Day's End fabric collection by Sarah Maxwell for Andover Fabrics. It is the free fabric download from Electric Quilt for June 2024.
Here were the quilts I created using the Twinkle Stars block.
The first two used a 4 x 4 grid with block sizes of 12". For the first quilt, I used the Symmetry option to change the rotation of the blocks.
The remaining quilts using the Shrink and Flip option in the Block worktable. This was the option shared in the video. I used a 2 x 2 layout with a block size of 24 inches.
The last one is the one I chose to provide detailed instructions on in the video. For these quilts, I decided to incorporate the friendship star block in the borders as well. The basic friendship star block is one of the default blocks in EQ8 Projects -- so no drafting is required. For the border, I alternated the friendship stars with a block with 3 columns and 1 row (drawn with the grid tool). With some coloring changes, it now appears there is a band running through all those border friendship stars.
As you can see, there are so many possibilities with this block. I am curious how you will play with the design.
Share a favorite Twinkle Stars quilt in the Learning EQ Facebook group. I've set up a post just for these quilts.
1 Comment
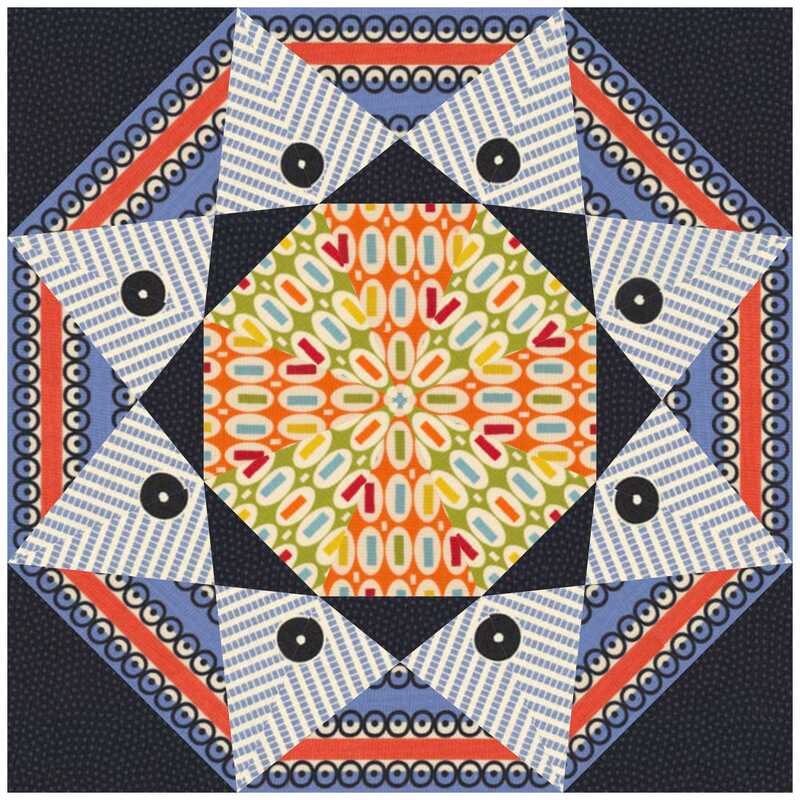
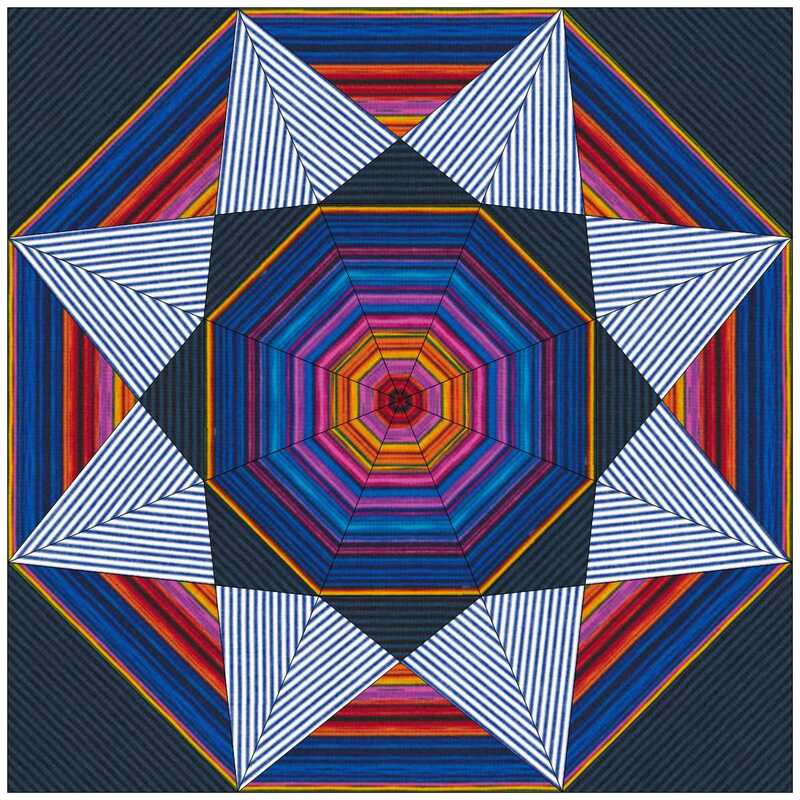
The quilts I am presenting today were inspired by a design by Mary Groesbeck. Mary is a talented designer. You can find her patterns at https://www.womancavedesign.com/. I used a different technique from Mary to create the quilts in this block post.
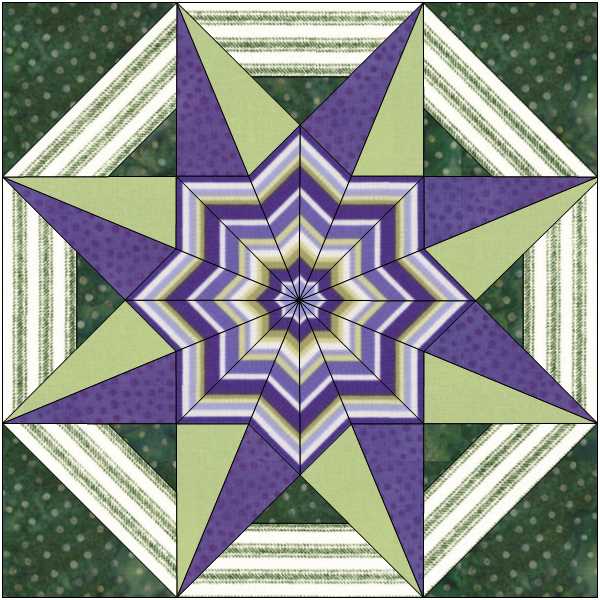
Usually when we think about drafting one patch quilts in Electric Quilt, we focus on using the One Patch layout option. However, I often prefer a different option -- one of which I will be sharing with you today. The block that I will be drafting is a half-hexagon block. When drawing a hexagon (or a half hexagon), you need to decide on your base measurement. The various tools and rulers are typically based on either the width of the block (which is double the size of an edge) or the height. The width and height are never the same on a regular hexagon (which is based on an equilateral triangle).

Hexagon Measurement Options
In Electric quilt, set the snaps horizontal at 11" (every 3 inches) and snaps vertical at 4" (the smallest number allowed).
Use the process outlined in the video to draft the half hexagon block. 
Half Hexagon Block Drawn in EQ8
For this block, the three top edges will all be 3", the bottom edge (which is the width) 6", and the block height 2.598".
Here is the quilt from the video. 
Option 1 Quilt - Half Hexagon Quilt in Black and White Fabrics
The fabrics for this quilt were pulled from the EQ Library>Colors. I used both colors library 34 White on Black and colors library 33 Black on White.
The quilt finishes 34" x 21-3/4". This quilt would be compatible for using the an Accuquilt die or most EPP papers (both of which uses the edge with for sizing their half-hexagons.
Option 2 Half Hexagon Quilt Variation
After going back to the Hexagon calculator, I obtained the measurements for a half hexagon with a height of 3". This would allow for using rulers that are based on the hexagon height (rather than the width). Often with these rulers we can cut strips 1/2" wider than the hexagon height and then use the rulers for the cross-cuts. These measurements would work super well for Star 60 (Studio 180 design), Jaybirds Hex-and-More and even the Half Hexagon rulers from Missouri Star. To modify the Half Hexagon quilt in EQ, we only need to adjust the block width and height on the Layout tab! Super simple. (The adjusted block size is 38.104" x 3".) 
Here is the adjusted quilt from the video.

Option 2 Quilt - Half Hexagon in Stripe Fabrics
The fabrics for this quilt came from the the Themes library in EQ8. They were all in 03 Stripes. I replaced the white and black solid fabrics with a grey and off-white from the Fabric of the Month Download from Do You EQ for April 2019.
I would love to see your Half Hexagon quilt. What fabric collection will you decide to feature in your design? Please share photos on the Learning EQ Facebook group.
But wait -- there's more...
One Patch Quilts will always tessellate. But the Tech Know Quilter Masters members were encouraged to bring their tessellation skills to a whole new level. Read on for a showcase of the quilts from the tessellation challenge. Tessellation Challenge
Want to know more about Tech Know Quilter Masters?
Tech Know Quilters members are eligible for the Masters program after completing 12 months of Tech Know Quilter classes. Masters members receive fewer lessons each month, with more time to devote to their own projects and challenges. Drop me a note if you have completed over 12 months of Tech Know Quilters and are interested in learning more about the Masters program. You can learn more about the regular Tech Know Quilters membership program and sign up for the wait list for the next open enrollment period here.
The quilt I am sharing today was inspired by a design I saw on the Quilt Index.

Mitchell, Eugeni. Flag Quilt. 1979. From Rocky Mountain Quilt Museum, Rocky Mountain Quilt Museum Collection. Published in The Quilt Index, https://quiltindex.org/view/?type=fullrec&kid=24-20-198. Accessed: 05/24/24
The quilt was made by Eugenia Mitchell of Golden CO and donated to the Rocky Mountain Quilt Museum.
It was one of the original 101 quilts donated by Eugenia Mitchell to start the Rocky Mountain Quilt Museum. Eugenia hated to see anything go to waste. In 1943, her son salvaged the large flag from a July 4th bandstand bunting, and Eugenia retrieved the small flags from veterans' graves after Memorial Day 1979 (with permission). Although I didn't make an exact replica of the quilt in EQ, I did follow the layout concept from Eugenia's quilt. Flag Dimensions for EQ Design
In the video tutorial, I will take you through drafting both my American Flag block along with the quilt.
One of the pluses of the quilt design is that it could easily be adapted with flags of a different country. Or maybe a collection of flags.
Here is my final block.

American Flag Block Created in EQ8 by Kari Schell
Here is my final quilt.
I did my best to stay with the same width to height ratio for the blocks in the borders -- but ended up taking some liberties by adjusting the proportions in some of the border blocks (just a bit). 
Memorial Day Flags Quilt designed with EQ8 by Kari Schell
I would love to see what you do with my flag block. Or a different flag block. Feel free to post in the Learning EQ Facebook Group. I've set up a dedicated post.
Tech Know Quilters April 2024 Month End Challenge
Prepare to embark on a journey of awe-inspiring creativity as we unveil our latest showcase, featuring an array of remarkable student projects from the Tech Know Quilter community.
Among the reactions, one common sentiment prevails: "I never imagined Electric Quilt 8 could achieve such feats!" I know you will be impressed as we unveil the astonishing capabilities of Electric Quilt 8, showcased through the diverse and imaginative projects crafted by our talented members.
Tech Know Quilters Masters Challenge - Design Your Own T Shirt
In this blog post I will inspire you with ideas developed by Tech Know Quilters Masters members who designed their own T Shirt in EQ (or used a T Shirt from the EQ library). And then created a design for the T Shirt. I will also walk you through the process of preparing your Electric Quilt 8 design for printing -- and will walk you through how to use VistaPrint to print your own T Shirt. Quilty T Shirts Tech Know Quilters Masters Challenge
For this challenge, Tech Know Quilter Masters members started by either drafting their own shirt or using a shirt from the EQ library.
In week 2, they found a design to add to their T Shirt. And then (if desired) they added text to their quilt. I am hoping some decide to create their own personal T Shirt from their design. I personally would love to wear any of them.
Did you know that if you have received twelve months of Tech Know Quilter classes, you are eligible for the TKQ Masters program?
Send me a note, if you are interested in learning more about joining Masters. From EQ8 to T Shirt
I decided to challenge myself to participate in the TKQ Masters Challenge as well.
I've been wanting to create a Tech Know Quilters T Shirt. I ended up with two designs and couldn't decide which one I preferred.
Let me walk you through the highlights on creating my design in EQ8.
In my free video this week, I decided to share (as Paul Harvey would say) "the rest of the story".
While the design in EQ was great, I didn't want a quilt with the design -- but wanted an actual T Shirt. I knew it would be fun to wear to retreats and quilt shows. And I loved the fact that it is a one of a kind item. The biggest challenge I needed to overcome was preparing a good design for printing. And then finding a way to get it actually printed. Check out how I addressed both of these challenges.
You may have noticed in the video that I added a new piece of software to the mix.
My original plan was to use a background remover app (such as remove.bg). I use that app a lot, but the export was not large enough to create a crisp design.
When I was looking for a way to get my shirt printed, I saw that VistaPrint https://www.vistaprint.com was an option. I've used them in the past for postcards and business cards and have been impressed with their quality. They allow for purchases of single shirts, so I thought I would give it a try. In the process, I realized my image should be at a dpi of at least 300. (That was when I realized remove.bg wasn't going to work.)
Do you have a favorite quilting T Shirt? I would love to see pictures. I've set up a separate post in the Learning EQ Facebook group for you to share.
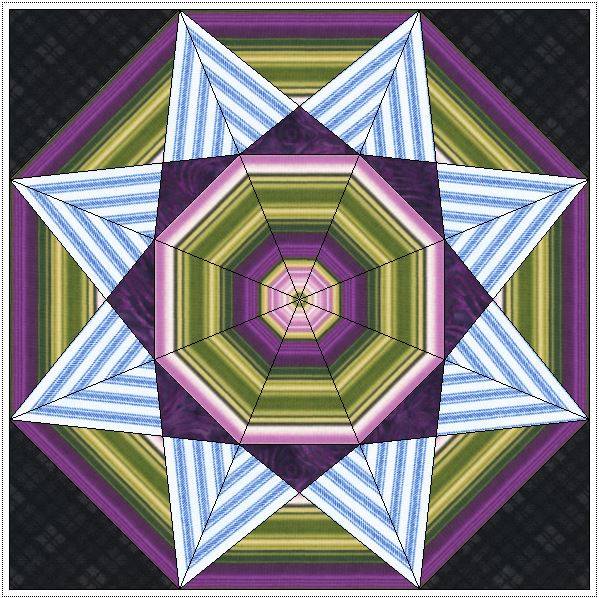
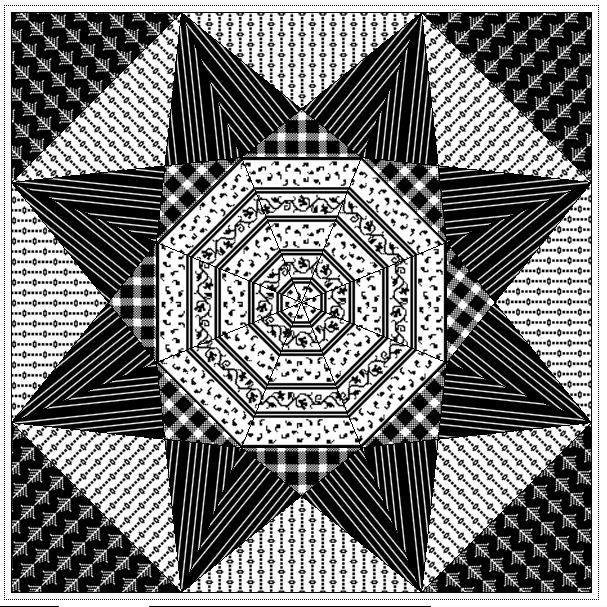
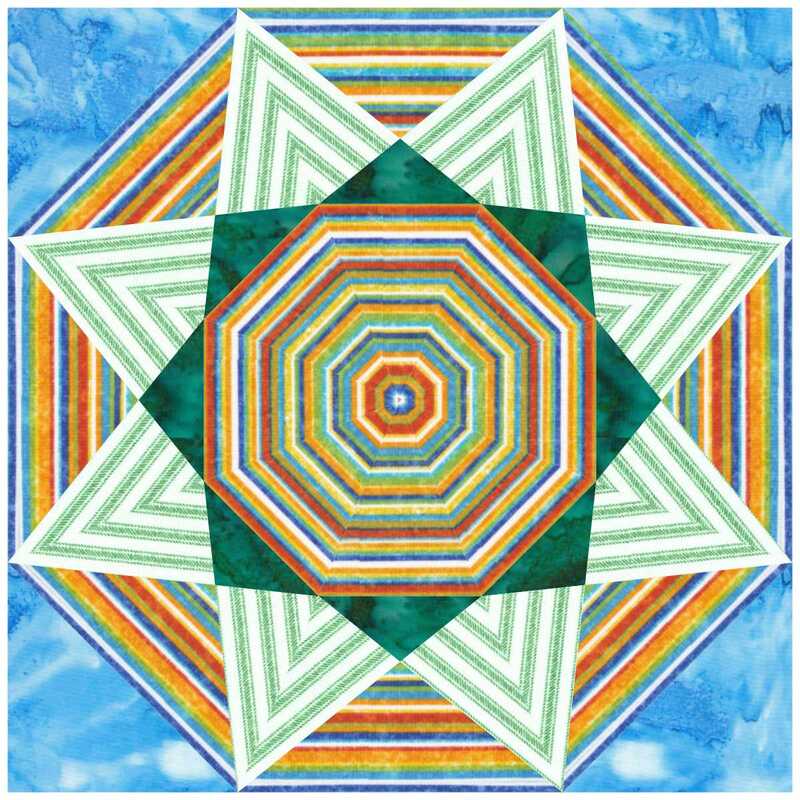
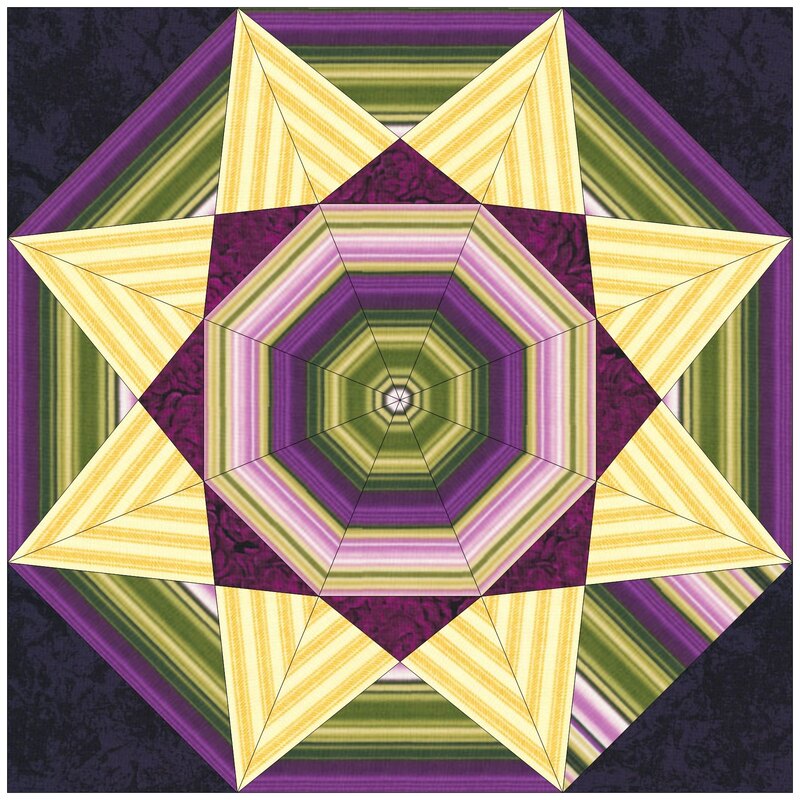
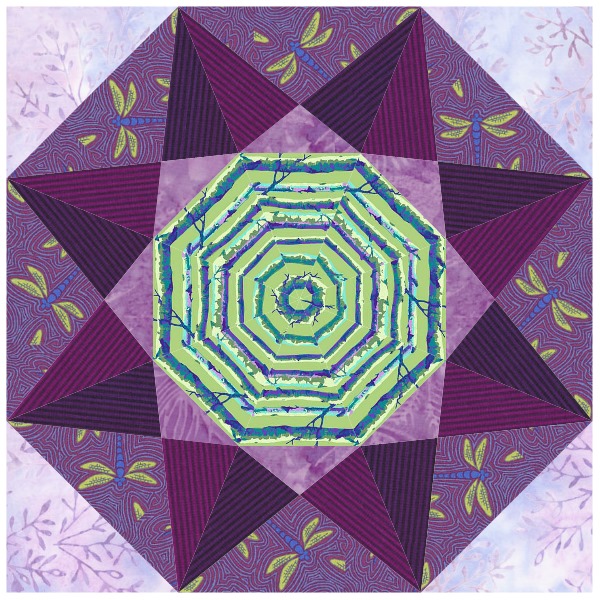
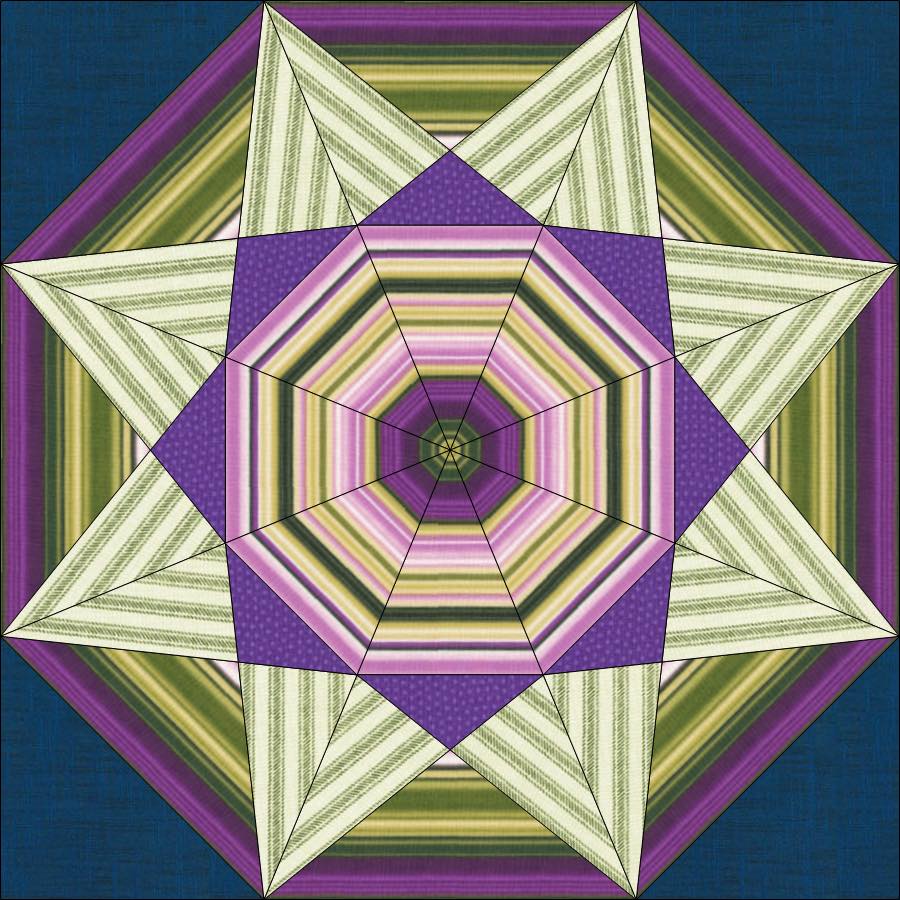
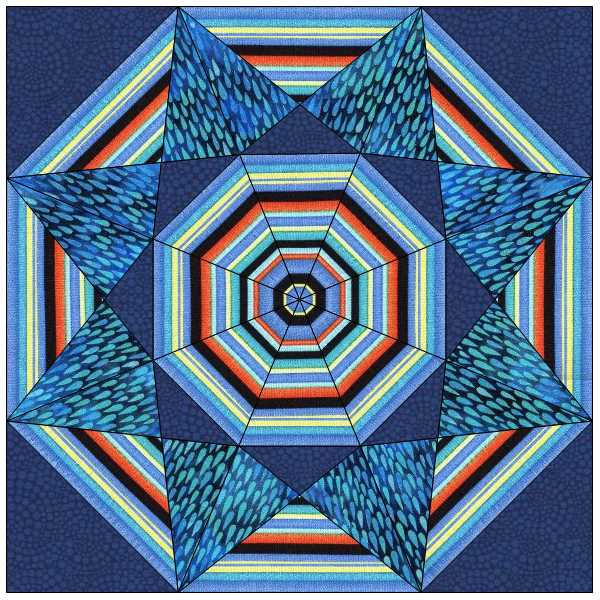
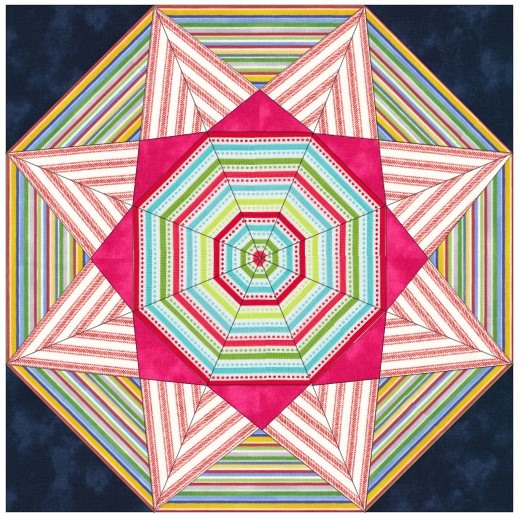
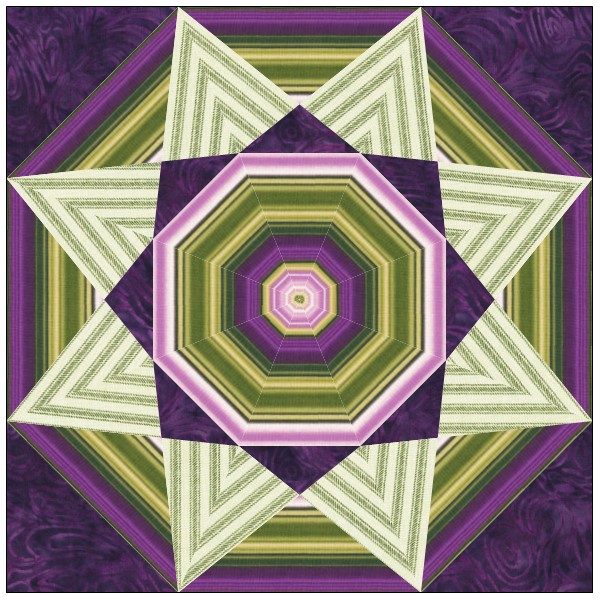
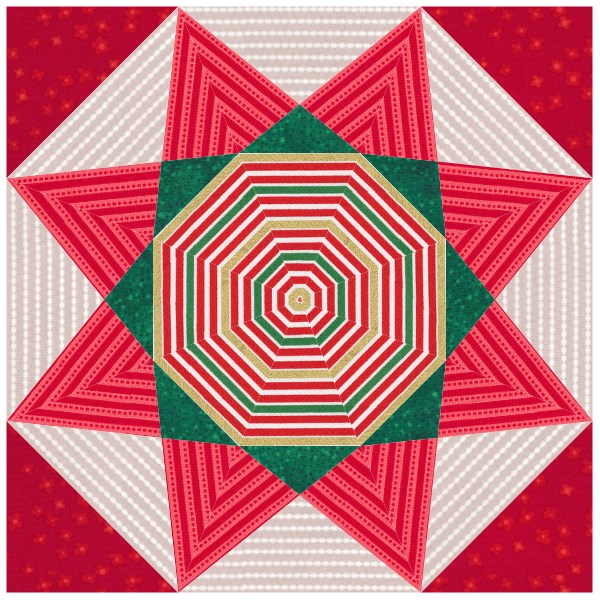
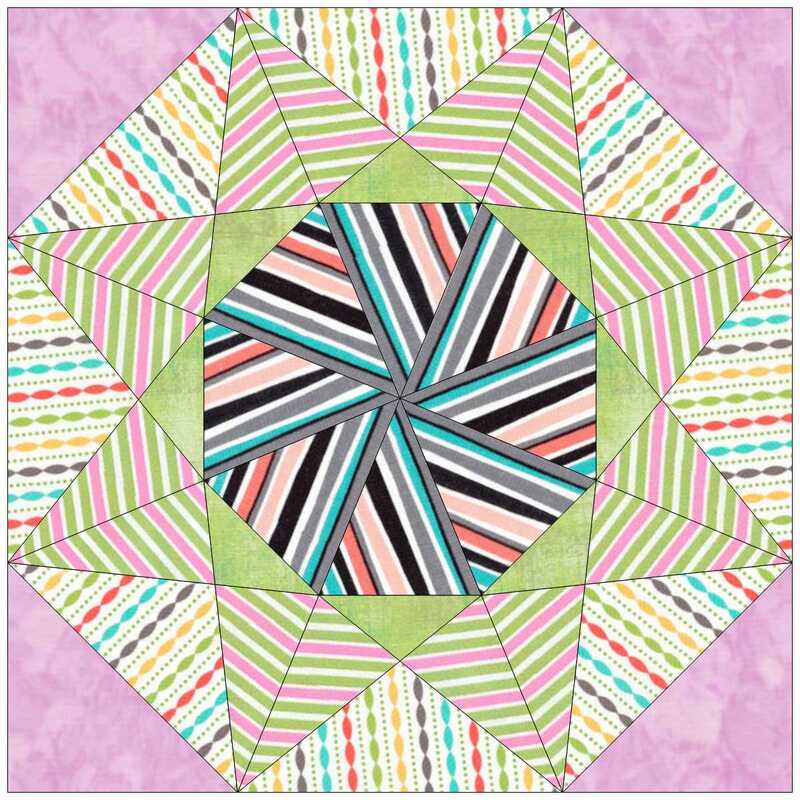
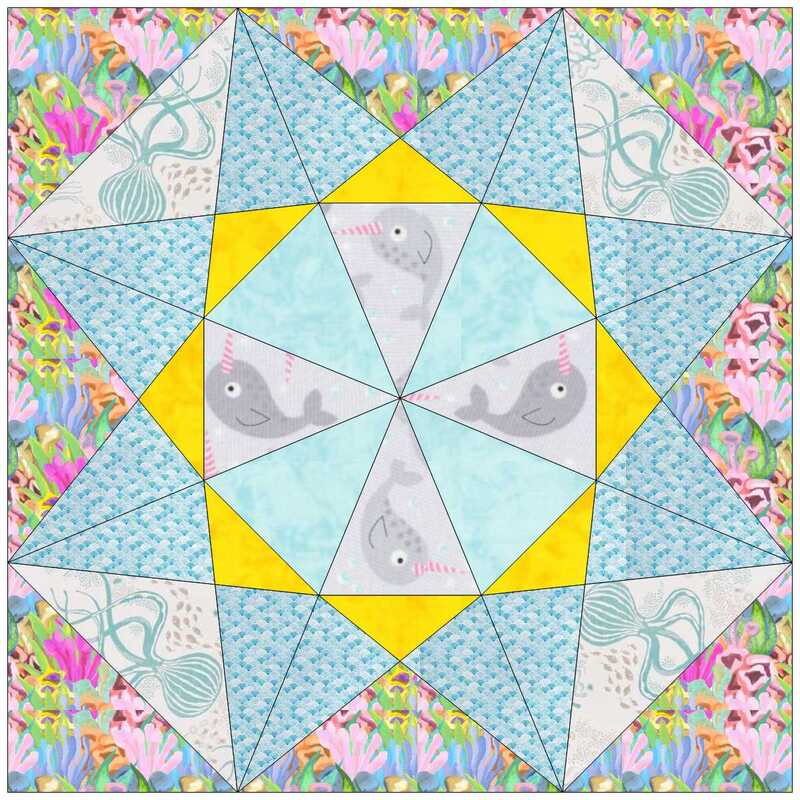
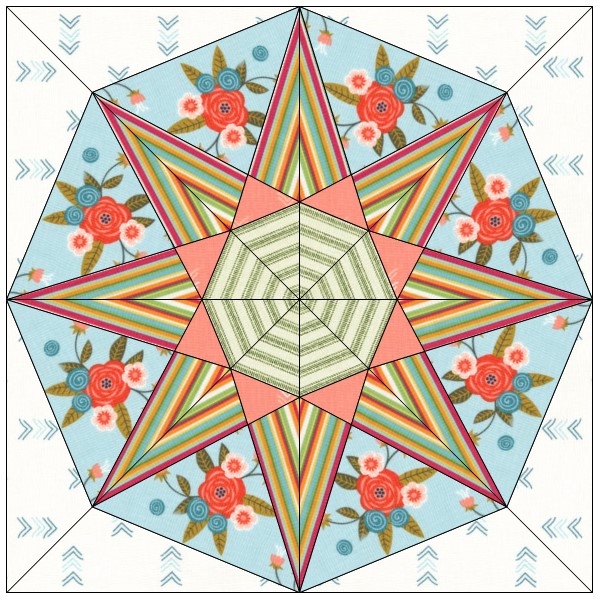
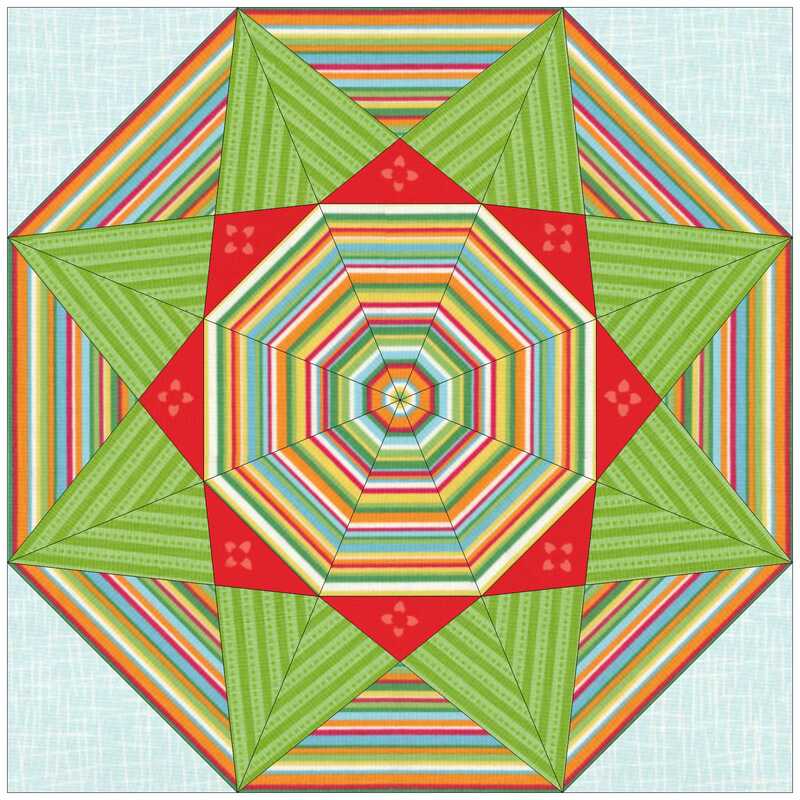
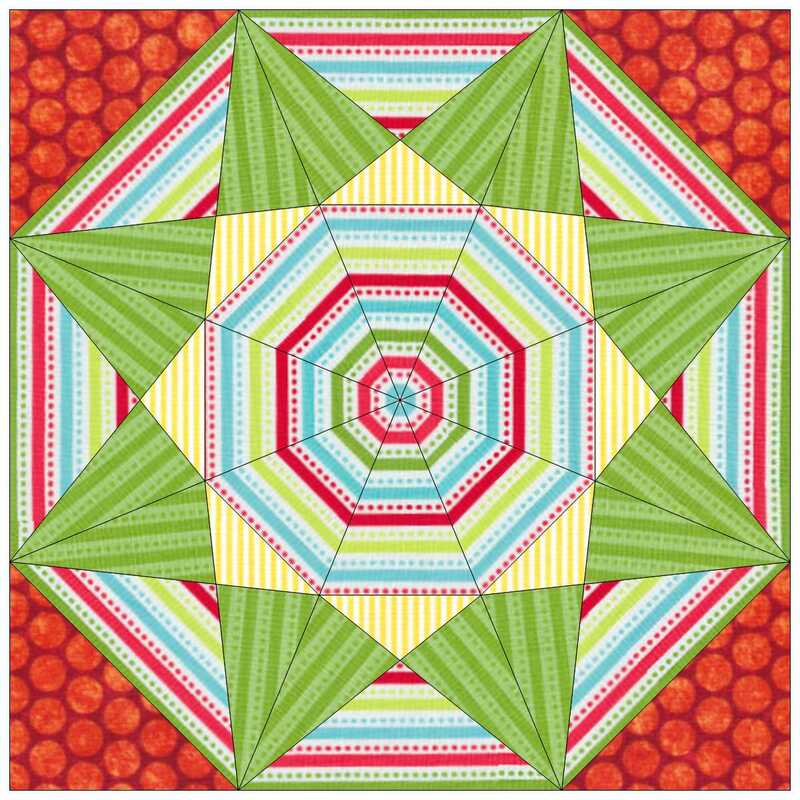
Sometimes that beautiful striped fabric in our collection can be a bit intimidating to work with.
If you have ever struggled with making that initial cut into striped fabric, this tutorial is for you. Kaleidoscopes with Striped Fabric
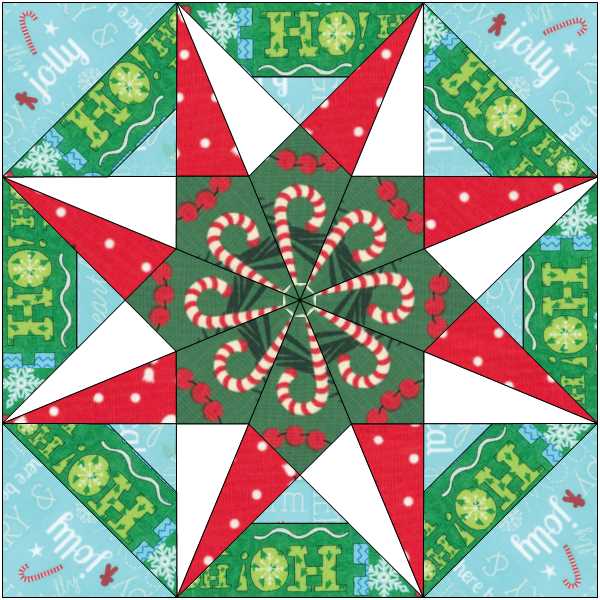
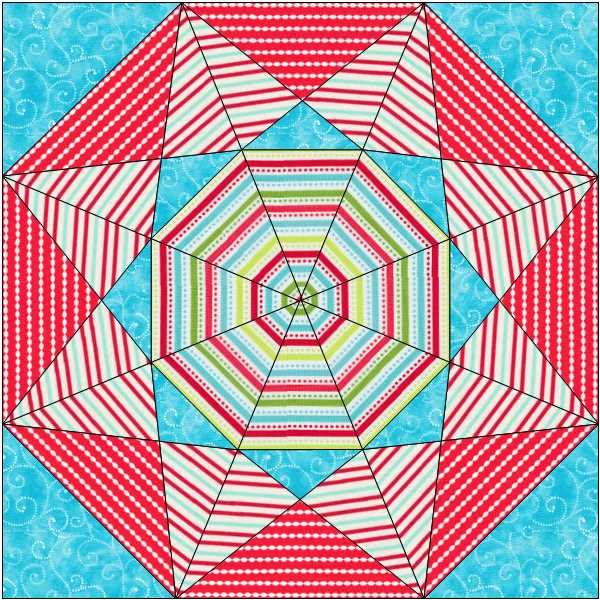
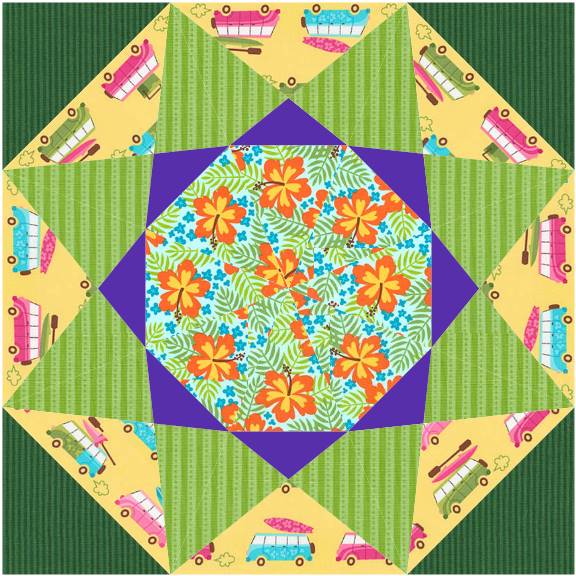
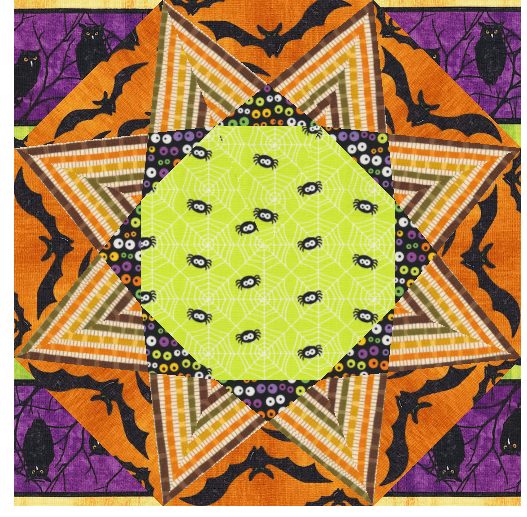
Tech Know Quilter members have been working with striped fabric and posting their blocks in our private Facebook group..
In the EasyDraw Kaleidoscope class they created a striped fabric Kaleidoscope block. While many of the blocks are the same -- the fabrics result in a very different look for each of the blocks. Enjoy some of their awesome designs.
If you are currently in TKQ and would like to take EasyDraw Kaleidoscopes as an add-on class, send me an email. I have a discount coupon just for you.
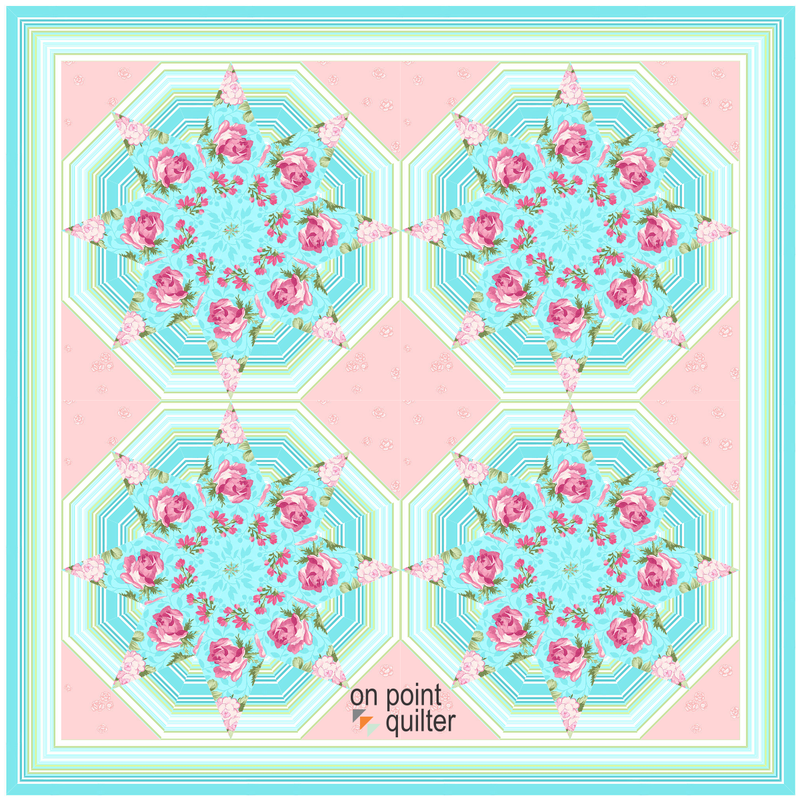
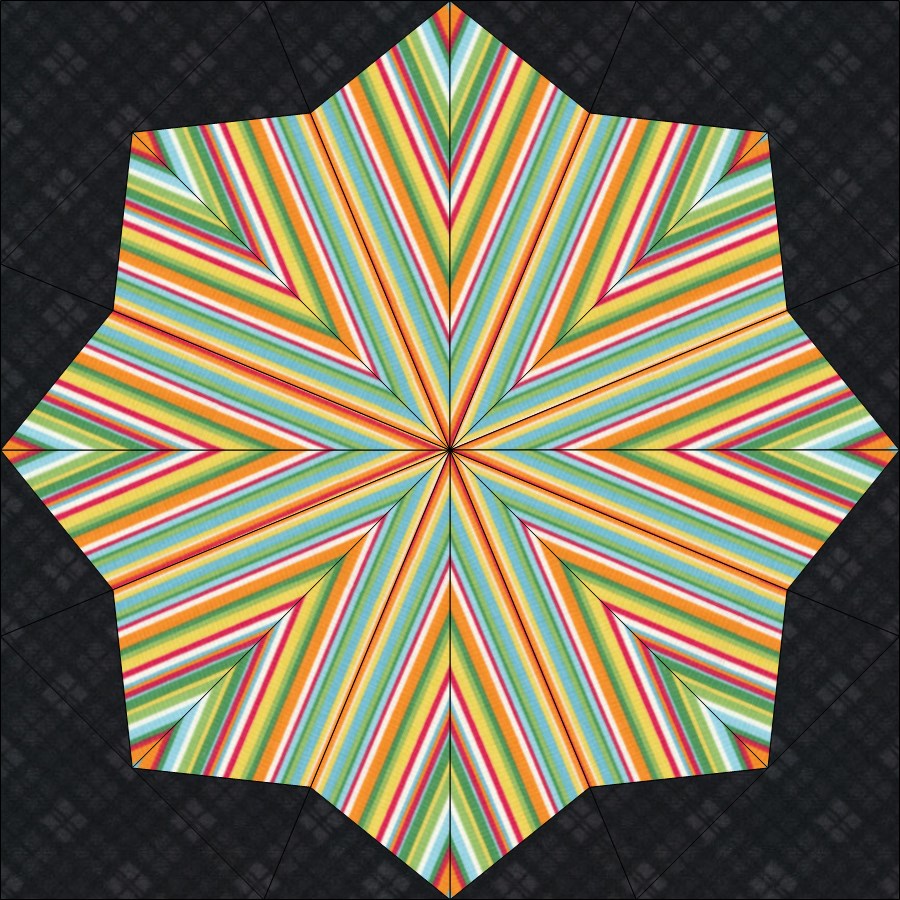
Rotating Fabric in a Block using Electric Quilt 8
Although Electric Quilt does not have a rotate fabric option in the block worktable (something definitely on my wish list), there is still a way for you to rotate fabric for your block.
Let me show you how.
In the video I used Rose Whisperers by Eleanor Burns for Benartex. This is one of the fabric of the month collections from Electric Quilt. You can still get the free download on their website.
Here is the block from the video. 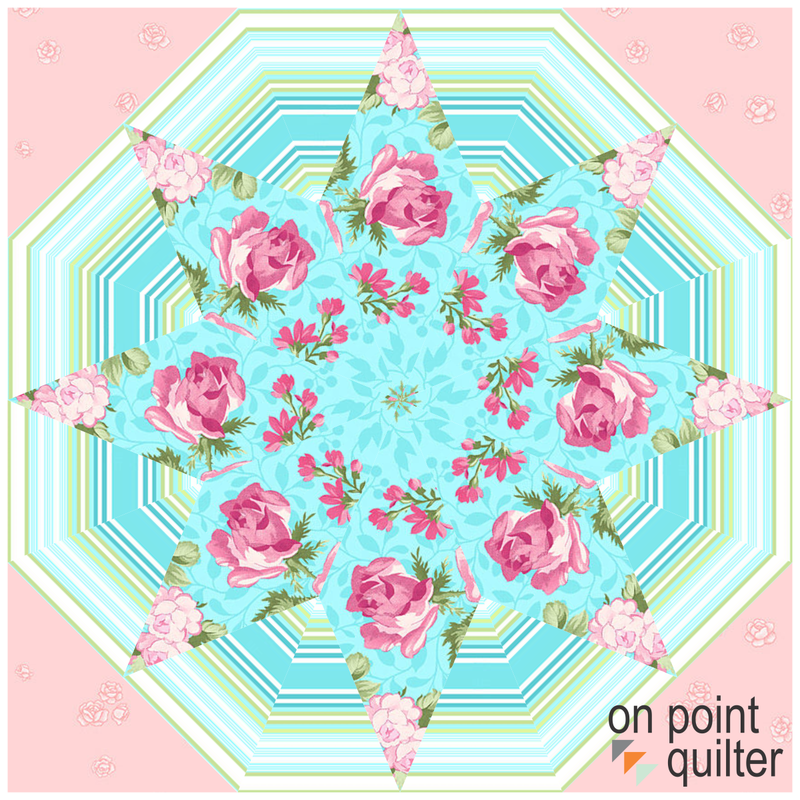
And if you want to supersize your project, consider creating a quilt comprised of four blocks. Just don't rotate the block (or put them in an on point layout) as you will need to adjust the rotation and fussy cut the fabrics again).
I look forward to seeing what you choose to do with your striped fabric. Post your quilts in the Learning EQ Facebook group.
|


Free guide available for newsletter subscribers


Kari SchellElectric Quilt Expert and Educator and Pattern Designer. Categories
All
Archives
July 2024
|


 RSS Feed