ON POINT QUILTER
  • Blog
  • About
  • EQ8 Training
    • Tech Know Quilters
    • EQ8 Made Easy
    • Electric Quilt 8 Sneak Peek
  • Store
  • Contact
  • Majestic View EQ8 Free Live Webinar
Picture

Three Six Nine

6/24/2023

 
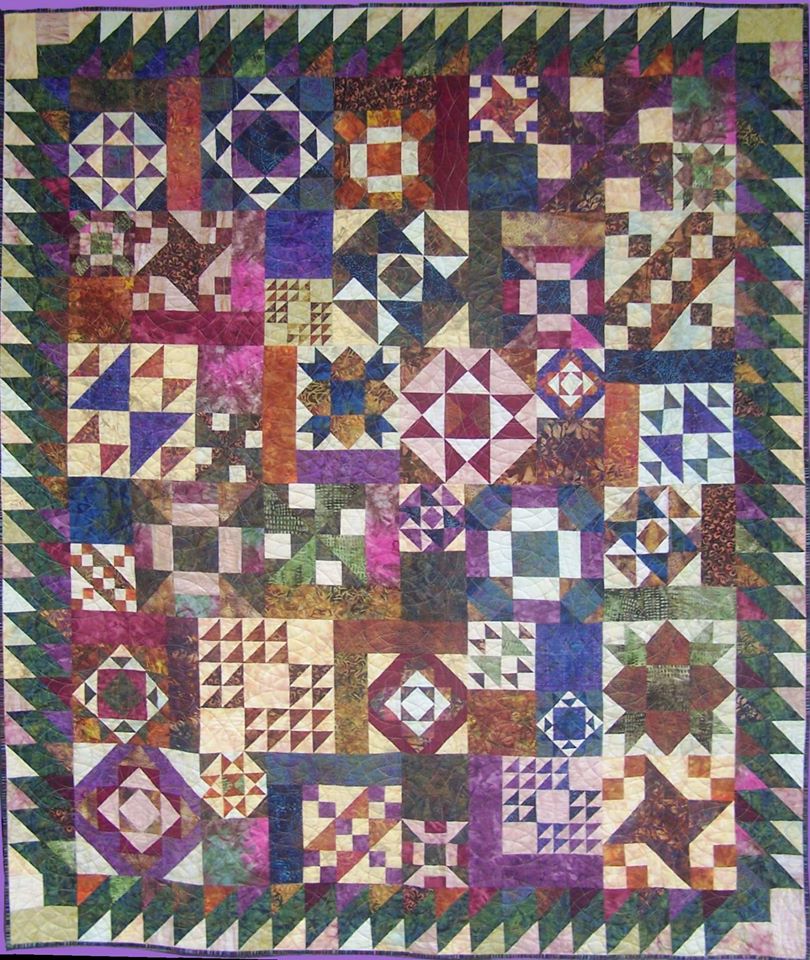
Back when I was starting to design patterns, I did a quilt that combined 6", 9" and 12" sampler blocks as part of a block of the month for a local quilt shop.  It ended up being one of my favorite sampler quilts and the inspiration for the layout I am presenting today.

Did any of you participate in this BOM at Quilted Treasures in Rogers?  If so, I would love to see pictures of your quilts.
Picture
Triple Play designed pieced and quilted by Kari Schell
Picture
Triple Play Custom Set Layout
Picture
Triple Play Strip Set Layout
Both of these layouts were covered in the Tech Know Quilters Sampler class.  Send me a note if you are interested in taking the class in July.  There just may be an open enrollment flash sale next week.  :)  So make sure you are on my e-mail list to receive information on this flash sale.

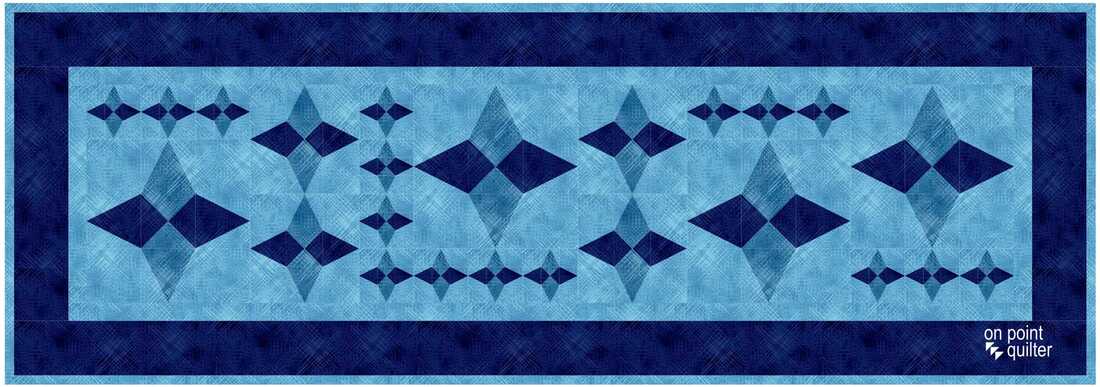
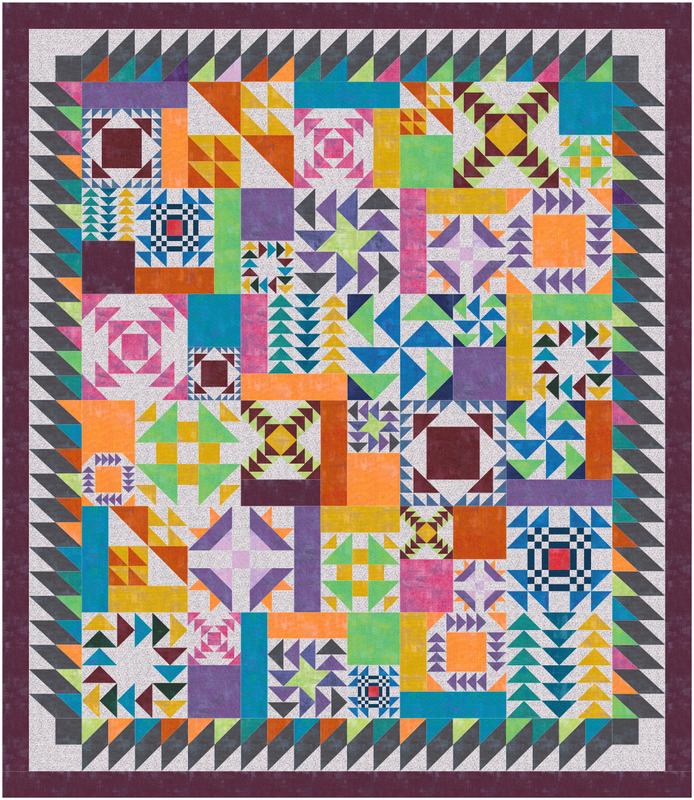
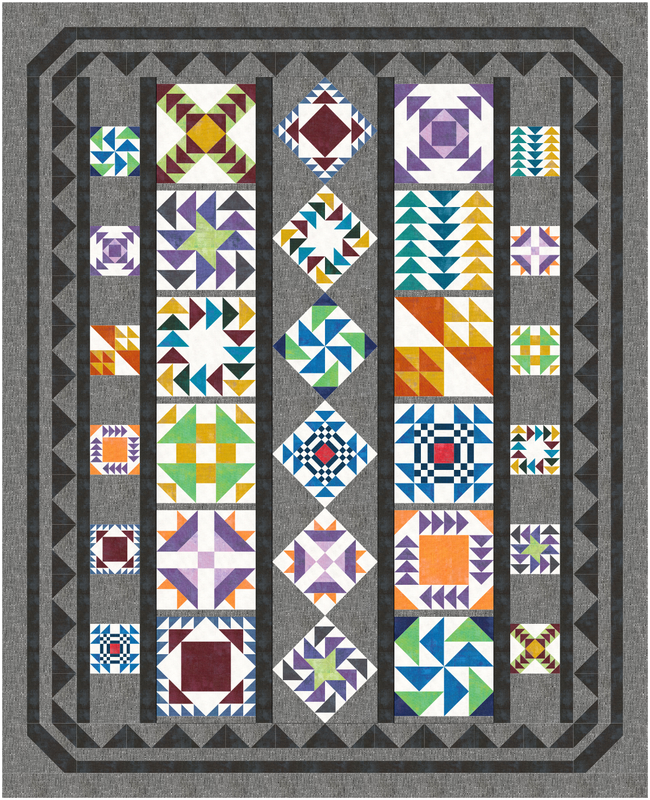
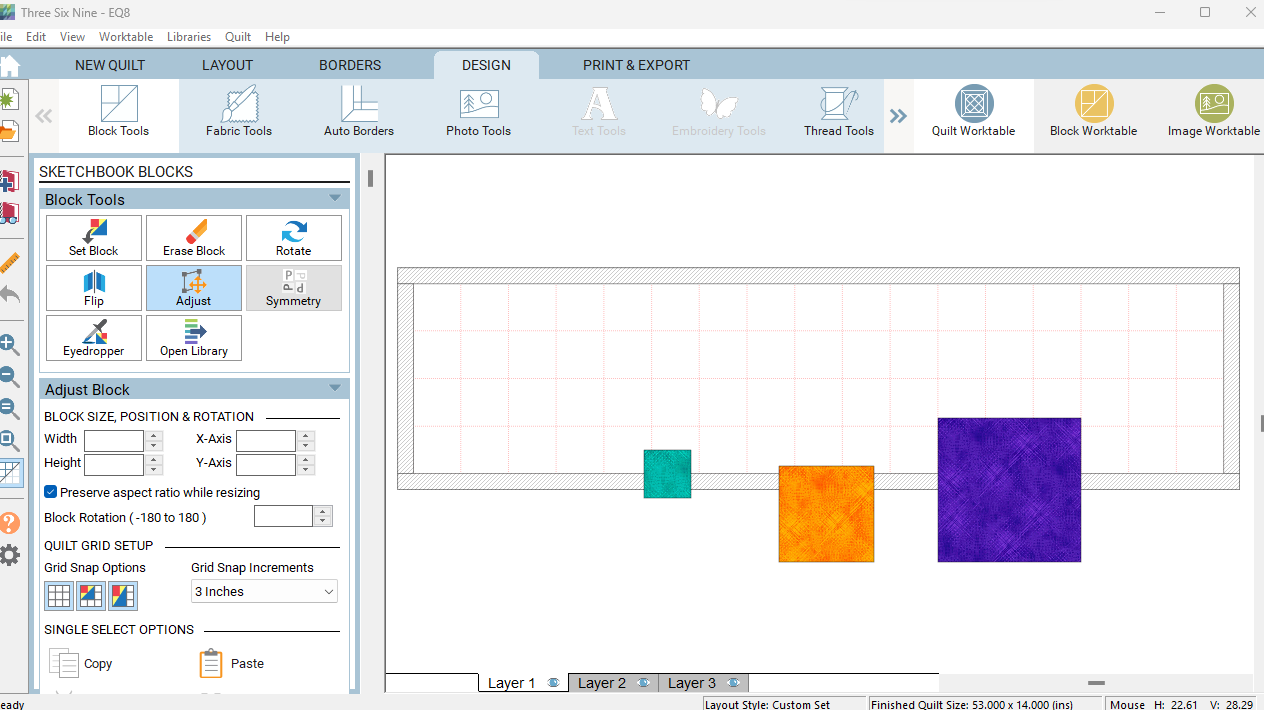
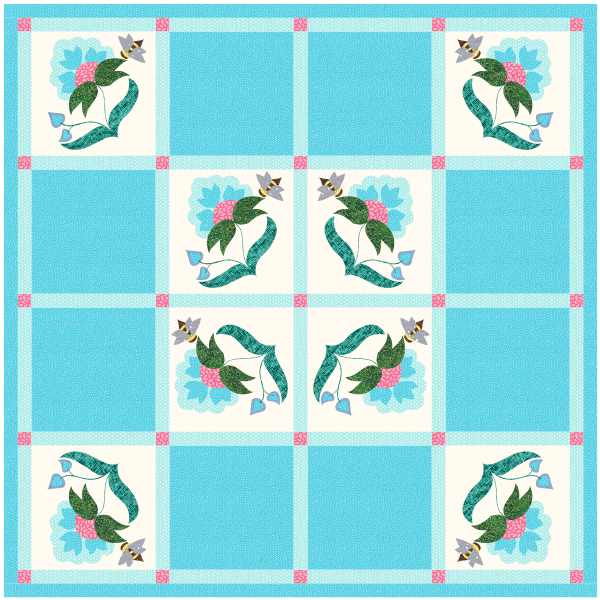
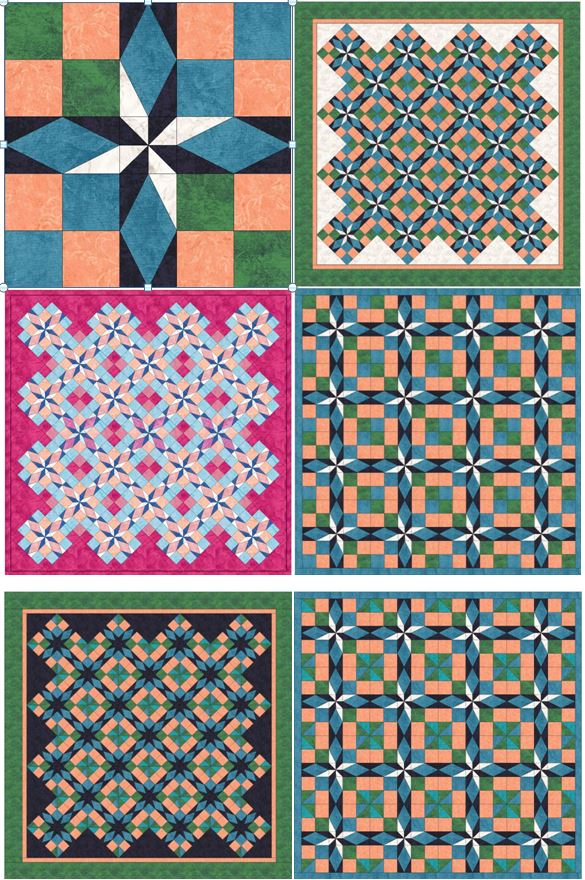
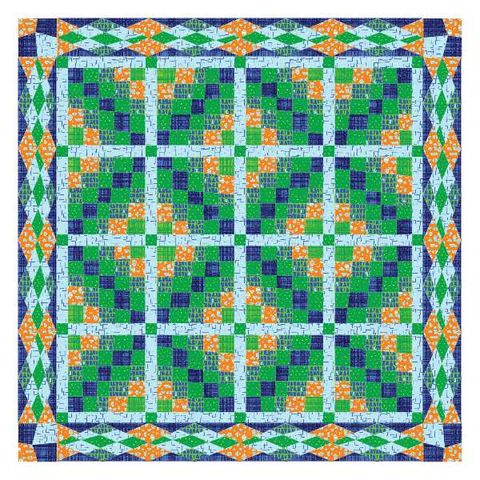
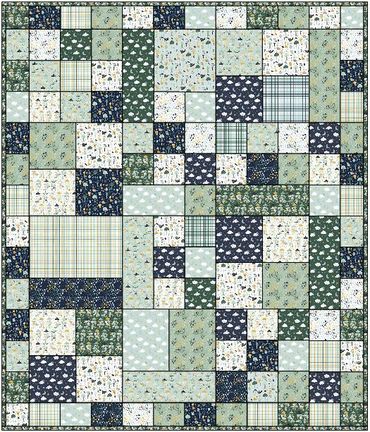
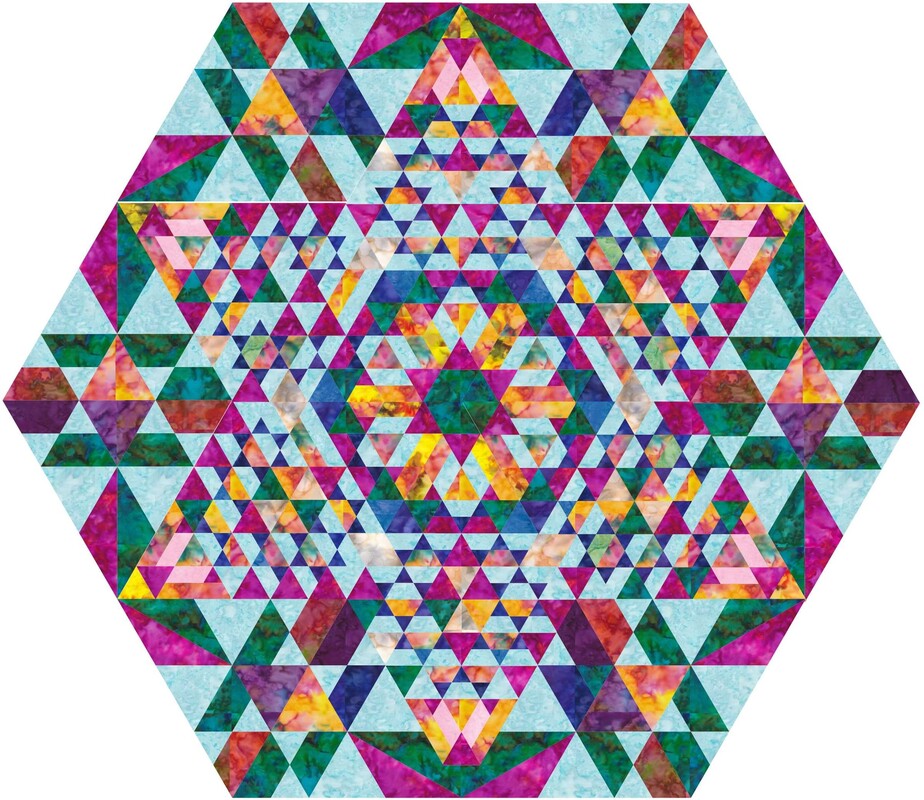
For my blog post today, I decided to create a quilt with 3", 6" and 9" blocks.  The beauty of this layout is that it is super simple to try out different blocks once the layout is built.  Let me know if you are as addicted to the concept as I am.

Three Six Nine Custom Set Quilt Design

Set up a custom set quilt with the center size of 51" x 12" if you wish to use my Three Six Nine quilt layout. 

​Or create your own layout.  You pick the size.
Picture
Add a plain block to the quilt.  Make three copies.  Size one at 3", one at 6" and one at 9".  

Save the quilt -- to save the coloring of each of the blocks.
Picture
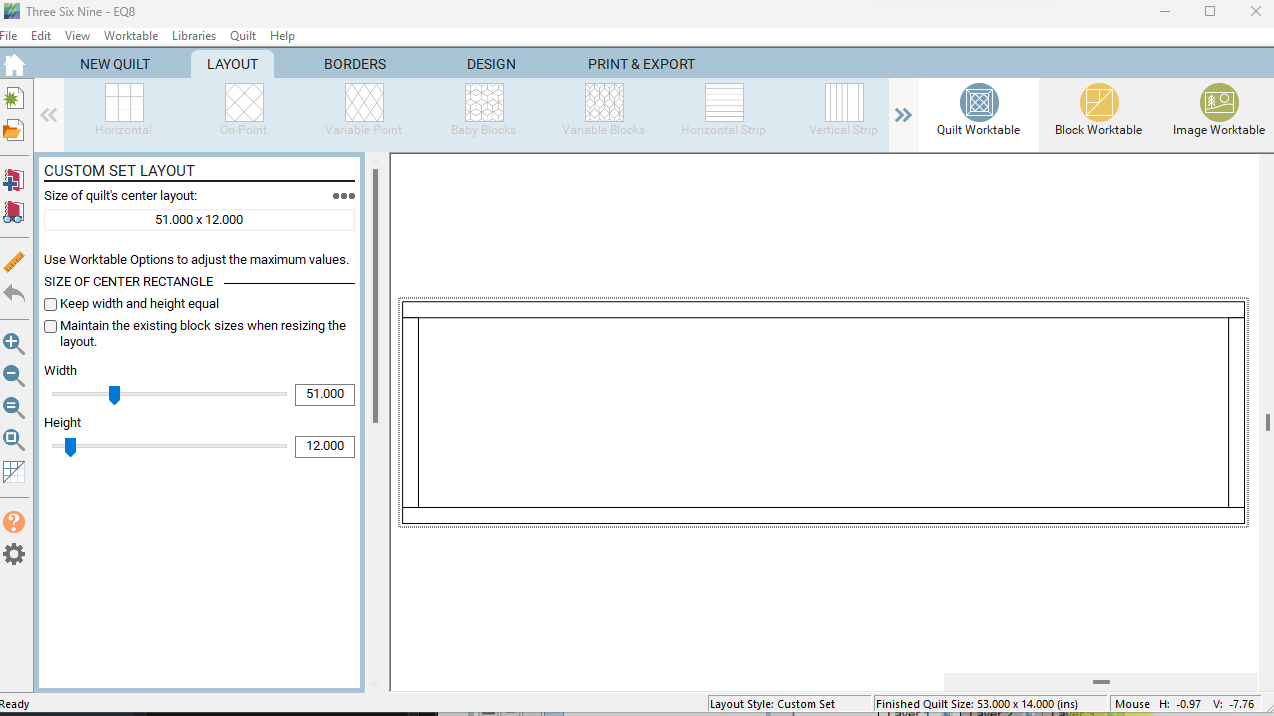
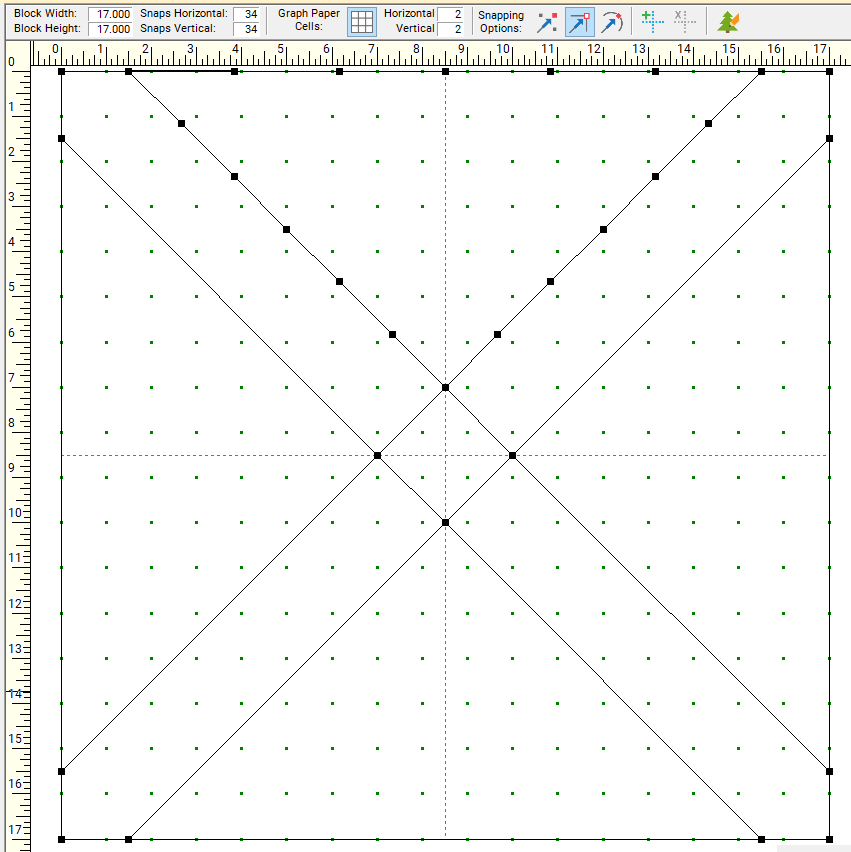
Make sure to turn on Snap Block Position to Grid in the Quilt Grid Setup (this is under the Adjust tool).  Set the grid snap increments at 3".

Copy and paste copies of the blocks and place in the quilt worktable.  Fill the entire worktable.  I tried to create a fairly random placement -- but you could try something more symmetrical.

Add borders.  I chose to do a 1", 3" and then a binding of 1/2".
Picture
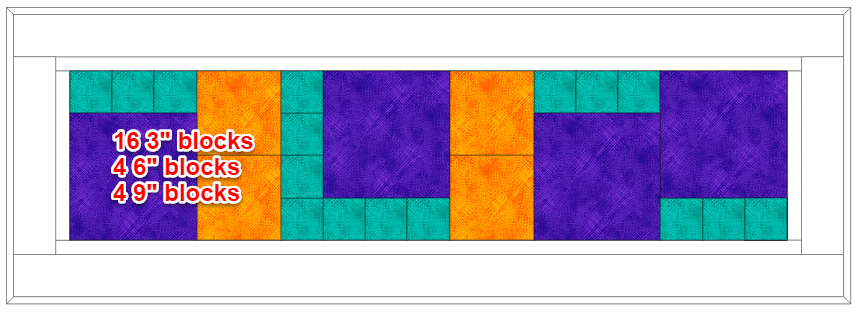
Three Six Nine Custom Set Quilt Layout
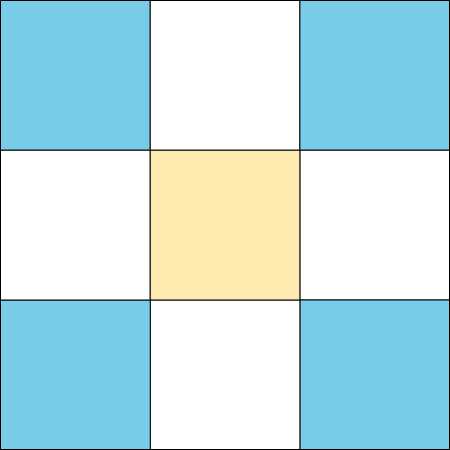
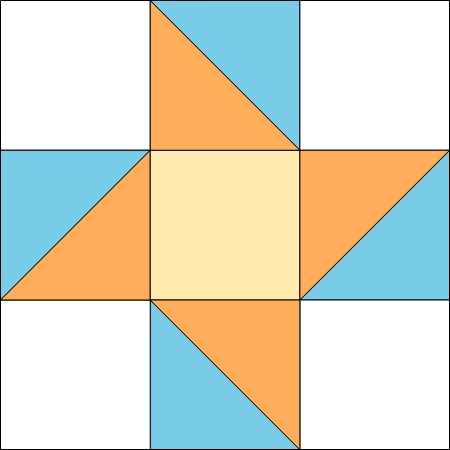
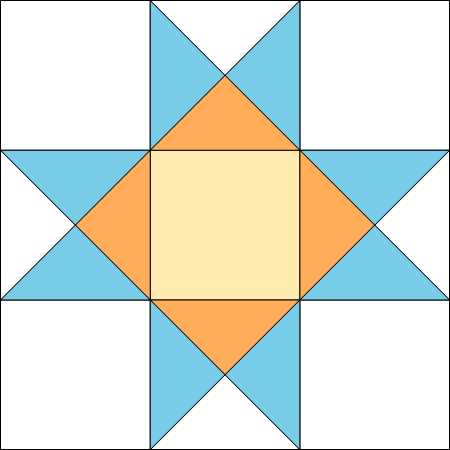
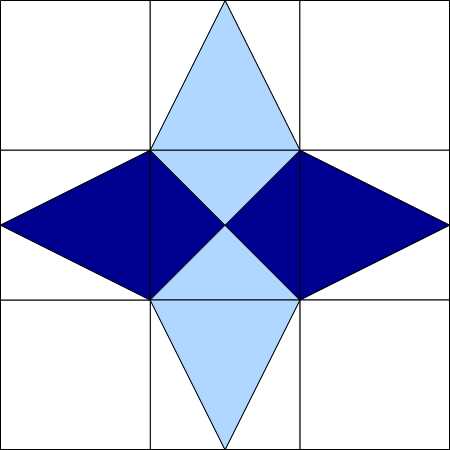
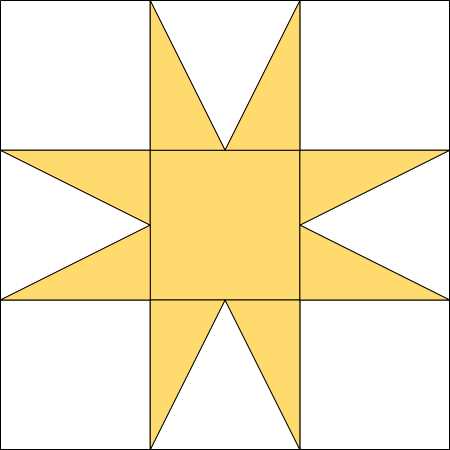
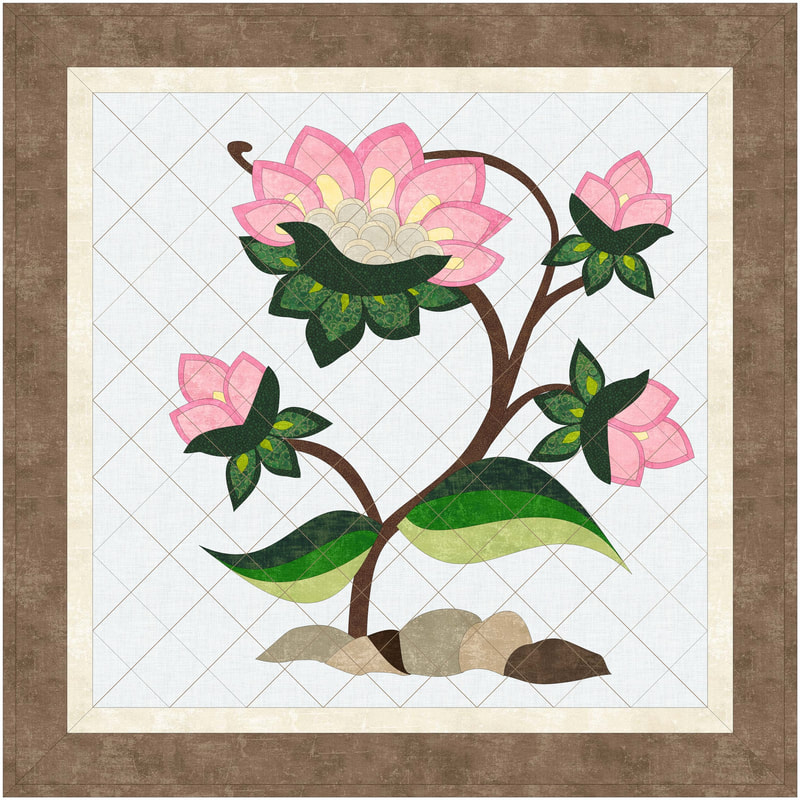
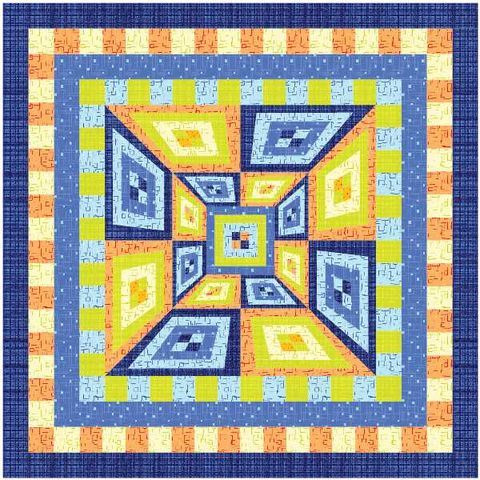
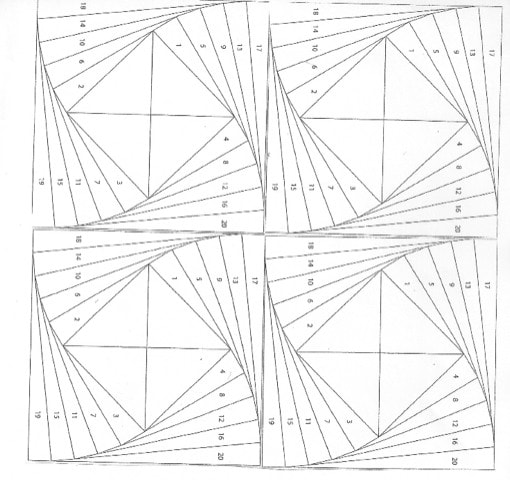
Find blocks that would be easy to piece in a 3 x 3 grid.  Those will also work well in 3", 6" or 9" blocks.  Here were some ideas that I decided to play with..
Picture
Default 9 Patch
Picture
Default Friendship Star
Picture
Default Ohio Star
Picture
Arkansas Snowflake
Picture
Eight-Pointed Star
Take a look in the EQ Library -- or Block Base+ for some other ideas for blocks for your quilt.
Watch the EQ8 video tutorial on how to design the quilt -- just using blocks from the library.
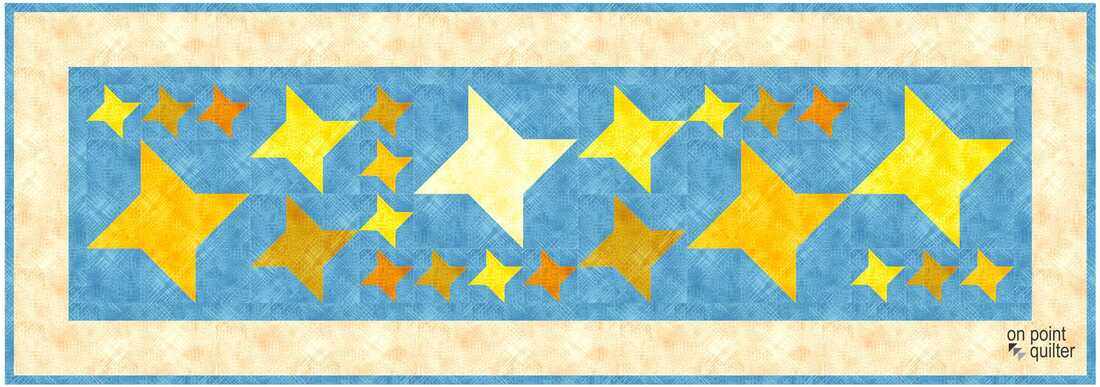
Here are my quilts using the five blocks shown above.  These were super fun to draft and would also be fairly easy to piece.  Maybe I will put this on my list for my next quilt retreat.
Picture
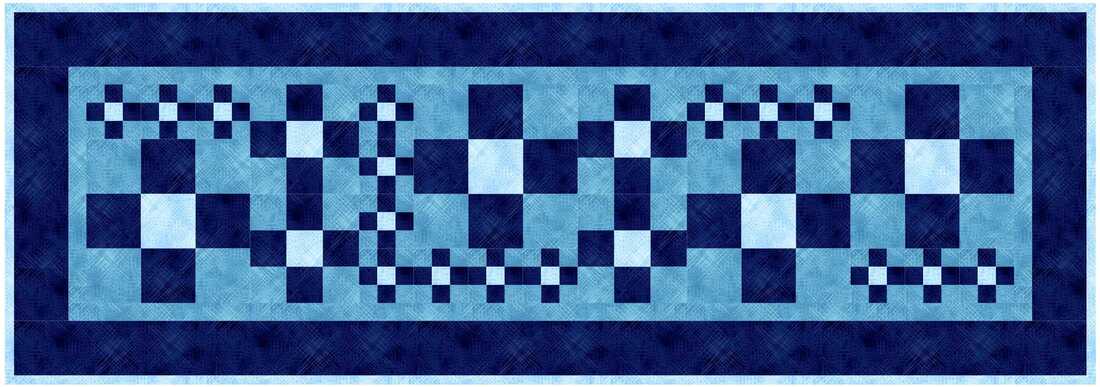
Default 9 Patch Quilt
Picture
Default Friendship Star Quilt
Picture
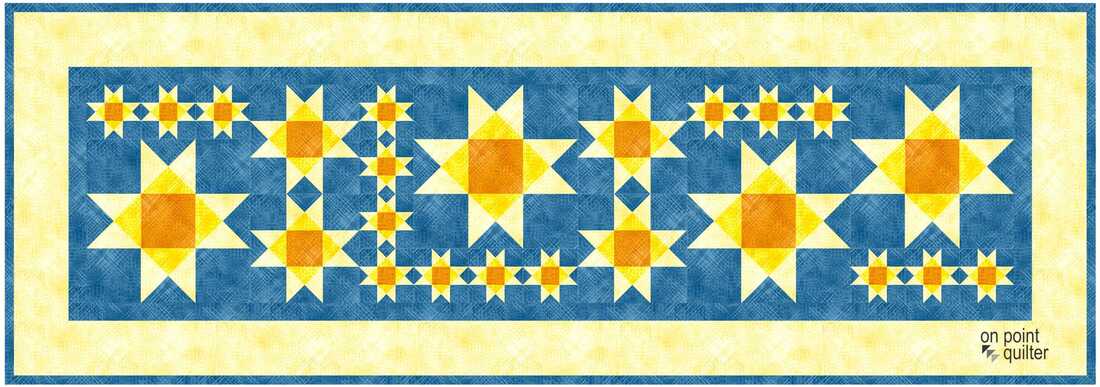
Default Ohio Star Quilt
Picture
Arkansas Snowflake Quilt
Picture
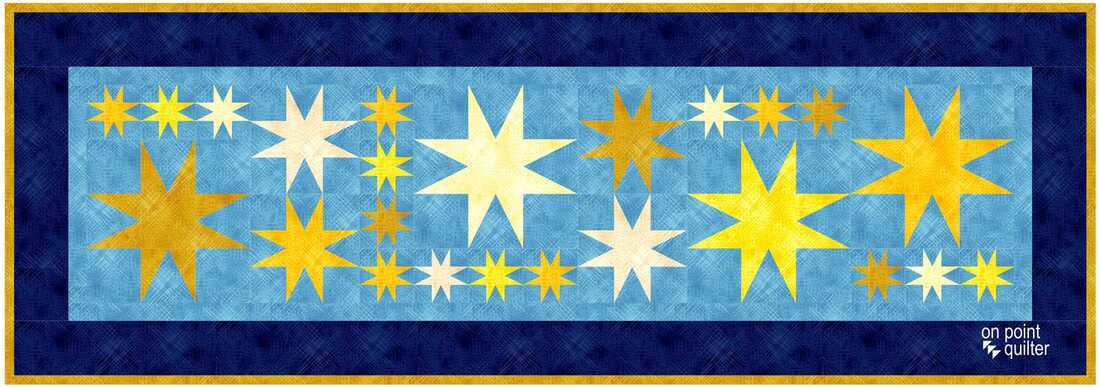
Eight Pointed Star Quilt
I am looking forward to seeing your Three, Six, Nine quilts.  Let me know what block you decided to use.  And of course this could work easily with a different layout size.
Learning EQ Facebook Post for Three Six Nine Quilts

Picture
Happy quilting.

​Kari

Join the On Point Quilter weekly newsletter and receive regular tips and inspiration on using Electric Quilt 8 along with the  Free 12 Top
Tips for EQ8 video guide.
Picture

Hexagon Floral Wreath

6/17/2023

 
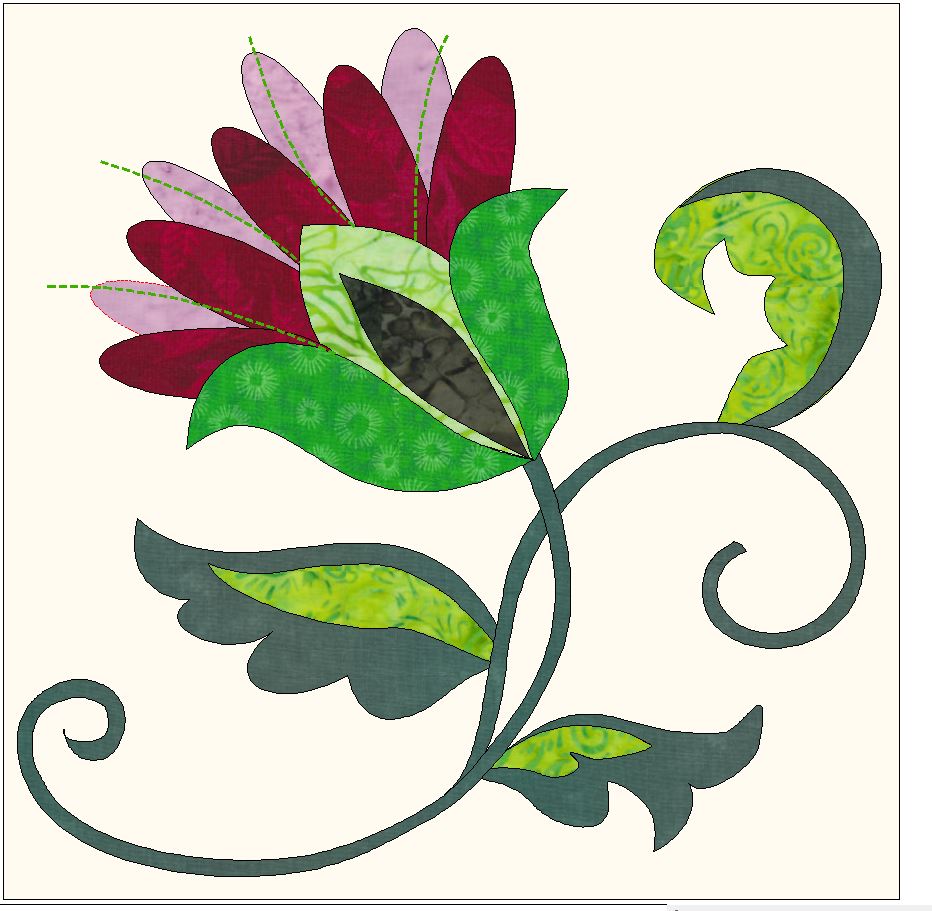
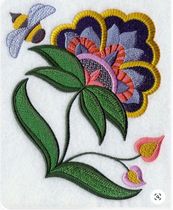
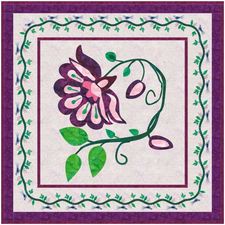
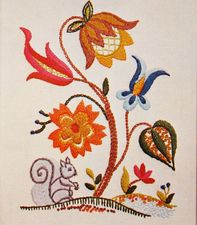
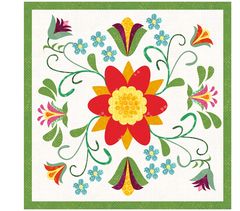
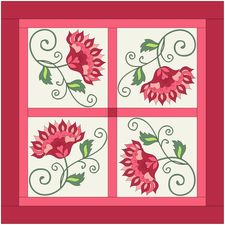
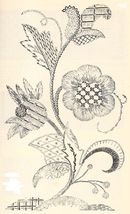
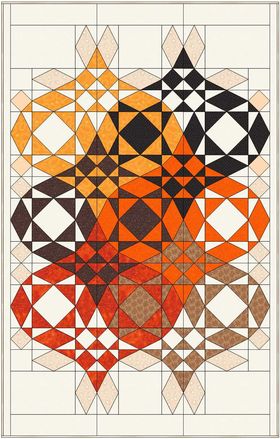
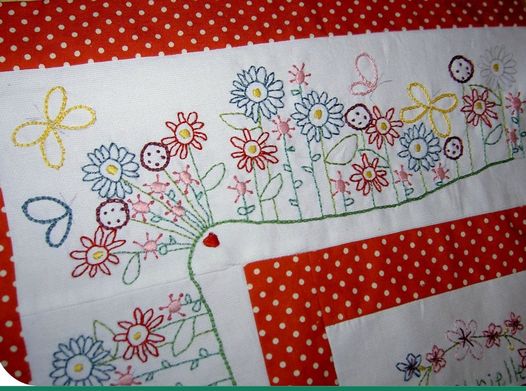
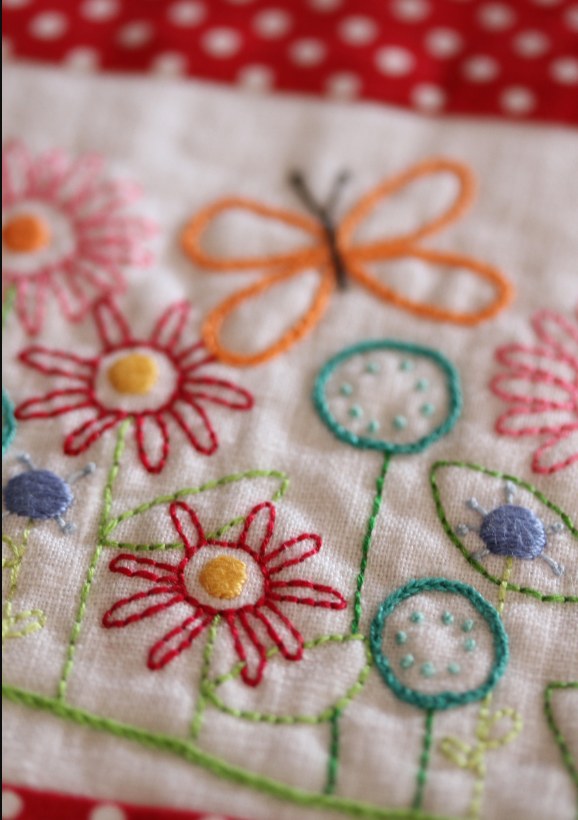
Last month the challenge for my Tech Know Quilter Masters members was to create their own Jacobean quilt block.  This allowed them to spend time practicing with their Electric Quilt 8 applique tools. At the bottom of this post, you can check out some of their designs.

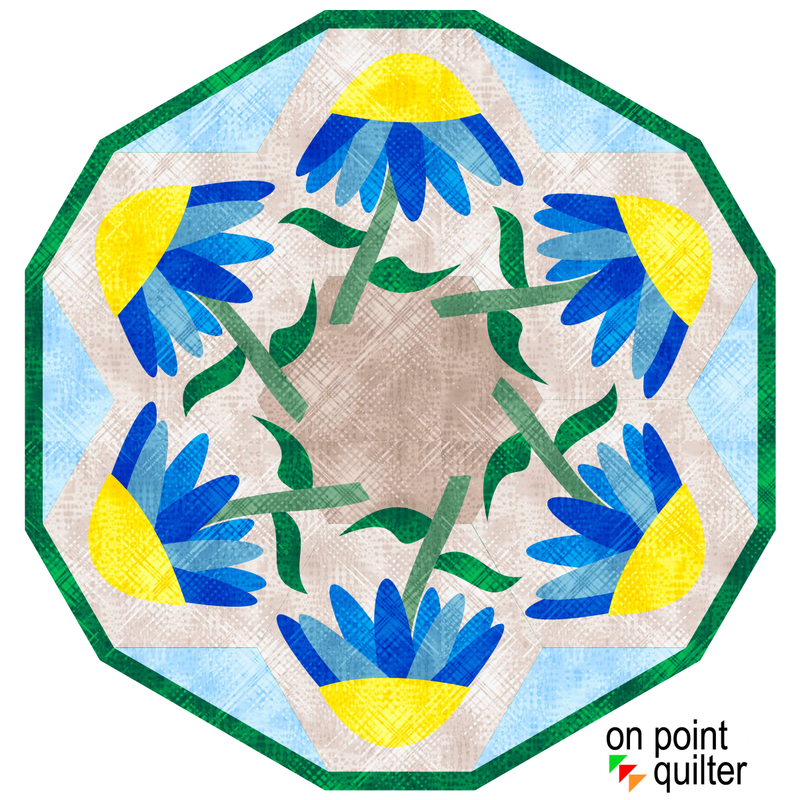
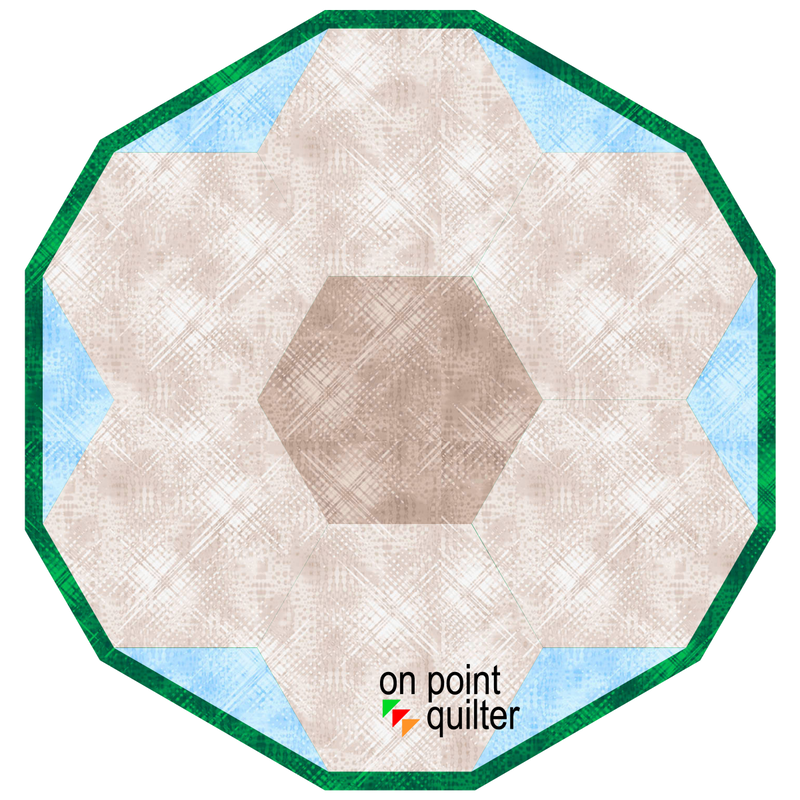
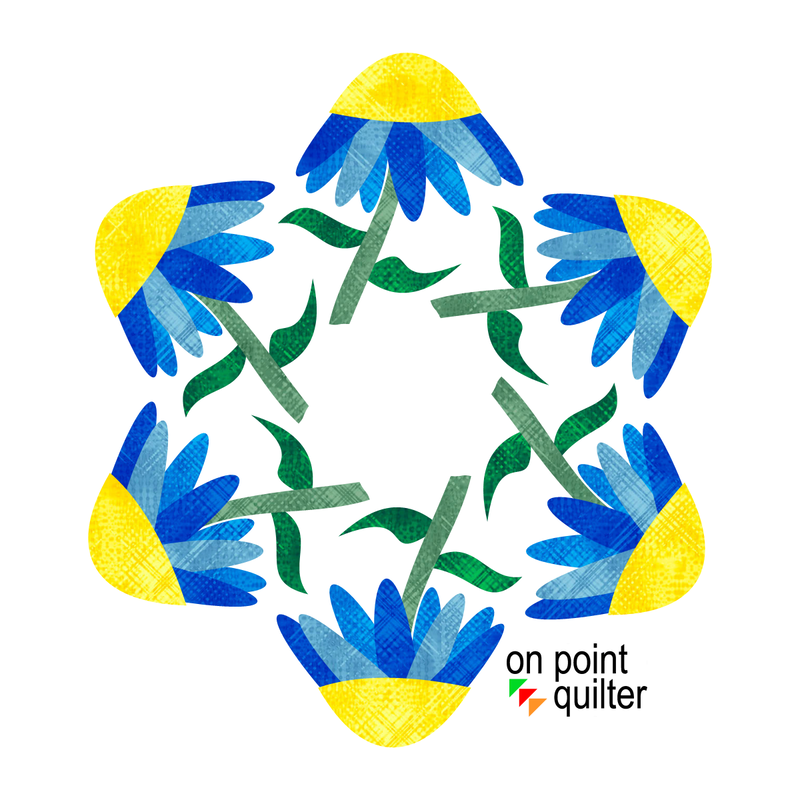
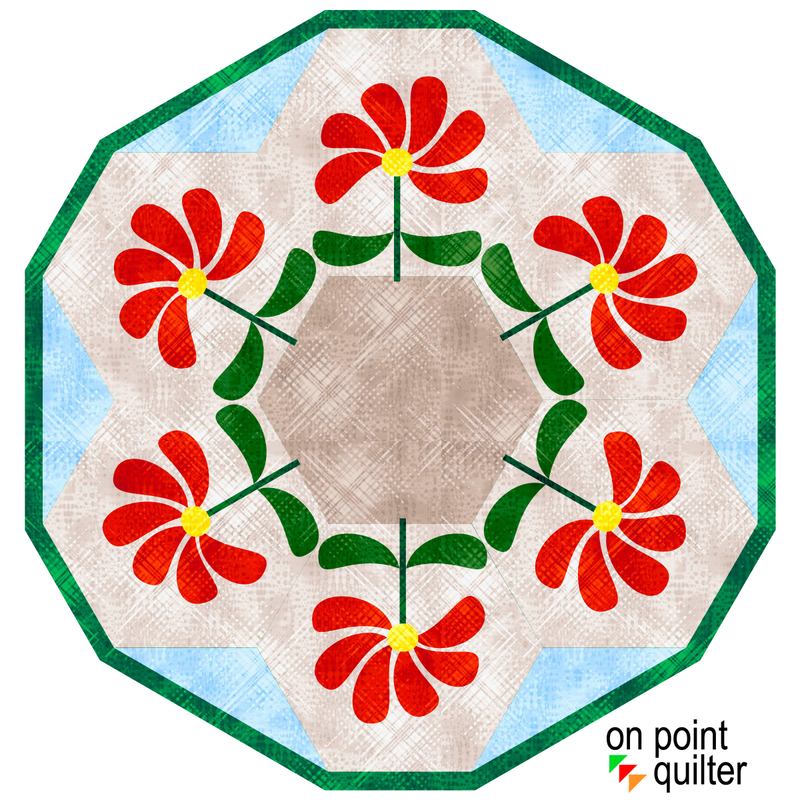
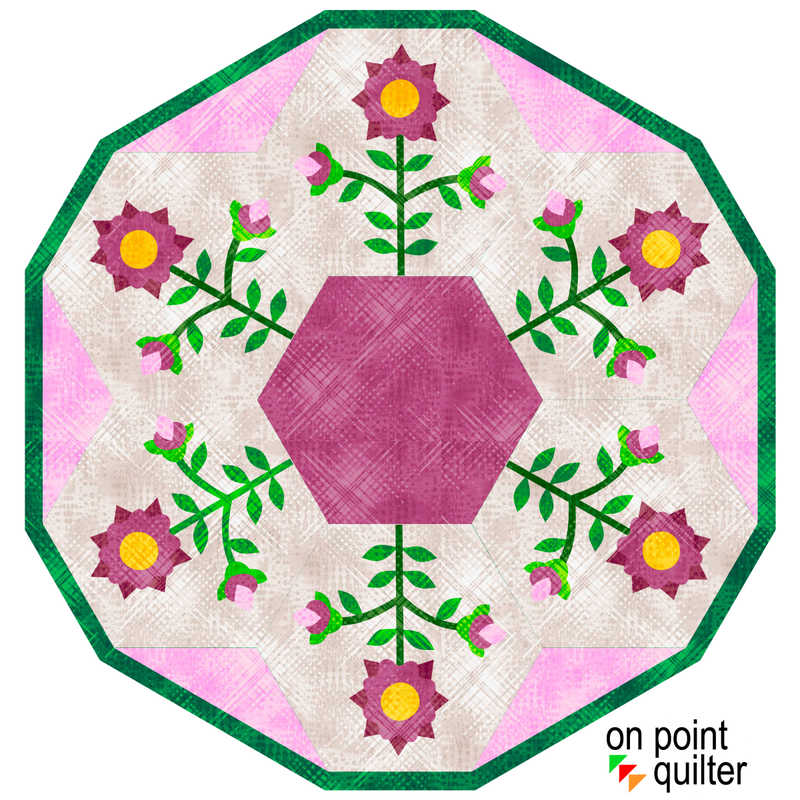
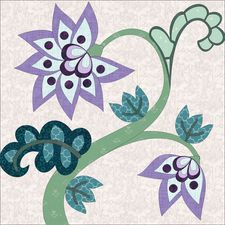
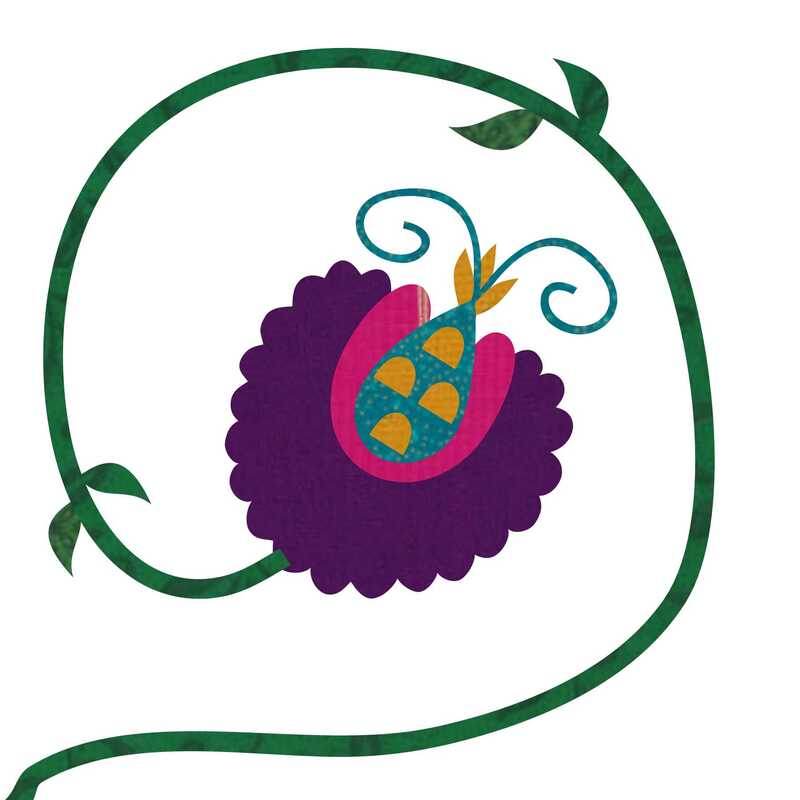
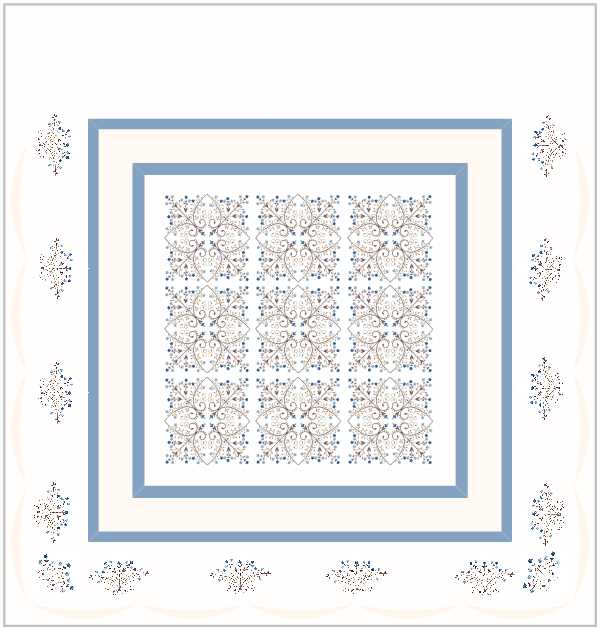
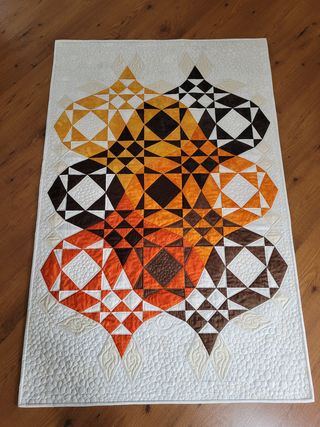
I wanted to carry that concept into the tutorial for today -- but knew I didn't want to get super complicated.  So as I was perusing some of the applique motifs in the Electric Quilt library, I came across the category "Flowers with Stems".  This category includes some fantastic motifs and I began wondering about turning them into hexagonal wreaths.  That was the concept I ended up exploring for this blog post.

Hexagon Floral Wreath Electric Quilt 8 Tutorial

​For fabrics, I used the latest free download from Do You EQ.  Vertex was designed by QT fabrics.  It has 84 fun fabrics to give your quilt a very scrappy look. ​
Picture
Link to Free Vertex Download from Do You EQ
One of the categories in the EQ library are Motifs.  These are essentially applique blocks that don't have a background.  While you can use them without modification in a quilt, you also have the ability to modify the blocks in the Block Worktable.  I ended up picking three different motifs to play with.  I covered using the Cornflower motif in the video -- but will also share my designs with the other two as well.
Picture
Cornflower Motif from the EQ8 Library
Picture
Lily Motif from the EQ8 Library
Picture
Mexican Rose from the EQ8 Library

Hexagon Applique Motif

Before playing with my motif from the EQ8 library, I decided to create a background -- and chose to do this as an applique motif as well.

One of the standard shapes in the applique toolkit is a hexagon. 

When creating your hexagon, make sure to use the Ctrl (if you are a PC user) or Command (if you are a MAC user) when drawing or resizing.  That will ensure all the sides of the hexagon are exactly the same size.  It will also keep the hexagon straight.

With Ctrl or Command, resize your hexagon to slightly under 2-1/4".  

Make sure to turn on Snap Aligned Segments and clone the hexagon and place six copies around the center hexagon.  I think you will love how they snap to the center hexagon.

Use the draw tool to draw a triangle for the space between two of the hexagons.   Clone and position in all of the open spaces between the hexagons.

Picture
Hexagon Motif Block with Faux Binding created as an Applique Motif using EQ8
I chose to create a faux border, by tracing the outline of my hexagon and triangle shape.  Once drawn, send to back.

Floral Applique Wreath

Use wreathmaker to create the floral six sided wreaths.  If the wreath doesn't look quite right, select undo and make any adjustments.  Electric Quilt will remember the settings for your last wreath -- so it is easy to do minor tweaks.  Make sure to size your wreath so it fit within the hexagon block.

The most time consuming part of the entire process is coloring the block.
Picture
Coneflower Wreath created using Wreathmaker in EQ8

Creating a Custom Set Quilt

On the quilt worktable, create a new Custom Set Quilt.  I set the size at 21" x 21" and the motifs at 20" x 20".  I went a bit larger on the worktable size as my faux binding went slightly outside the block outline.  This way you could still see the entire binding.

Both the hexagon motif and the cornflower wreath were set and centered on Layer 2.

I finished up with a little recoloring and added the project to the Project Sketchbook to save.
Picture
Coneflower Hexagon Quilt Created by Kari Schell using EQ8
Watch the full tutorial.
Here is my final quilt.
Picture
I mentioned that I played with a couple of extra motifs.  Here are my quilts.  (Note that this was not included in the video.  But playing with these motifs is a bit addicting.)
Picture
Mexican Rose Wreath Quilt
Picture
Lily Wreath Quilt
I am curious which motif you chose to work with from the EQ8 library -- or did you create one of your own?  I would love to see your quilt.  Please feel free to share in the Learning EQ Facebook group post I have set up.
Learning EQ Facebook Group - Hexagon Floral Wreath Post

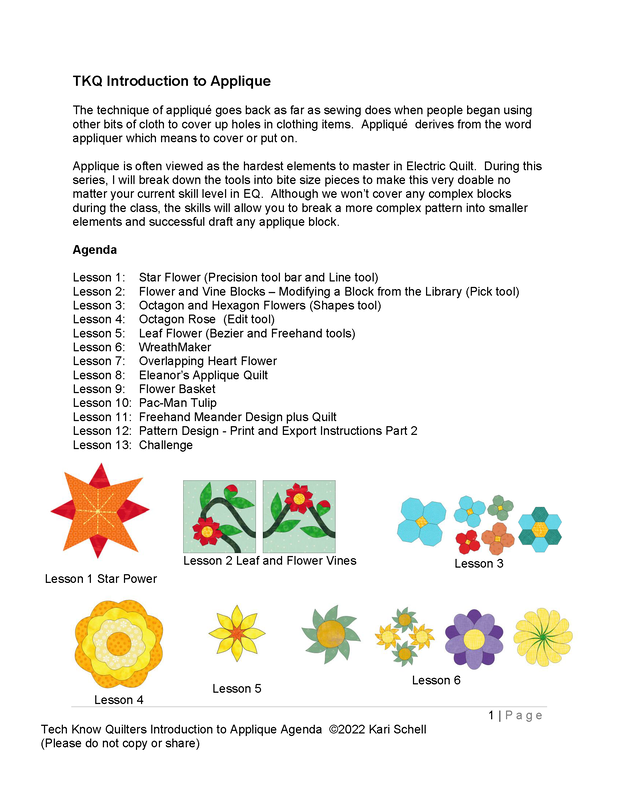
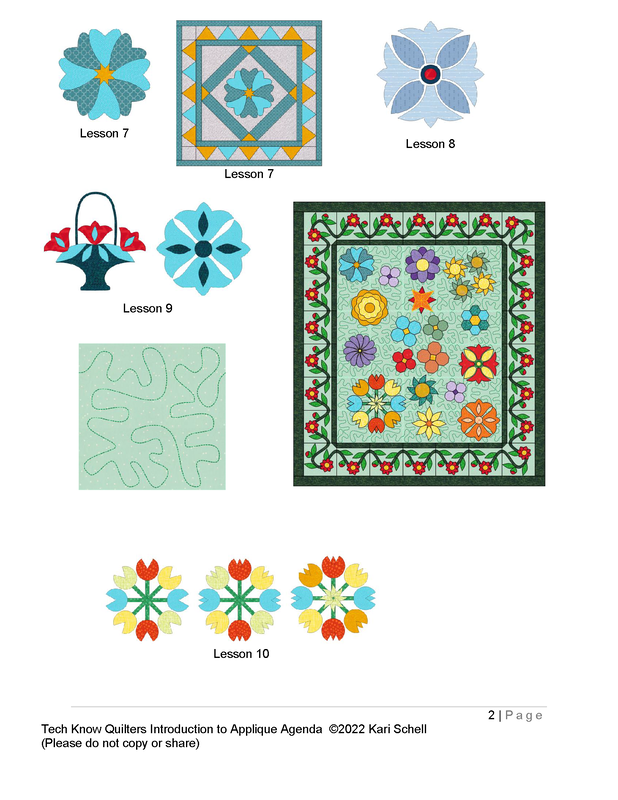
Introduction to Applique Class

Applique is often viewed as the hardest elements to master in Electric Quilt.  During this series, I will break down the tools into bite size pieces to make this very doable -- no matter your current skill level in EQ.  Although we won’t cover any complex blocks during the class, the skills will allow you to break a more complex pattern into smaller elements and successfully draft any applique block.  Even the Jacobean applique blocks shown below.
Not currently a member -- send me a note if you are interested in joining Tech Know Quilters -- and let me know if you would like to start with this class.

Current members, let me know if you would like this class as an add-on to your current class for the month.  We will send you a an add-on coupon for your discounted price.  If you prefer we can make this your July class.
Take a look at the agenda along with the blocks and quilts from the class.  Click on the picture for a close-up.
Picture
Picture
Email Kari

Tech Know Quilters Jacobean Applique Masters Challenge

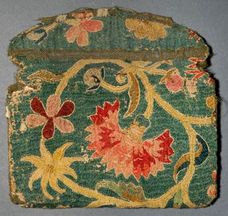
Tech Know Quilters members are eligible for the Masters program after completing 12 months of Tech Know Quilter classes.  During April they were challenged to create their own Jacobean style quilt block.  Each week they were challenged to add a new element to their block -- this allowed them to keep the project manageable.

Masters members receive fewer lessons each month, with more time to devote to their own projects and challenges. 

​If you have completed 12 or more months of Tech Know Quilters and are interested in joining Masters, send me a note.  I will send you more information on the program.


​I am in love with their designs.
Picture
Ann Cornett Horlsey EQ Design
Picture
Ann's Inspiration Piece
Picture
Maureen Feron Pinwill EQ8 Design
Picture
Maureen's Inspiration
Picture
Maureen Pinwill EQ8 Quilt
Picture
Lynne Maramieri EQ8 Design
Picture
Kari Schell EQ8 Design
Picture
Curryanne Hostetler EQ8 Design
Picture
Curryanne's Inspiration
Picture
Curryanne Hostetler Quilt
Picture
Roxanna Khoury EQ8 Design
Picture
Roxanna's Inspiration
Picture
Edith Craig EQ8 Design
Picture
Edith's Inspiration
Picture
Margo Reppert EQ8 Design
Picture
Margo's Inspiration
Picture
Nanne Panne EQ8 Design
Picture
Julie Pedersen EQ8 Design
Picture
Katherine Martin EQ8 Design
Picture
Katherine's Inspiration
Picture
Fran Heisey EQ8 Design (check out her added embroidery)
Picture
Fran's Inspiration - Winterthur pocketbook
Picture
Patricia Hansen EQ8 Design
Picture
Barbara Ross EQ8 Design
Picture
Rhonda Goss EQ8 Design
Read More About Tech Know Quilters and Sign Up for the Wait List

Picture
Happy quilting.

​Kari

Join the On Point Quilter weekly newsletter and receive regular tips and inspiration on using Electric Quilt 8 along with the  Free 12 Top
Tips for EQ8 video guide.
Picture

Window Die Cut Design - From EQ to a Handmade Card

6/10/2023

 
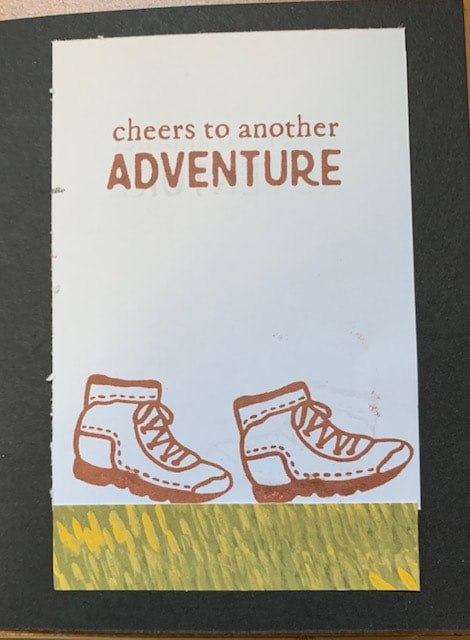
My latest hobby has been making my own greeting cards.  This week I came across a design that had a window frame that overlayed a landscape image.  I began thinking about how I could do something similar using Electric Quilt 8.  I wanted to be able to cut the design out on an electronic cutting system.  For me that meant incorporating Cricut Design Space and my Cricut Maker.
In the video, I will take you through my process.  At a high level:
  • The design was drawn as an applique motif in Electric Quilt 8.
  • In Electric Quilt, the design was printed to a pdf writer as an outline drawing.
  • The design was imported into Inkscape**, where fold lines were added and the design was converted and saved as an SVG.
  • The SVG image was uploaded to Cricut Design Space.  In Cricut Design Space the card base was created and merged with the frame design.
**What is Inkscape?

The extra piece of software I used for creating the SVGs is Inkscape.  Inkscape is a professional vector graphics editor for Windows, Mac OS X and Linux. It's free and open source. 

Inkscape can seem overwhelming to use when you open it for the first time. However you only need to use a couple of tools within Inkscape -- so this really is a piece of cake. You can download Inkscape here.

Inkscape will allow you to create an SVG file which may be used in any electronic cutting system (Cricut Design Space, Silhouette Studio, or Brother Canvas Workspace).

So what is an SVG file?  An SVG file is a graphics file that uses a two-dimensional vector graphic format.  Unlike raster formats such as JPG, GIF, and PNG, an SVG image remains crisp and clear at any resolution or size.  My Translation -- Much cleaner of an image than any trace in a cutting system.
The video is broken into three parts (in case you don't want to watch the entire video):
  • Part 1 (.33) Electric Quilt 8
  • Part 2 (4.17) Inkscape
  • ​Part 3 (7.00) Cricut Design Space

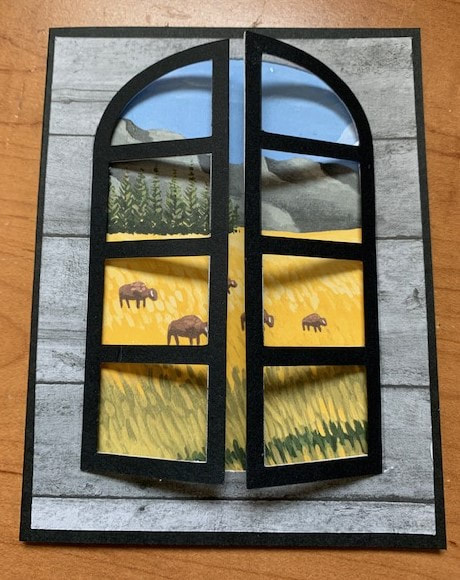
Window Card Construction

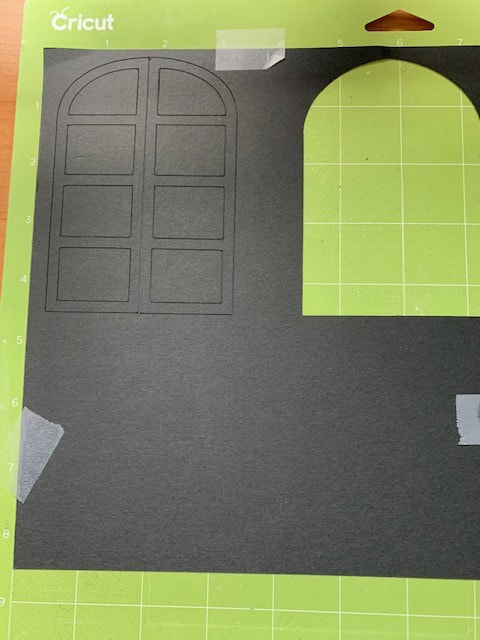
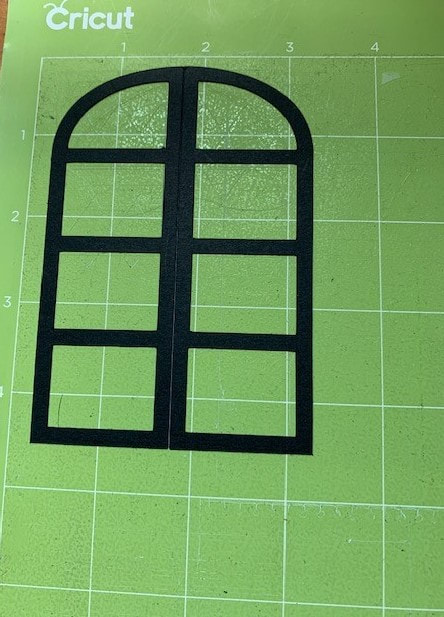
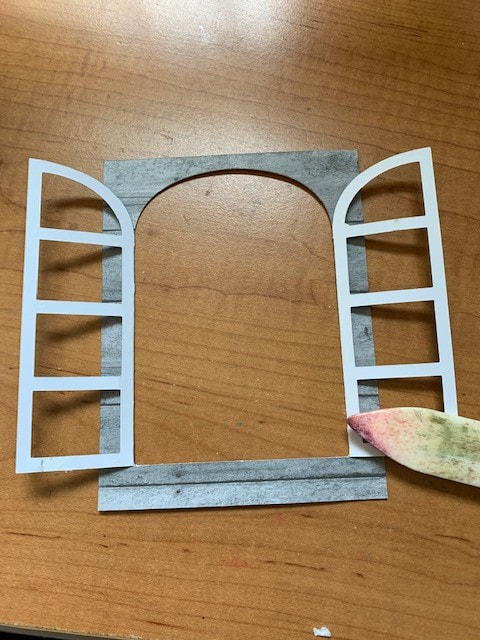
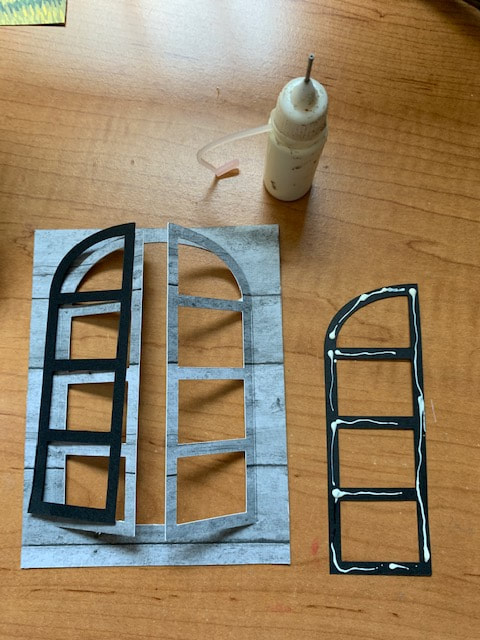
Step 1:  Cut out the Window Frame svg on your electronic cutting system.
Picture
Picture
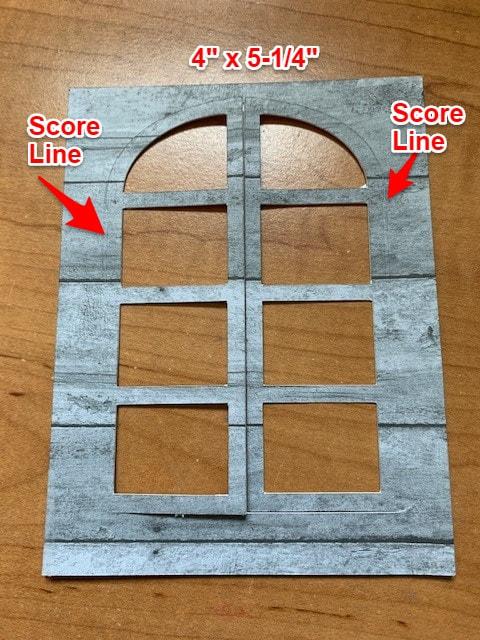
Step 2:  Cut out the card front with the foldable window frame on your electronic cutting system.  I used the Cricut Maker to score the left and right edges and cut the rest of the SVG.
Picture
Picture
Step 3:  Fold back along score lines and press with a bone folder.
Step 4:  Glue black frames to card front.
Picture
Picture
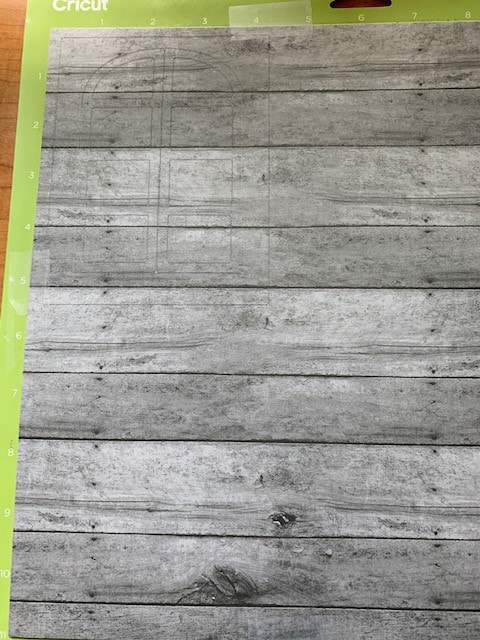
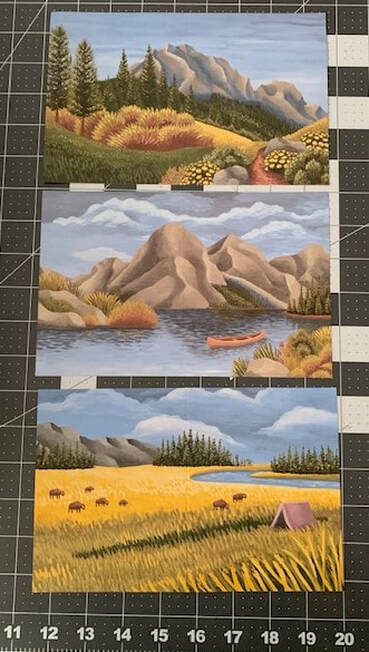
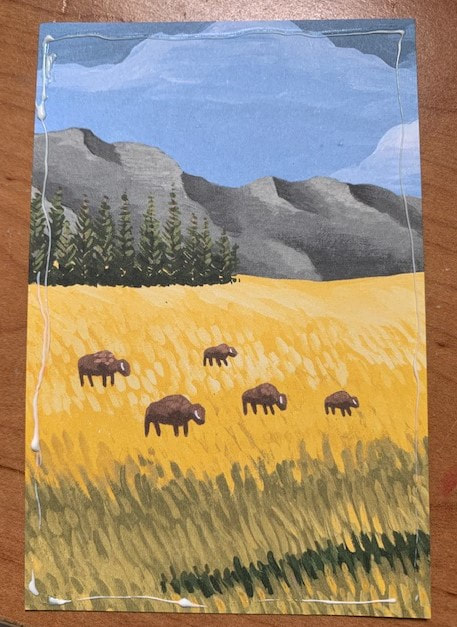
Step 5:  Select a background.  Trim to 3-1/4" x 4-3/4",  Glue to back of card front.  I was thinking that if you had a fun landscape photo from a trip, it might be nice to use that instead.
Picture
May 2023 Paper Pumpkin from Stampin Up card bases
Picture
Trimmed from Paper Pumpkin card base
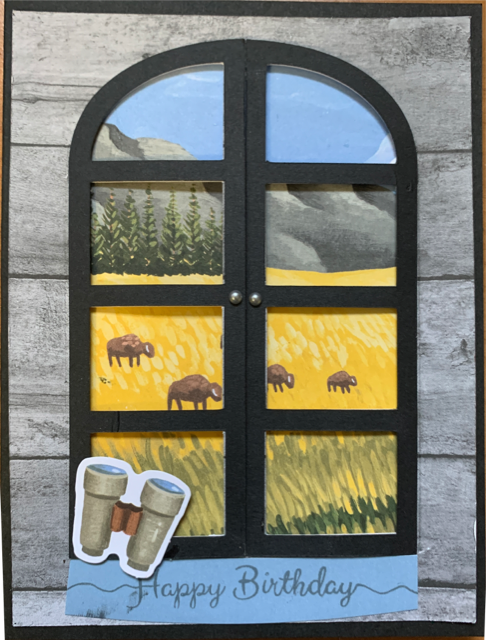
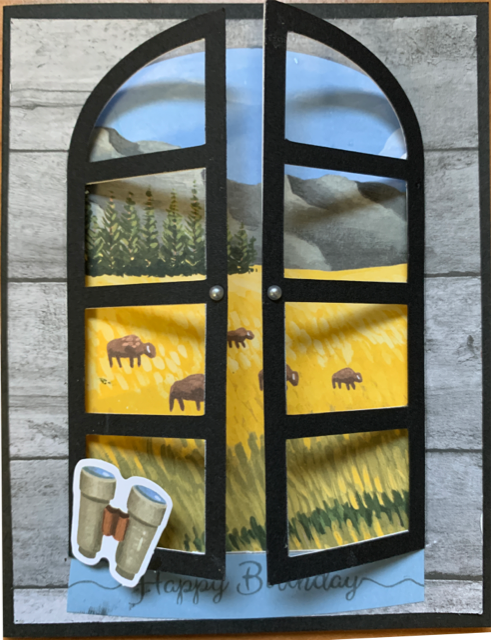
Step 6:  Cut a card base using Black cardstock 8-1/2" x 5-1/4".  Score at 4-1/4".
Step 7:  Glue card front to card base.
Picture
Picture
Step 8:  Add greetings and embellishments.
  • Greeting
  • Binoculars (from the Paper Pumpkin kit)
  • Metallic Pearls (for opening the windows)
Picture
Picture
Step 9:  Create inside panel for card.  Stamped items from Paper Pumpkin kit.
Picture
Let me know if you use Electric Quilt 8 for uses other than quilting?  I love hearing how you are using the software.
Window Dies for Cardmaking Learning EQ Facebook Post

Tech Know Quilters Showcase

Current Tech Know Quilter members have been sharing their class projects along with their original designs (and in some cases quilts) in the membership's private Facebook group.  Enjoy this show of some of their recent creations.

You can learn more about the Tech Know Quilters membership program and sign up for the wait list for the next open enrollment period here.
Picture
Pat Norrad EQ Design
Picture
Pat Norrad Finished Quilt
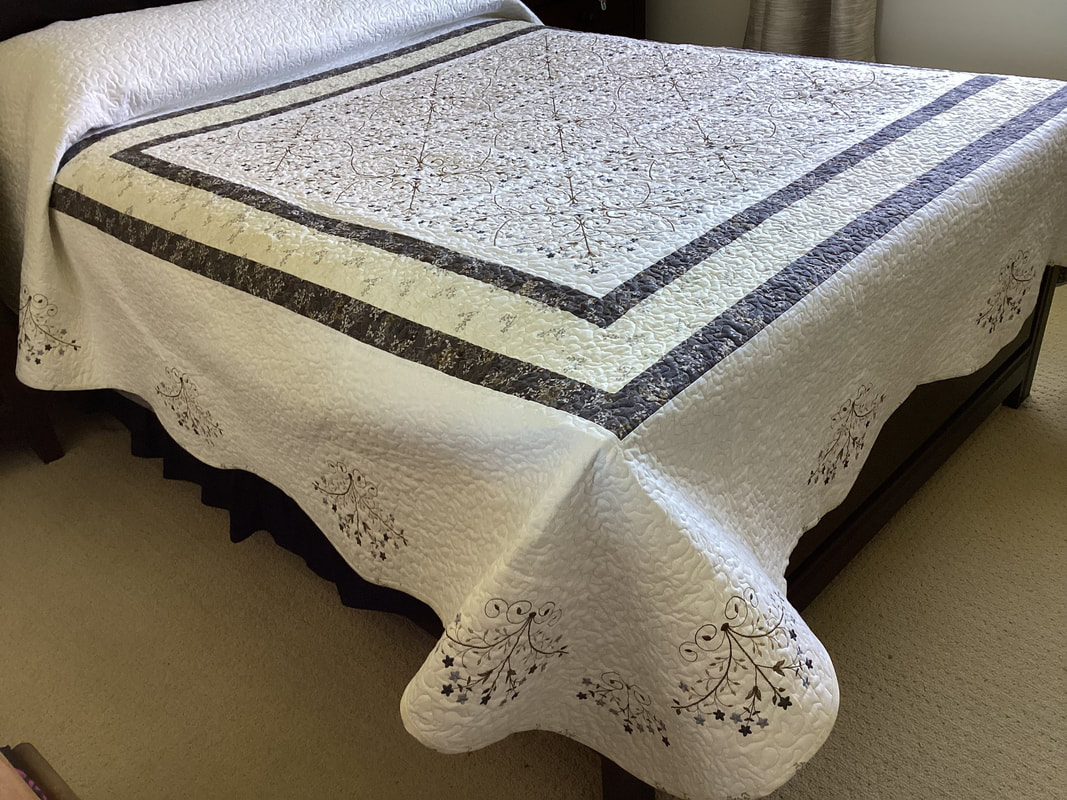
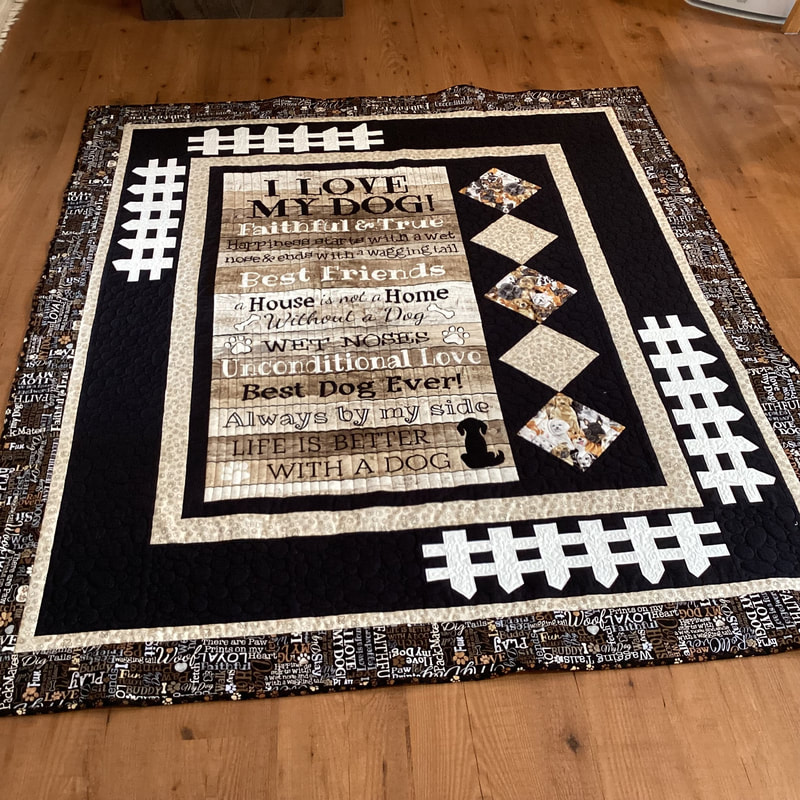
Pad Norrad     My very dear Aunt and Uncle, who are in the mid 80's, asked if I could repair their favorite quilt they've had for over 40yrs. It wasn't repairable so I said it would be easier to just make them a new one. OMGoodness - what did I just say, LOL Along with my EQ8 Program, I also enjoy Digitizing. I put the two together and was able to create my pattern in EQ8 and Digitize the Embroidery needed to go into each of the blocks. I took the Advance Border Design Class (along with many others) and thank goodness I did. I've learned a lot more than I thought I would; thank you Kari Schell. In the end, this is a Bedspread that is quilted, not your usual quilt. I've decided I would make the Pillow Shams that match. 
Picture
Margo Reppert I'm rather pleased with my Jacobean Challenge.
Picture
Joan Sledge Webb This is a quilt I designed using fabric colors from my grandson's wedding.
Ann Cornett Horsley -- One block used in five different layouts.  Playing around.
Picture
Picture
Pat Norrad EQ8 Design
Picture
Pat Norrad Quilt
Pat Norrad​ We were given Challenge to only use two colors to make a project. The two crayons I pulled from a brown paper bag was Brown and Orange (go figure). We could have a cream, white or black background. I created this Quilt using the Storm at Sea block with shades of the two colors.
Picture
Connie Bobcik My Gees Bend quilt
Picture
Connie Bobcik One of my horizontal quilts.
Picture
Connie Bobcik - One of my Log Cabin 3D Quilts
Picture
Connie Bobcik - My Fractured Background quilt.
Picture
Pat Norrad EQ8 Design
Picture
Pat Norrad Quilt Top
Pat Norrad This is another quilt I just finished. It is a Grad Quilt for our next door neighbor's daughter. We've good neighbors for 19 yrs and have watched their 3 children grow up. Their daughter finally got her wish to have her 'own' dog and she is just crazy over this dog. I drew the pattern in EQ8 and I'm so glad I did. 
Picture
Cindy Meyer I've called this "Where the Stars Go" because it reminds me of a black hole. The fabrics were downloaded from a website and, of course, I purchased those fabrics to make this quilt. I've printed the foundations but still playing with the borders before I begin.
Picture
Edith Craig My class this month was Masters Hexies and More. I used the concepts from this class, some of the blocks we drafted in class, and used a different layout template from the Layout Library. The combination of various blocks made a striking layout and shows how varied a quilt can look using only a couple of blocks.
Picture
Maureen Pinwill
I have been working on a quilt for the past few years which involves a great deal of simple embroidery along the whole border of a king size quilt, so much of this hand embroidery has been undertaken by hand either whilst watching tv or when I wake up, usually at about 4 - 4.30 am. The patchwork pieces are tiny and quite traditional but all the pieces are the same along the top and sides of the quilt. It has lots of small embroidery decorations that are mirrored on top to bottom and also side from side. So I had to ensure that everything was pieced in the correct order. All the top blocks are joined together and then a backing will be placed when all the tops have been joined. I only have three more blocks to finish and only then can I start back the quilt sew the quilting top and put the border on. I hope to get it finished for my daughter's next wedding anniversary in March 2024.  The next time I approached a quilt of this nature I will use my Artista Designer Plus Embroidery program to do so, as I am sure it would have been completed much earlier if I had taken the time and trouble to put the design in that program. Although I do use embroidery to meditate so it has given me many, many hours of peace and calm 
Picture
Picture
Picture
Helen Warwick EQ Quilt
Picture
Picture
Helen Warwick Foundation pattern
Helen Warwick Drafted in EQ8 for foundation paper piecing. The original Java Twist was not foundation paper pieced and my friend could not get any of the blocks to come out the correct size by following the directions. I suggested trying to draft it as a foundation paper pieced block and she knew how to do foundation paper piecing, but not how to draft them. This is what I came up with. I learned a lot in the foundation paper piecing lessons from Kari. The quilt turned out beautiful.
I have a very happy friend. 
Picture
Linda Carlson This Masters Hexes and More variation came from Lesson 5. What looks like white pin dots on blue is actually a stripe fabric turned on the diagonal. It was a good class!
Picture
Joan Sledge Webb I'm expecting my first Great Grandchild in September. I wanted to make a scrappy quilt using the It's A Boy collection by Riley Blake. Took me a few tries but I did get the pieced border to line up and I'm pretty happy with it. I might change some of the fabrics before I start on the quilt but it's a start.
Picture
Rhonda Goss Masters Hexie class quilt
Picture
Julie Pedersen Masters Hexies N More class
Learn More About Tech Know Quilters and Sign Up for the Wait List
Picture
Happy quilting.

​Kari

Join the On Point Quilter weekly newsletter and receive regular tips and inspiration on using Electric Quilt 8 along with the  Free 12 Top
Tips for EQ8 video guide.
Picture

Log Cabin Crossing

6/3/2023

 
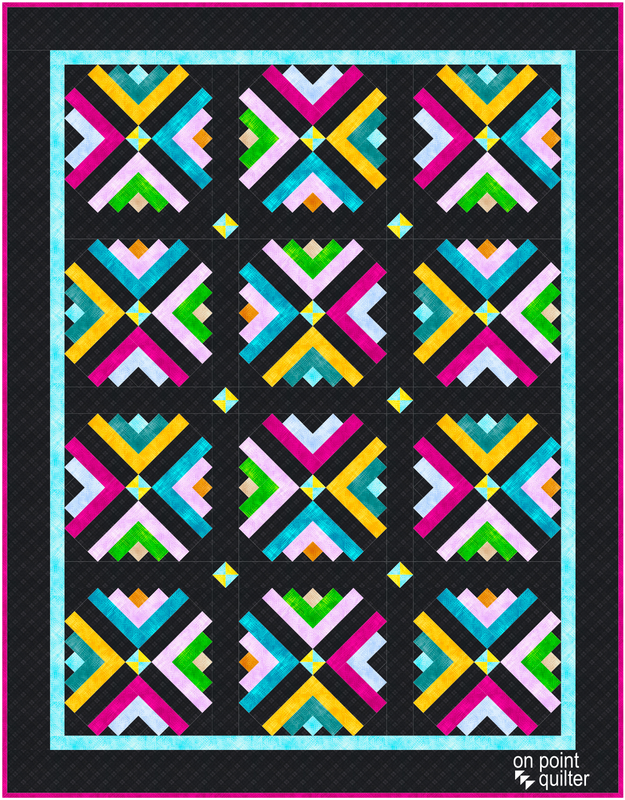
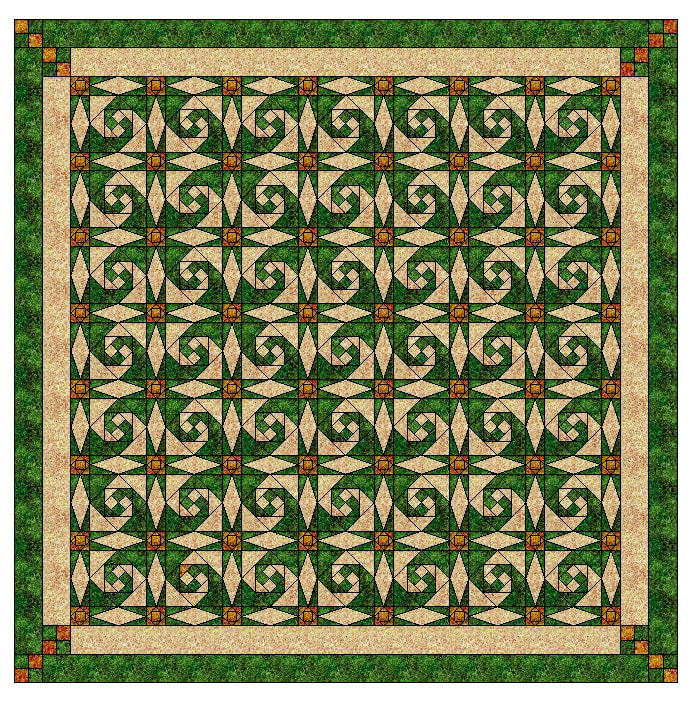
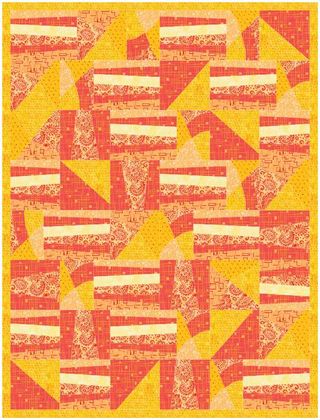
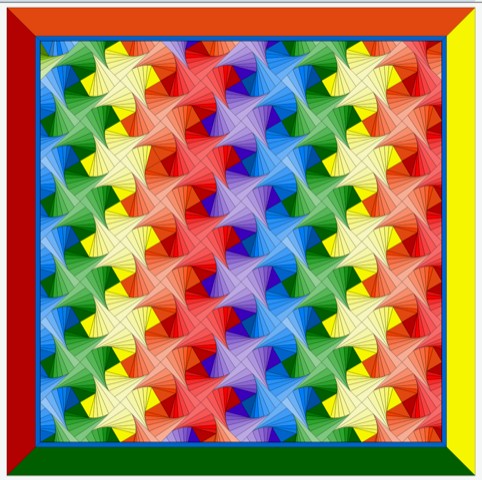
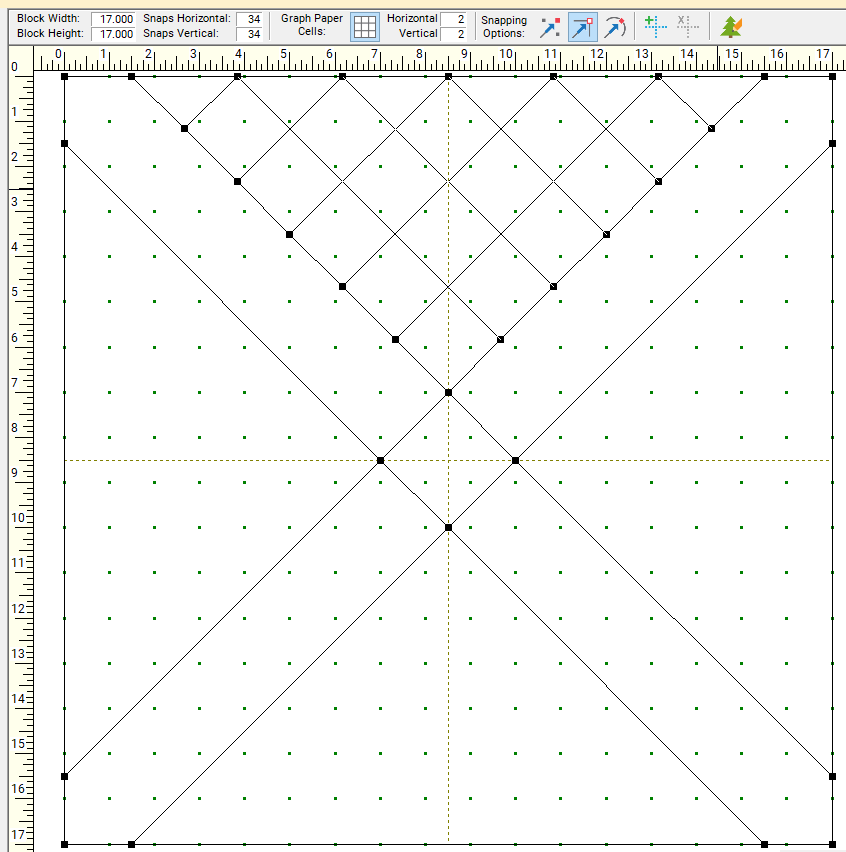
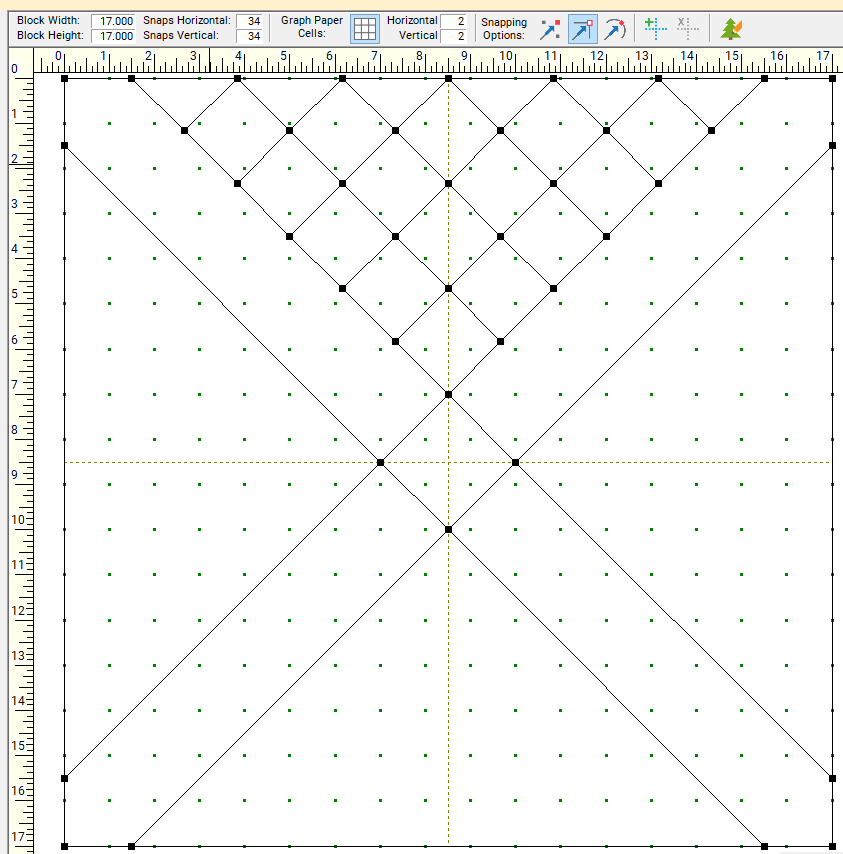
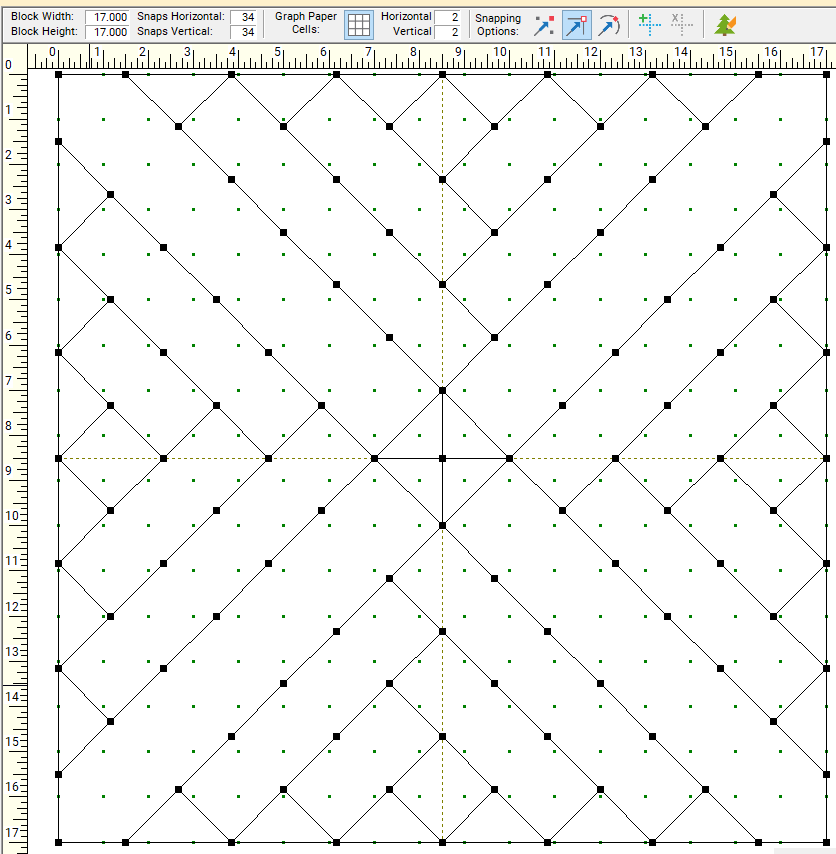
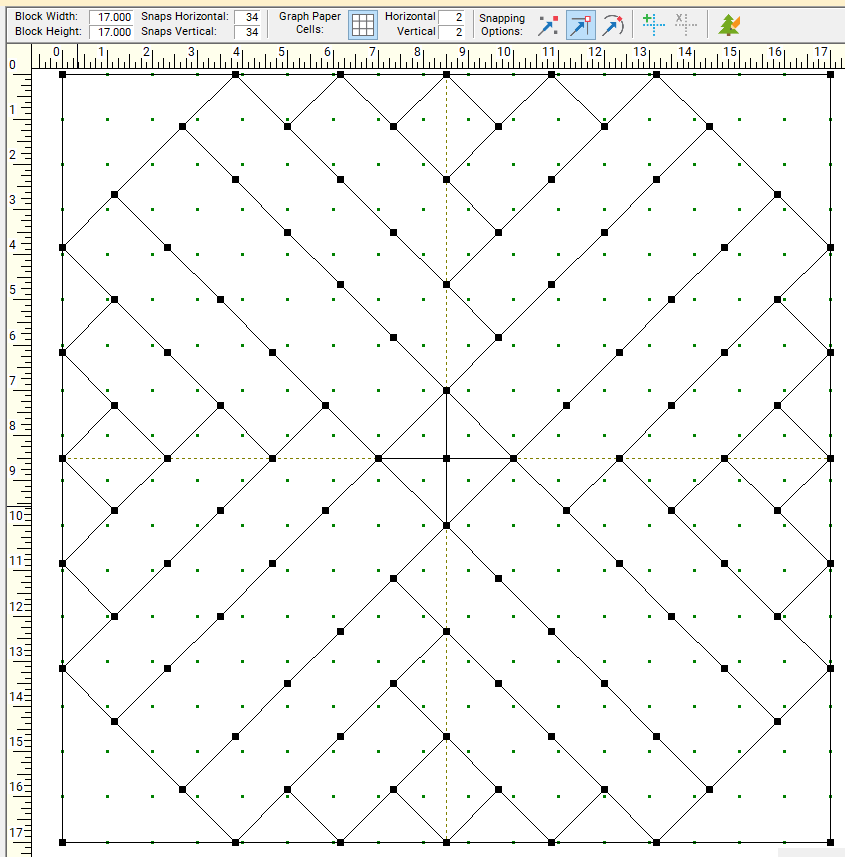
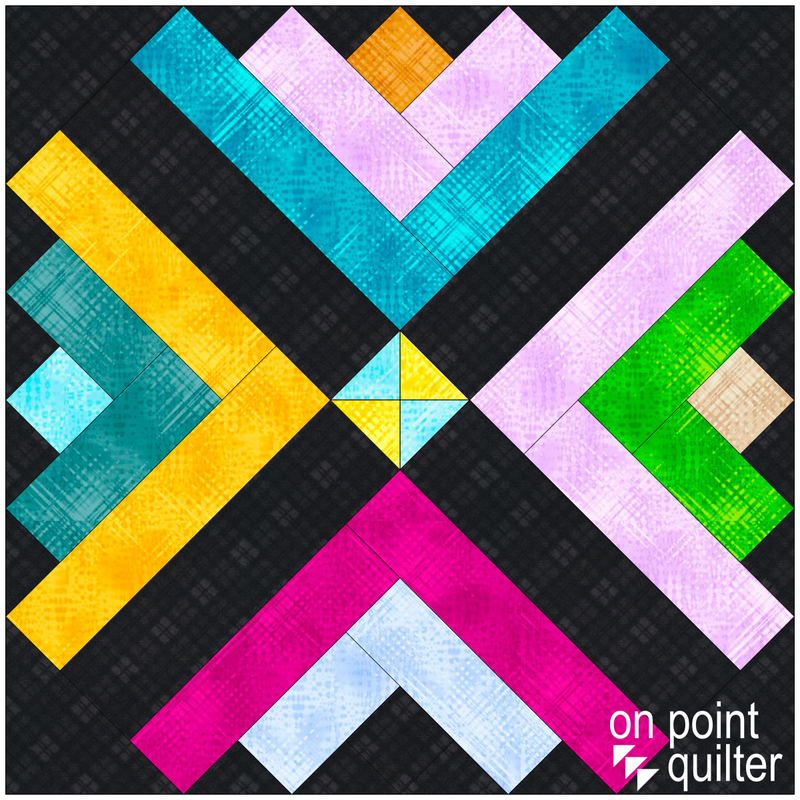
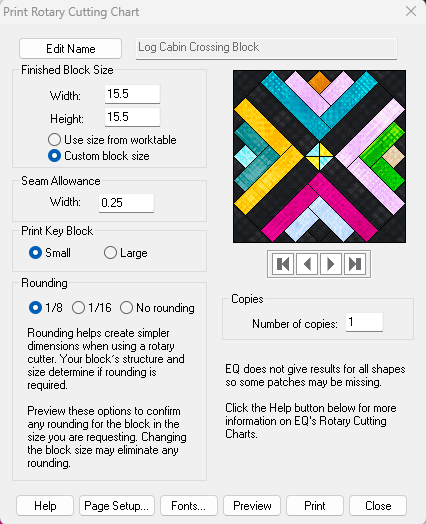
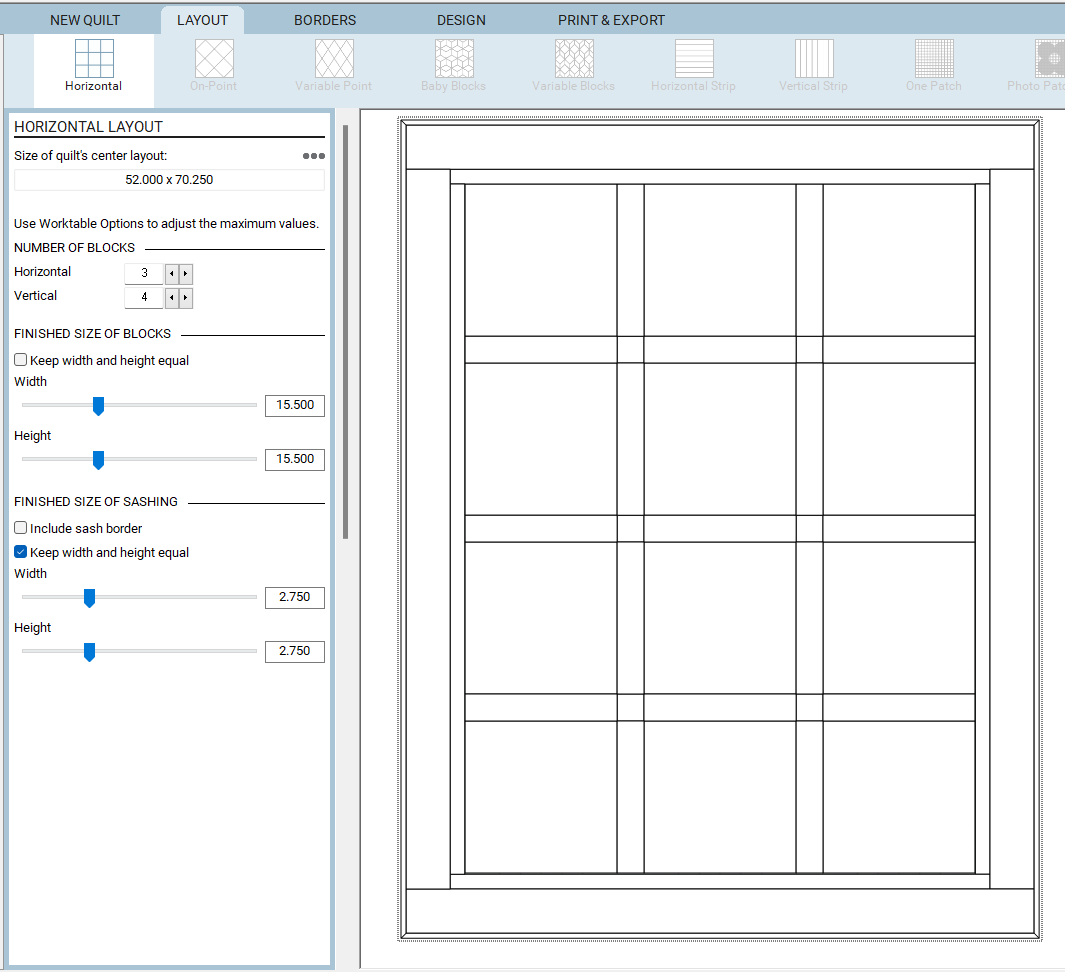
This block and quilt I am presenting today is an original design -- the result of some playing in Electric Quilt 8 the other day.  When playing I will often go through a number of iterations of a block or quilt.  It is a design that is scrap friendly and can use a collection of left-over 2" strips.

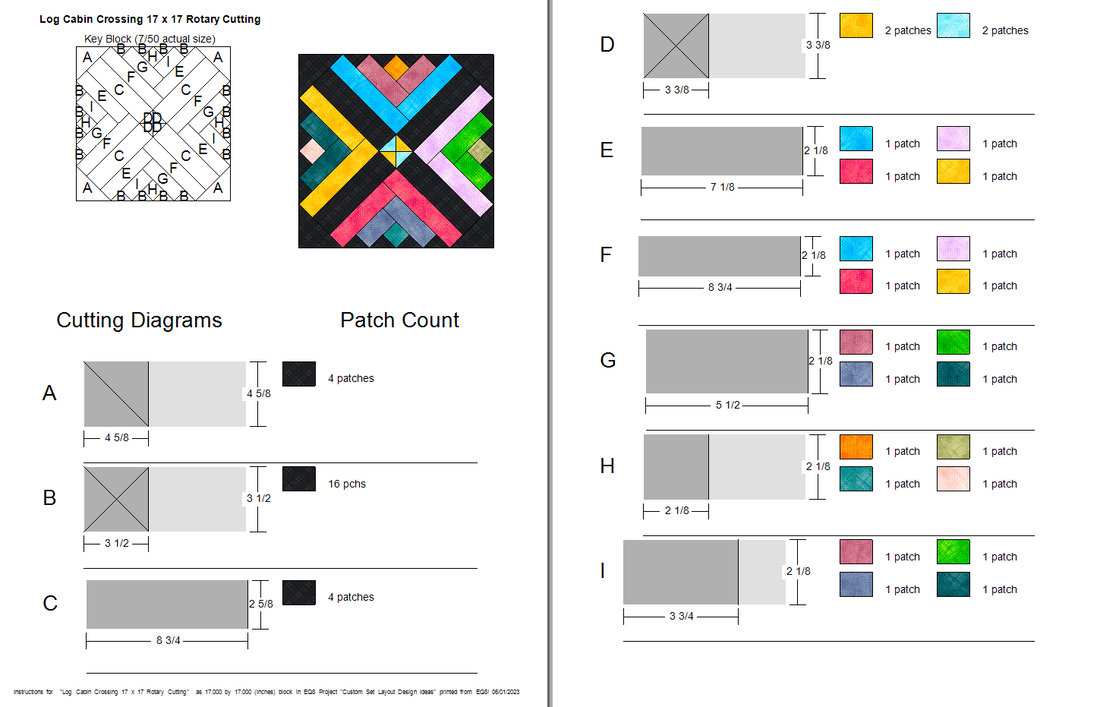
Tip -- always save multiple times as you draft your blocks and quilt.  Sometimes your additional playing does not yield better results and you may want to go back to an earlier version.

Designing the Log Cabin Crossing Block
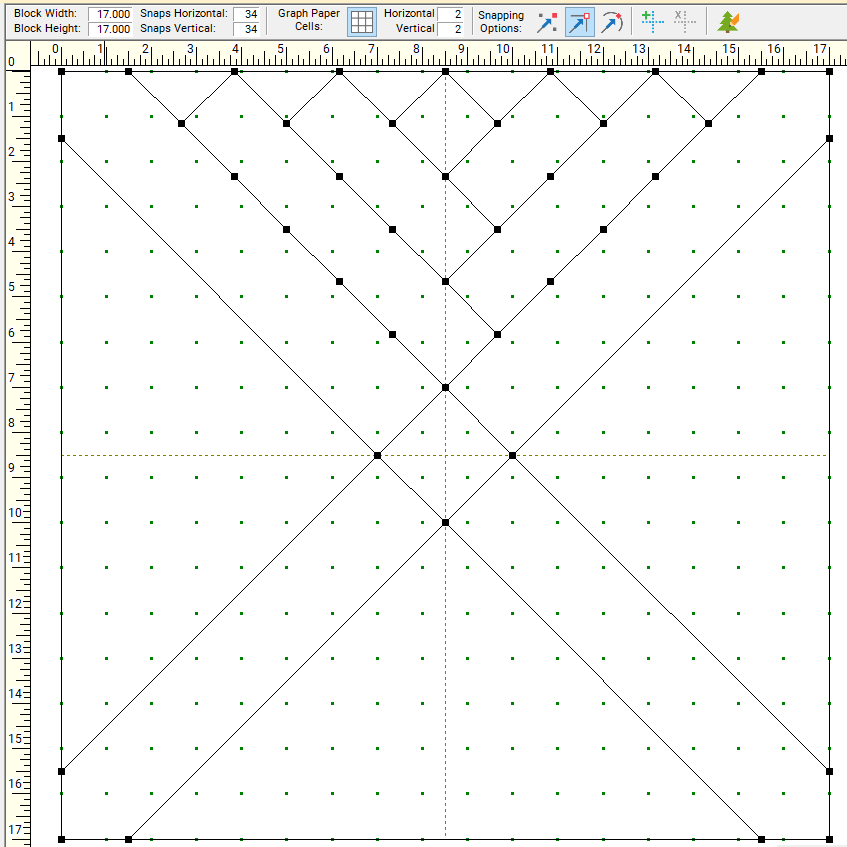
I started by drafting a very simple crossing block using EasyDraw.  I chose to make the block 17" x 17".  This is the size without added seam allowances. 

​The diagonal lines were drawn 1-1/2" in from each corner.  They cross to create an on point square in the center.  It also gave me some really large on triangles for additional designing.
Picture
Crossing Lines
When working with an on point segment in a block, the snaps horizontal and vertical won't always give you the precision you need to create perfect diagonal lines -- ones that produce squares and rectangles that are easy to cut.

Fortunately EasyDraw gives us the ability to partition lines.  Use a similar partition for all three edges of your big triangle.  I used Partition Segment - 6 for my design.  However, feel free to experiment with the concept with a different number of partitions.   Just remember that the more partitions you add the more piecing you will be doing. 
Picture
Partition Segment 6
Next it is time to draw your lines.

Make sure to switch to Snap to Nodes only under your snapping options.  If you also have Snap to Grid on, EQ will naturally gravitate to those snap points when they are close to a Node.  EQ has a much stronger magnet on grid points versus the nodes.

Draw a series of diagonal lines that are parallel to the long diagonal lines originally drafted.  This is super simple as all you need to do is connect the dots (or in this case nodes).
Picture
Draw Diagonal Parallel Lines
Go to Color and back to Draw.  The will split all your drawn lines at intersections.  So they are no more long diagonal lines but a series of small short lines instead. 

This is a design decision point. 

​You could piece your block with 15 squares in each of the larger triangles.  Or you could turn each of the squares into half squares triangles.  A great idea if you have a stash of extra half square triangle units from a previous project.  Maybe a set created from cheater corners.
Picture
Break lines at intersections
I chose to simplify my design and delete some of the small diagonal segments.  This will turn the squares into 5 rectangles.  Essentially creating log cabin pieces.

​Much faster to piece.
Picture
Delete some of the small diagonal segments to create log cabin rectangle pieces.
You could replicate the process and draw the same segments for the other three large triangle units.  

However, I chose to go with an easier approach.  I converted the longer lines to guides (this will assist in placement.  

Then cloned and rotated the log cabin pieces from the top and placed over the guidelines.  I found it was easiest to get everything to snap if I switched back to Snap to Grid.  Note that we have Horizontal and Vertical Grid snap points at all three corners of the large triangle.
Picture
Duplicate the top segments. Rotate and place on the other three edges of the block.
Just for fun I decided to create a small pieced unit in the on point square in the center.

Another design point.  Chose your own design for that on point square.

A simple quarter square triangle unit for me. 
Picture
Optional - Add some piecing to the on point square in the center.
After playing with my design in the quilt worktable, I realized I could simplify the construction process by making a slight modification to the corners. 

By eliminating two diagonal lines and adding a third one going the other direction, I've eliminated the awkward house shaped piece in the corner.  Instead I have an additional rectangle and a half square triangle for the corner.

​Now all the pieces will show up on the rotary cutting chart and it will be easier to cut and piece the entire block.
Picture
Modify the corners to improve construction.
Color the block using a variety of fabrics for a scrappy look.

​I used the latest free download from Do You EQ.  Vertex was designed by QT fabrics.  It has 84 fun fabrics to give your quilt a very scrappy look. 
Link to free Vertex download from Do You EQ
Picture
Colored block.

Designing the Quilt

When I pulled the rotary cutting chart for my 17" block, I realized that it wasn't quite as rotary cutting friendly as I hoped.

Each of the logs needed to be cut from 2-1/8" strips.  And the cross cuts had challenging measurements as well.

​
Picture
17" x 17" Rotary Cutting Chart
Fortunately in EQ, we don't have to create our quilts in the size we designed our blocks.  

I could tell you that I worked through the math and figured out the size of the block that resulted in easier to cut logs.  However, I wasn't feeling very brainy today -- so I cheated.  I just experimented with some different sizes. 

To do this, in the Rotary Cutting dialogue box, switch from "Use size from worktable" to "Custom Block size".

Type in a new size and select preview. 
Picture
Type in a custom block size to experiment with different rotary cutting results.
Notice how much better the rotary cutting chart is once the block size is changed to 15-1/2" x 15-1/2". 

​Now the logs can be cut from 2" strips of fabric.
Picture
15" x 15" Rotary Cutting Chart
On the Quilt Worktable, select New Quilt and select the Style Horizontal.

On the Layout tab, change the number of blocks to 3 horizontal and 4 vertical.

Change the size of the block to 15.5"

Change the sashing size to 2.75"

On the border tab, set up 3 borders:
Border #1 - 1" Long Horizontal
Border #2 - 4-1/2" Long Horizontal
​Border #3 - 1/2" Mitered (for the binding)
Picture
Horizontal Quilt - Layout Tab
On the Block worktable, create a block for the cornerstones.  This is optional -- but I thought it was a way to carry the concept of the center of my bocks into the cornerstone.

My cornerstone block was designed at four inches.  Make sure to turn on Snap to Grid before drawing the unit.

I created an on point square and then drew horizontal and vertical lines through the center.
Picture
Cornerstone Block
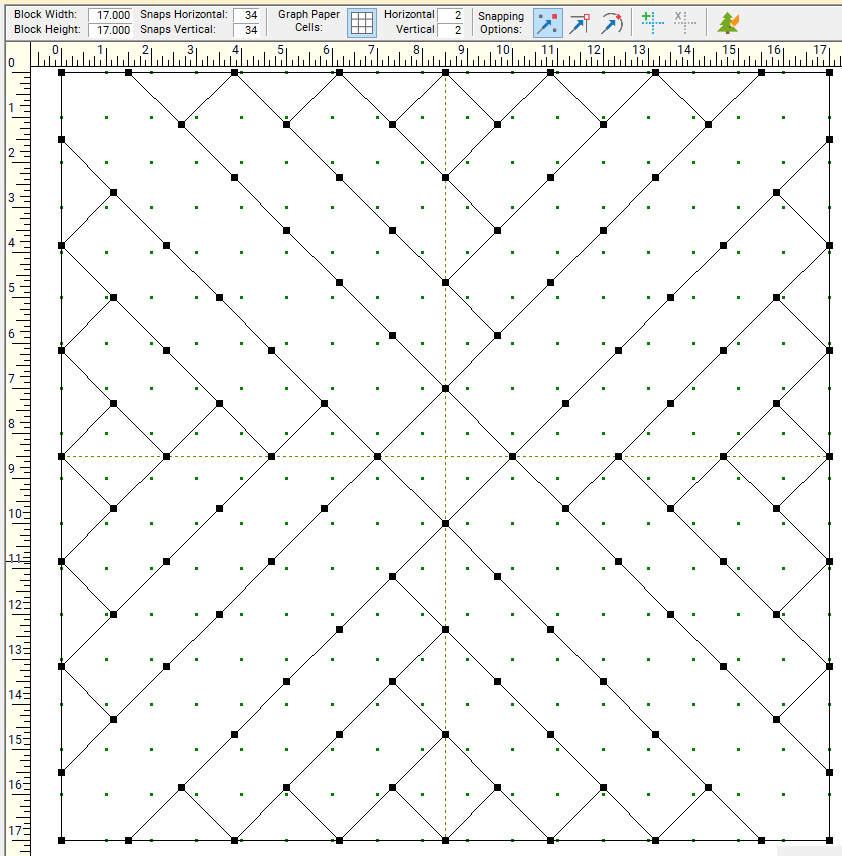
See the full video on creating your own blocks and quilt.
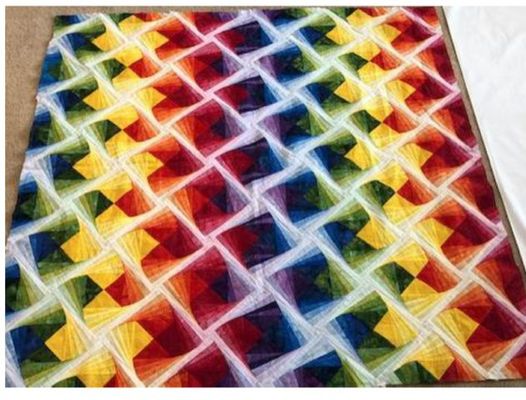
Here is my final quilt.  I love how the log cabin units stand out when using a black background.
Picture
I am curious what you choose to do with the design.  did you make any different design decisions.  Whether you did (or did not) I would love to see your final quilt.  Please feel free to share in the Learning EQ Facebook group post I have set up.
Learning Electric Quilt Facebook Group - Log Cabin Crossing Post

EasyDraw Class Options in Tech Know Quilters

Did you enjoy learning some new skills in working with EasyDraw?  If you are ready to enhance those skills, check out the three EasyDraw class options within the Tech Know Quilter membership.  
  • Introduction to EasyDraw (Beginner)
  • EasyDraw Kaleidoscopes (Intermediate)
  • Advanced EasyDraw (Advanced)
If you aren't sure which class makes the most sense, take a look at the blocks for each class in the slideshow below.  If you can draft most of the blocks for a particular class without assistance, select the next class on the list.

Not currently a member -- send me a note if you are interested in joining Tech Know Quilters -- and which class you would like to start with.

Current members, let me know if you would like any of these classes as an add-on to your current class for the month.  We will send you a an add-on coupon for your discounted price.
Email Kari
Picture
Join the On Point Quilter weekly newsletter and receive regular tips and inspiration on using Electric Quilt 8 along with the  Free 12 Top
Tips for EQ8 video guide.


Happy quilting.


​Kari
Picture
    Picture
    Picture
    Picture
    Free guide available for newsletter subscribers
    Picture
    Picture
    Picture

    Kari Schell

    Electric Quilt Expert and Educator and Pattern Designer.

    Categories

    All
    Art And Stitch
    Cricut Maker
    Dear Jane
    Electric Quilt 7
    Electric Quilt 8
    Goose Goose Duck Challenge
    Inkscape
    Patterns
    Silhouette Cameo
    Stampin Up
    Tips And Techniques
    Tools And Rulers

    Archives

    January 2026
    December 2025
    November 2025
    October 2025
    September 2025
    August 2025
    July 2025
    June 2025
    May 2025
    April 2025
    March 2025
    February 2025
    January 2025
    December 2024
    November 2024
    October 2024
    September 2024
    August 2024
    July 2024
    June 2024
    May 2024
    April 2024
    March 2024
    February 2024
    January 2024
    December 2023
    November 2023
    October 2023
    September 2023
    August 2023
    July 2023
    June 2023
    May 2023
    April 2023
    March 2023
    February 2023
    January 2023
    December 2022
    November 2022
    October 2022
    September 2022
    August 2022
    July 2022
    June 2022
    May 2022
    April 2022
    March 2022
    February 2022
    January 2022
    December 2021
    November 2021
    October 2021
    September 2021
    August 2021
    July 2021
    June 2021
    May 2021
    April 2021
    March 2021
    February 2021
    January 2021
    December 2020
    November 2020
    October 2020
    September 2020
    August 2020
    July 2020
    June 2020
    May 2020
    April 2020
    March 2020
    February 2020
    January 2020
    December 2019
    November 2019
    October 2019
    September 2019
    August 2019
    July 2019
    June 2019
    May 2019
    April 2019
    March 2019
    February 2019
    January 2019
    December 2018
    November 2018
    October 2018
    September 2018
    August 2018
    July 2018
    June 2018
    May 2018
    April 2018
    March 2018
    February 2018
    January 2018
    December 2017
    November 2017
    October 2017
    September 2017
    August 2017
    July 2017
    June 2017
    May 2017
    April 2017
    March 2017
    February 2017
    January 2017
    December 2016
    November 2016
    October 2016
    September 2016
    July 2016
    June 2016
    May 2016
    April 2016
    March 2016
    February 2016
    January 2016
    December 2015
    November 2015
    October 2015
    September 2015
    August 2015
    July 2015
    June 2015
    May 2015
    April 2015
    March 2015
    February 2015
    January 2015
    December 2014
    November 2014
    October 2014
    September 2014
    July 2014
    June 2014
    May 2014
    April 2014
    March 2014
    February 2014
    January 2014
    December 2013
    November 2013
    October 2013
    September 2013
    August 2013

    RSS Feed

Contact:
On Point Quilter
e-mail:  [email protected]
phone:  763-566-6536

GET MY NEWSLETTER FOR REGULAR EQ AWESOMENESS!

* indicates required
  • Blog
  • About
  • EQ8 Training
    • Tech Know Quilters
    • EQ8 Made Easy
    • Electric Quilt 8 Sneak Peek
  • Store
  • Contact
  • Majestic View EQ8 Free Live Webinar