
 Eiffel Tower Quilt with Embroidery designed by Brigitte Lee (participant in the Summer Games Challenge) Eiffel Tower Quilt with Embroidery designed by Brigitte Lee (participant in the Summer Games Challenge)
Did you watch the opening ceremonies for the Summer Olympics last night? If so, let me know what your favorite part of the event was.
I loved the Eiffel Tower light show and seeing the cauldron after being lit by the Olympic torch raising in the air and moving by hot air balloon. I am not a huge sports fan -- but there is something about the Olympics that draws me into watching some of the best athletes compete on a world-wide stage. For those of us more interested in quilting (and in designing blocks and quilts), I have a challenge going on that combines some of our favorite summer sports with tutorials on drafting foundation friendly blocks using EQ8. You can learn more about the challenge here. The challenge is currently on sales for $21.99 (80% off the regular price of $109.99). 
Medals Foundation Friendly Quilt Block Using EQ8
And the winner is.....
When you enter a competition, the winners often receive a medal to honor their achievements. At the Olympics--Gold, Bronze and Silver medals are awarded to the top competitors in each of the events. This block is not a square or rectangle, but we can still draw it as a foundation friendly pattern in EasyDraw.
Here is the image you can download and use as a tracing image in EQ.

Medals Foundation Pattern for Tracing
In the video, I also share how to create a mini-quilt. Add four Medals blocks to the Friendship Rings block.

Summer Games Quilt Center
Those in the Summer Games EQ8 Challenge have also received instructions for their first six sport themed blocks that will be added to this quilt center.
If you would like to receive these blocks (in addition to all the future blocks), you can purchase the challenge for 80% off here.
I would love to see what you do with the Medals block. Feel free to share pictures in the Learning EQ Facebook group.
Remember to take advantage of the offer to purchase the Summer Games Challenge for 80% off. Enjoy video instruction for 20+ Foundation Friendly blocks.

0 Comments
In this post:

Introducing the Summer Games EQ8 Challenge
In the Summer Games EQ8 Challenge you will learn how to draft a series of sports themed blocks. Most of the blocks will be paper piecing friendly with some very simple applique. Imagine the confidence you will gain after a little bit of work in both the EasyDraw and Applique worktables. This challenge is designed for both beginners to Electric Quilt 8 and those that would like to expand their block drawing skills to a whole new level. Through regular emails with instructional videos, you will be encouraged you to spend a small amount of time using Electric Quilt 8 each day. This will allow you to become much more comfortable with the software. To celebrate our favorite summer athletes, the Summer Games Challenge is currently on sale for $21.99 (regular price of $109.99). This sale price is available for a limited time. 
What’s Included

Here is What is Happening in the Summer Games Facebook Group
Here are a few of the blocks that have already been posted in the private Facebook group. Although the challenge focuses on drafting the blocks, those in the group also receive patterns for the sports blocks and some are having fun piecing the blocks as well.
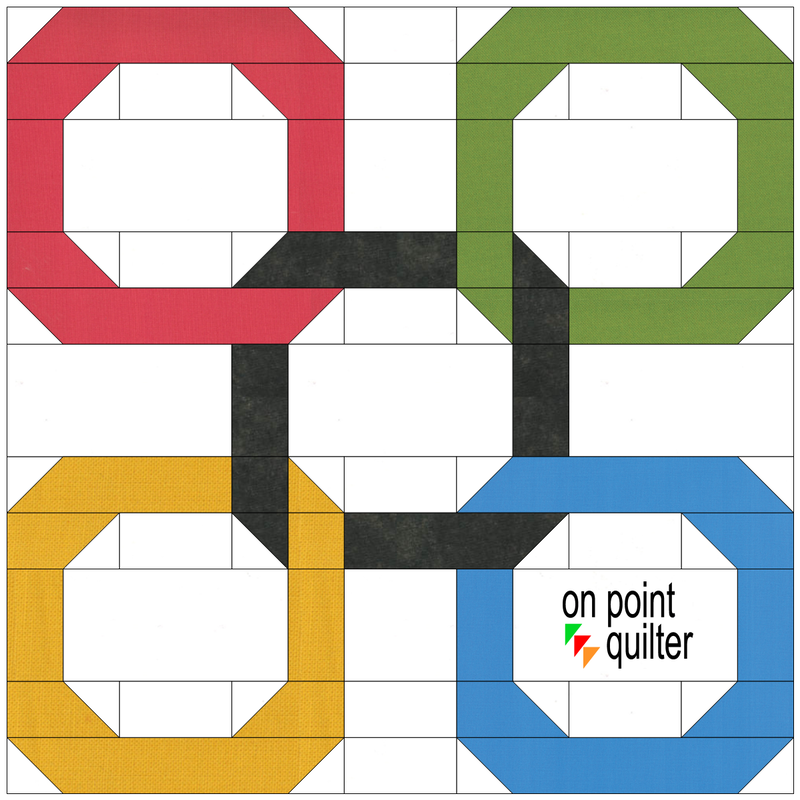
Friendship Rings Video Tutorial
Just for fun, I did a quilt with the friendship rings and the Eiffel Tower block from last weeks post. No tutorial -- but playtime. Can you guess my layout?

I would love to see what you chose to do with the Friendship Ring block. Feel free to post in the Learning EQ Facebook group. I've set up a dedicated post.
In celebration of the upcoming Summer Olympics in Paris, I have a special tutorial on creating your own foundation friendly Eiffel Tower block.
Scroll down for the free tutorial on creating the Eiffel Tower block. The Summer Games EQ8 Challenge starts this Tuesday (July 16). I look forward to having you join this group of over 500 EQ8 users, as you learn to create over 20 foundation friendly blocks. Make sure to sign up to join the fun. 
Just as we will watch athletes up their physical skills this summer, you will also have an opportunity to up your quilting game through honing your Electric Quilt 8 skills.
Introducing the Summer Games EQ8 Challenge
In the Summer Games EQ8 Challenge you will learn how to draft a series of sports themed blocks. Most of the blocks will be paper piecing friendly with some very simple applique. Imagine the confidence you will gain after a little bit of work in both the EasyDraw and Applique worktables. This challenge is designed for both beginners to Electric Quilt 8 and those that would like to expand their block drawing skills to a whole new level. Through regular emails with instructional videos, you will be encouraged you to spend a small amount of time using Electric Quilt 8 each day. This will allow you to become much more comfortable with the software. To celebrate our favorite summer athletes, the Summer Games Challenge is currently on sale for $21.99 (regular price of $109.99). This sale price is available for a limited time.
What’s Included
How It Works
Special Bonus: Live Finishing Session
You will be invited to a live event on August 24th where I will cover a layout for the blocks. I will also be introducing the Tech Know Quilter membership during the webinar and opening enrollment at that time. The session will be recorded and the recording will be made available to all challenge participants. The Summer Games Challenge along with the Live Finishing Session bonus is currently on sale for $21.99 (regular price of $109.99). 
Frequently Asked Questions
What level is this challenge targeted toward? Beginner to Electric Quilt 8. It will help if you have a basic level of understanding of EQ (i.e. have worked through the getting started videos or spent some time playing with the software). Are there any pre-requisites for the challenge? You should be familiar with your computer or have access to someone that can help with basic computer questions. It is important that you know how to save a picture from an email (and where it goes on your device when you save the picture). This process is not part of Electric Quilt and will be different depending on your computer, email system, operating system, browser and even settings on your computer. If you have problems with saving and accessing the picture during the Getting Started series, touch base with your favorite tech guru. They should be able to help. Does it matter if I am on a MAC versus PC? No Electric Quilt looks essentially the same for both PC and MAC users. Both should be able to successfully complete the project using the instructions in the videos. How will I access the videos? The e-mails will contain links to the videos plus any added instructions for completing that day's challenge. You can watch the videos at whatever time works best for you. Are the videos downloadable? No. However they can be watched whenever you wish and can be paused and rewatched as frequently as necessary. What if I didn't receive one of the e-mails? Most of the time these may be located in spam or junk folders. First check there. To minimize the potential issues. add [email protected] to your address book. If that doesn't work, please e-mail me so I can help research the problem. What if I started late? Once you enroll in the program, you will receive your first e-mail within 24 hours. We will get you caught up within a few days. What if I can’t attend the live session? The sessions will be recorded and as a participant in the Summer Games Challenge, you will receive a link to the recording. Eiffel Tower Foundation Friendly Block Using EQ8
Since some of the best athletes in the world will be in Paris later this month, I decided to celebrate with a free tutorial on how to draft your own Eiffel Tower foundation friendly block using Electric Quilt 8.
If you draft the Eiffel Tower block, I would love to see pictures. I have set up a post in the Learning EQ Facebook group where you can share your creations.
The video is similar to those that will be received during the Summer Games EQ8 Challenge.
If you would like to receive all the Summer Games EQ8 Challenge with over 20 foundation friendly blocks you can draft in EQ, you can purchase the series here.
Even though the challenge has not officially started, challenge participants have already started sharing in their EQ designs in the private Facebook group.
As part of the Summer Games EQ8 Challenge Getting Started series, a number of EQ8 users tackled a more complex Eiffel tower block. Check out their EQ drawings.
Would you like to join them?
Click on the pictures to purchase for over 80% off (limited time sale event)
Click on the above picture to learn more and enroll.
The 4th of July (Independence Day in the US) is just around the corner. I will be sharing one of my favorite red white and blue quilts in this weeks EQ tutorial.
Also check out the month-end showcase of quilts designed by Tech Know Quilter members. Stars and Stripes Door Quilt
The quilt I will be sharing with you today, is one that would be super easy to piece, and a cute way to decorate for Independence Day. If you aren't into red/white/blue quilts, try a different color combination.
The miniature size (23-1/4" x 6-1/8"), also makes it a fun quilt to hang on a door.
There are two rail fence blocks -- one done in EasyDraw and one in PolyDraw.
The fabric used in designing this quilt is from the Bandana Ballad collection by Michael Miller. The collection is included in Electric Quilts 2020 Stash Download 1 Collection
Although it is fun to download fabrics directly from manufacturing websites, it is much more efficient getting them directly from EQ as the fabric is always sized correctly and usually cropped to eliminate tiling problems. In the video, I also share with you my trick for adding a binding around this quilt. The binding is added for a visual perspective of my final quilt. I always calculate yardage for my binding separately, using my preferred binding method.
Stars and Stripes Quilt designed using EQ8 by Kari Schell
Here is my pieced version of this quilt. It was done many years ago and was gifted to my mother to use as a door hanger in her assisted living facility.
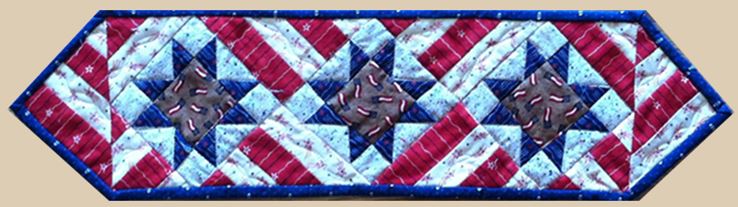
Stars and Stripes Miniature Door Hanger made by Kari Schell
There are so many possibilities for modifying this design.
I look forward to seeing that you do with the design. Feel free to share in the Learning EQ Facebook group. Tech Know Quilter Showcase
Every month I challenge current Tech Know Quilter members to share a project that showcases something they learned during the previous month. I continue to be amazed at the creativity of these exceptional quilt designers and am honored to assist them on their Electric Quilt 8 journeys.
Check out their amazing challenge posts for May 2024.
|


Free guide available for newsletter subscribers


Kari SchellElectric Quilt Expert and Educator and Pattern Designer. Categories
All
Archives
July 2024
|


 RSS Feed