• Blog
  • About
  • EQ Training
    • Tech Know Quilters Electric Quilt 8 Membership Training
    • Shoot for the Stars with EQ8
    • Electric Quilt 8 Sneak Peek
    • Scheduling a Workshop or Lecture
  • Store
  • Card Making
  • Contact
  • Free Stuff
    • Other Video Tutorials
Picture

Block Alphabet

7/30/2022

 
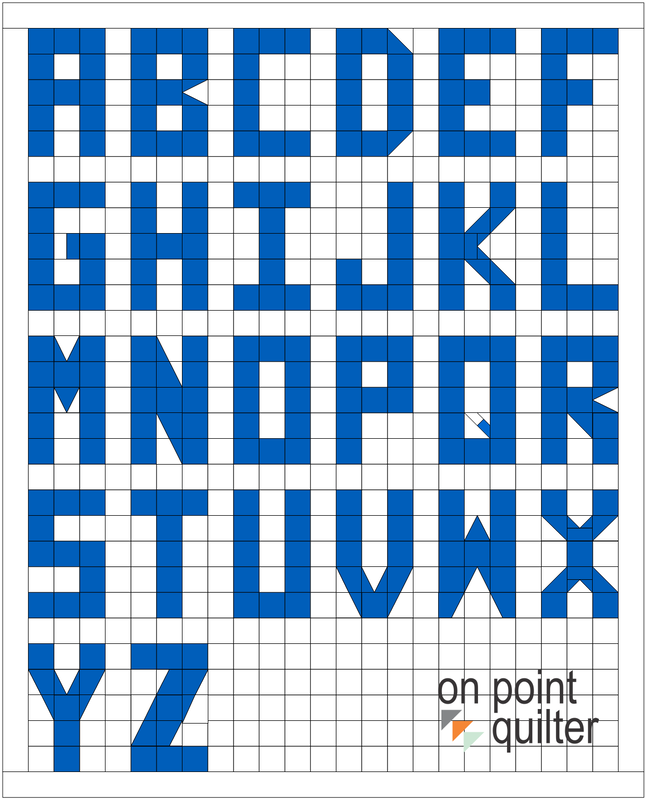
This week found me needing a pieced alphabet for a future project.  Ideally all my letters will be the same size which will make it very usable in a variety of quilt blocks.  A 3 x 5 size seemed ideal after a lot of looking at a variety of block letters on the Internet.

I started by drafting a couple of my pieced letters using EasyDraw, but then realized I wanted a bit more flexibility as I created the alphabet and applied what I learned in drafting one block to another block.  Ideally I wanted to be able to draft the entire alphabet on one page.  

Within EQ8, one way to approach this is to use the One Patch Quilt Layout as graph paper.  This gives us flexibility to color (and un-color) the graph paper squares during the design process. 

​By the second letter I realized that I needed to be able to add piecing to some of the squares in order to differentiate some of the letters.  I didn't want the "B" to look like the number "8" or the "D" to look like the "O".  To add the additional detail, I created a few very simple 2 inch blocks in EasyDraw and added them to Layer 2 on the Quilt worktable.
Picture
Picture
Picture
Picture
Picture
Picture
I was able to do the entire alphabet with only 6 blocks (in addition to the 2 inch squares).  And the blocks would be a breeze to do with the Deb Tucker rulers:
  • Tucker Trimmer for half square triangles
  • V Block Tool for the v block and half v block
  • Wing Clipper for the flying geese units
If you would like to purchase any of the rulers from me, use code TUCKER when checking out for a 10% discount on all rulers in my store.  Offer good through August 7, 2022 -- while supplies last.
Picture
Once I had fine tuned the alphabet, I was then able to trace the images to create my 3" x 5" EasyDraw blocks.  You may not even need to trace if you print out a copy of your quilt showing the quilt patch lines.

For the EasyDraw blocks, I thought through the easiest way to piece each of the blocks and eliminated some of the extra lines.  I also want to make sure I don't have any inside corners that need to be pieced.  Note the "A" block can be pieced in horizontal rows that are then combined together.  
Picture
Watch the entire process in the EQ8 video tutorial.
You could copy my alphabet -- or create one of your own.  Feel free to set your own rules.

I am looking forward to seeing your alphabet and maybe even a quilt that incorporates some words in it.  Feel free to post pictures in the Learning EQ Facebook Group.
Learning EQ Facebook Post for Block Alphabet
Have a fantastic week.
Picture
Happy quilting.

​Kari
​
​Join the On Point Quilter weekly newsletter and receive regular tips and inspiration on using Electric Quilt 8 along with the  Free 12 Top Tips for EQ8 video guide.
Picture

Clamshells

7/23/2022

 
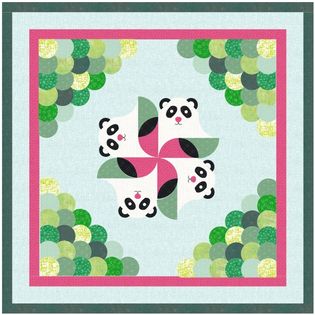
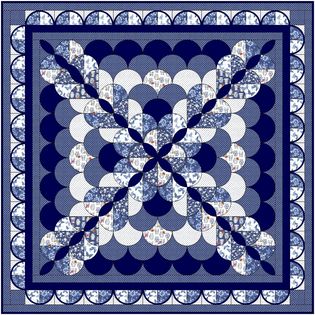
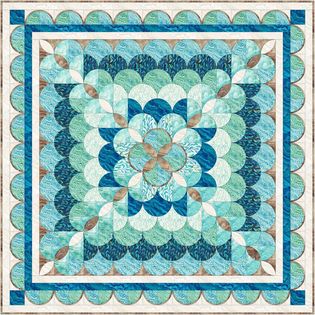
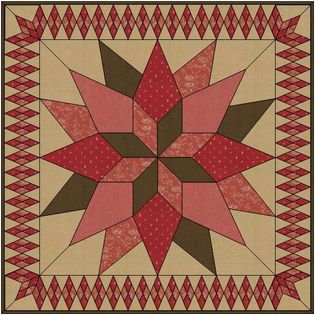
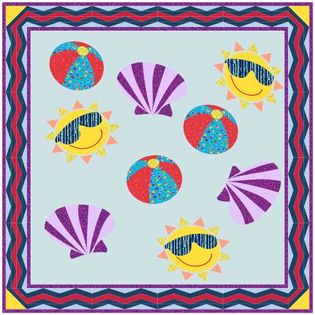
With the variety of clamshell rulers and tools to choose from when piecing your next clamshell quilt, I thought it was time to do a tutorial on a drafting a basic clamshell block.  But playing with clamshells can be very addicting, so I ended up with 2 different clamshell blocks and five different quilts.  And my head is still spinning with other ideas.

In the video, I didn't include the process to add new fabrics -- but the fabrics in the video are from the July 2022 Fabric of the Month collection from Do You EQ.  The collection is Stitchy by Christa Watson for Benartex.  And the file is free!
Stitchy Fabric Download from Do You EQ
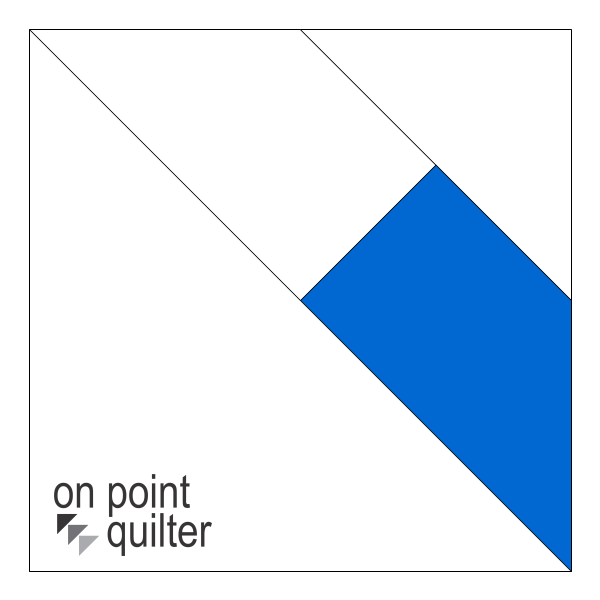
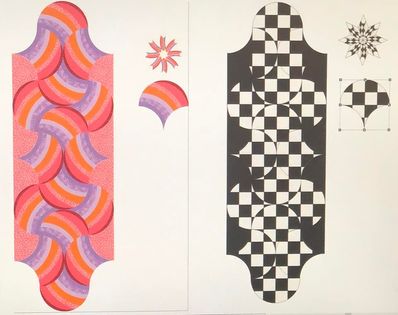
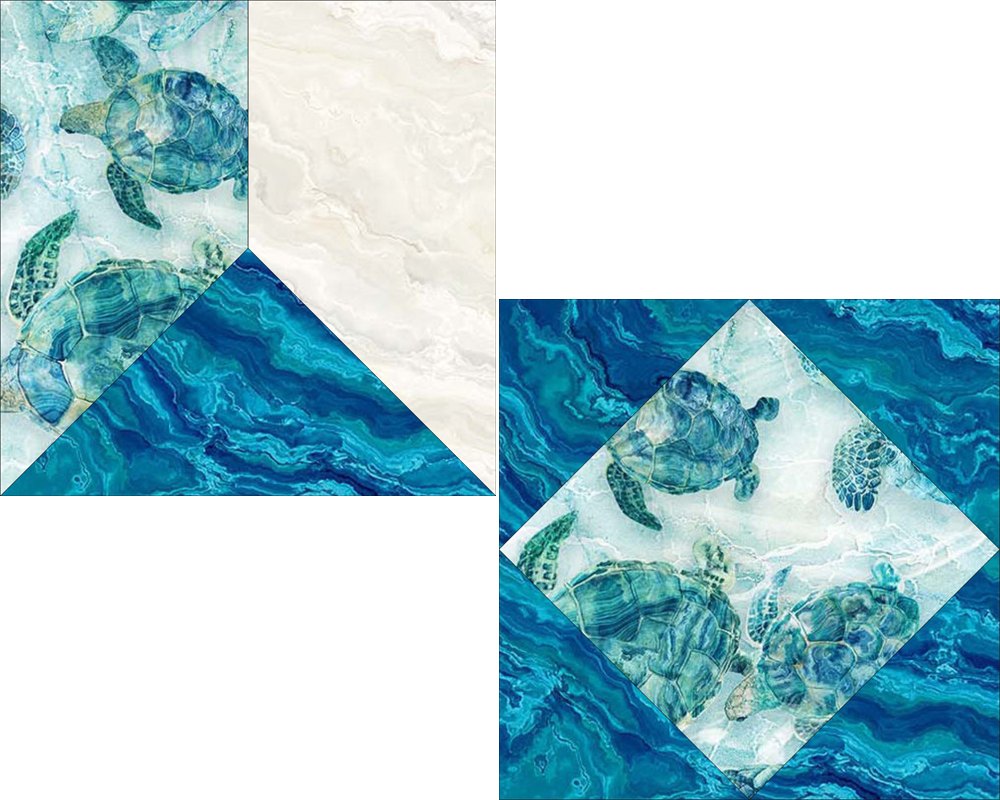
Here are the blocks from the video.  They are super easy to draft in EasyDraw using the Arc tool.  The key is the snap settings in the Precision toolbar and when necessary using the space bar on your keyboard to change the direction of the arc when drawing it.

Hint:  If you release your hold before changing the arc direction, select undo and redraw the arc, making sure to select the space bar, before releasing the mouse at the destination snap location.
Picture
Clamshell Block 1
Picture
Clamshell Block 2
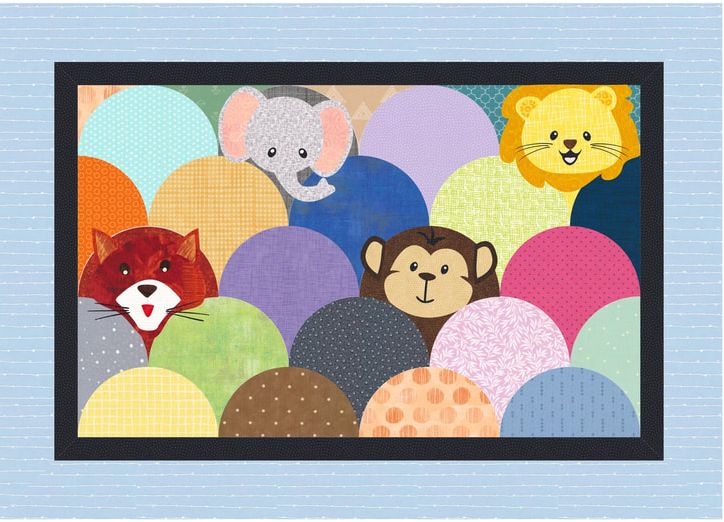
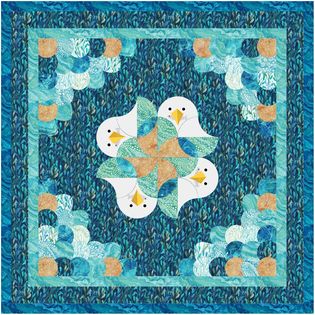
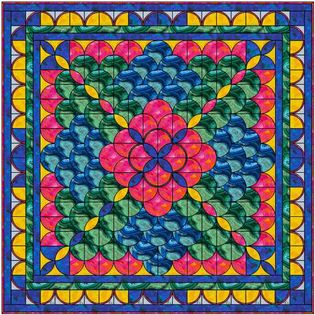
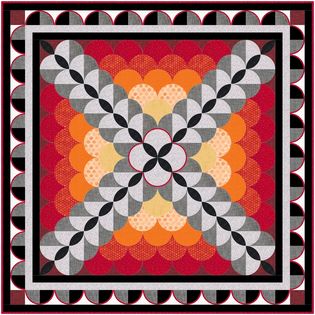
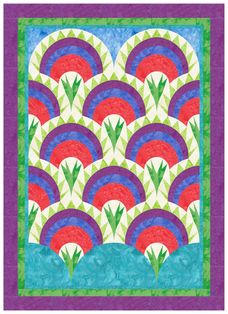
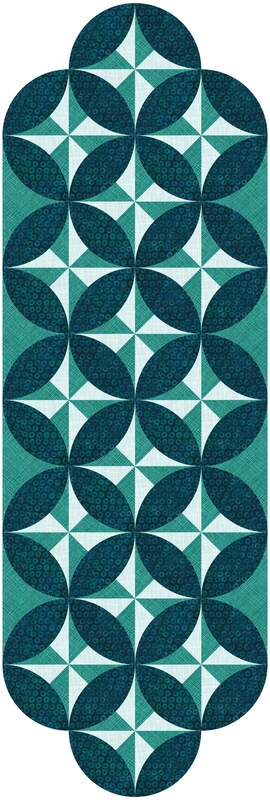
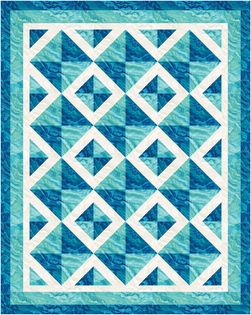
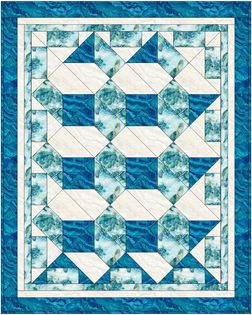
Check out a sample of quilt options from these simple blocks.
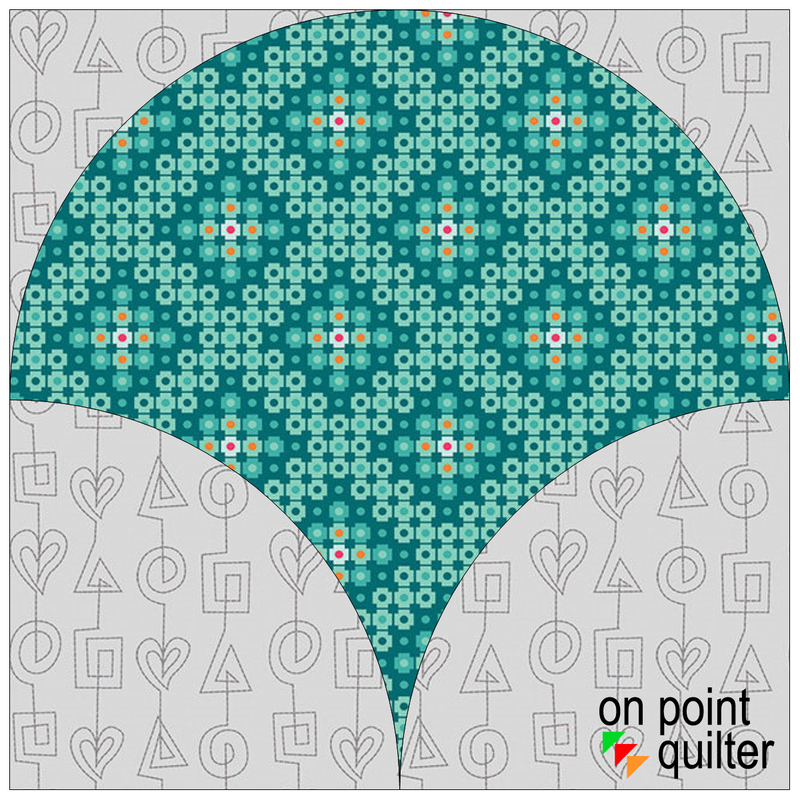
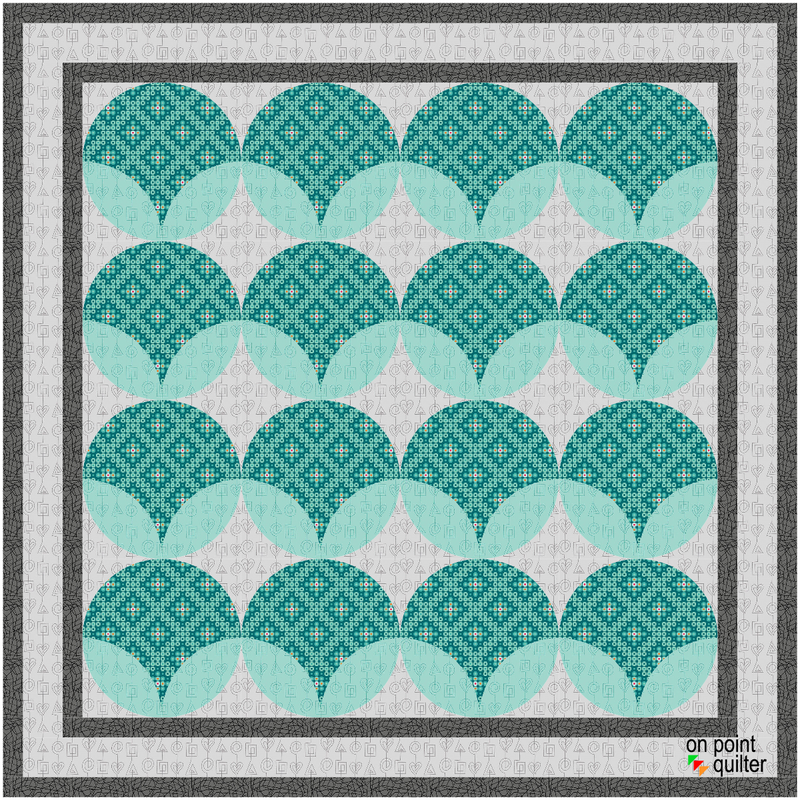
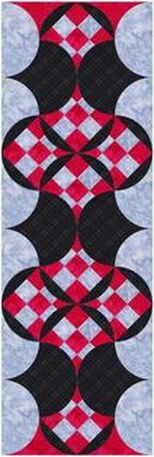
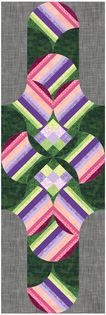
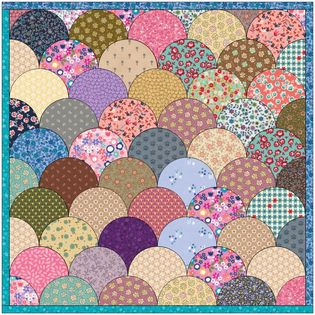
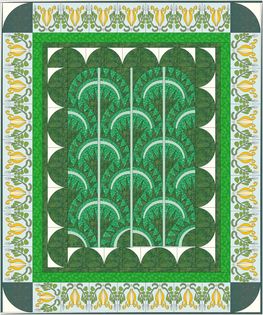
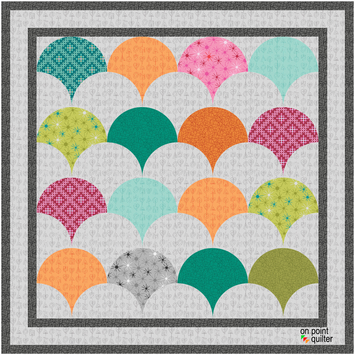
PictureClamshell Quilt 1
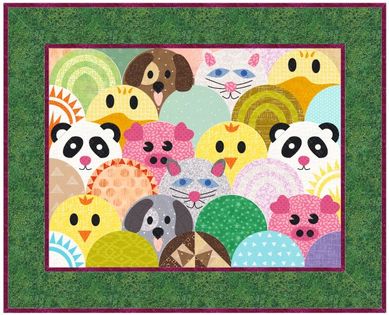
For the first quilt, just color the full clamshells in a variety of fabrics.  I suggest saving before finishing the coloring for the second quilt, as it will make the 3rd quilt much easier to create and color.

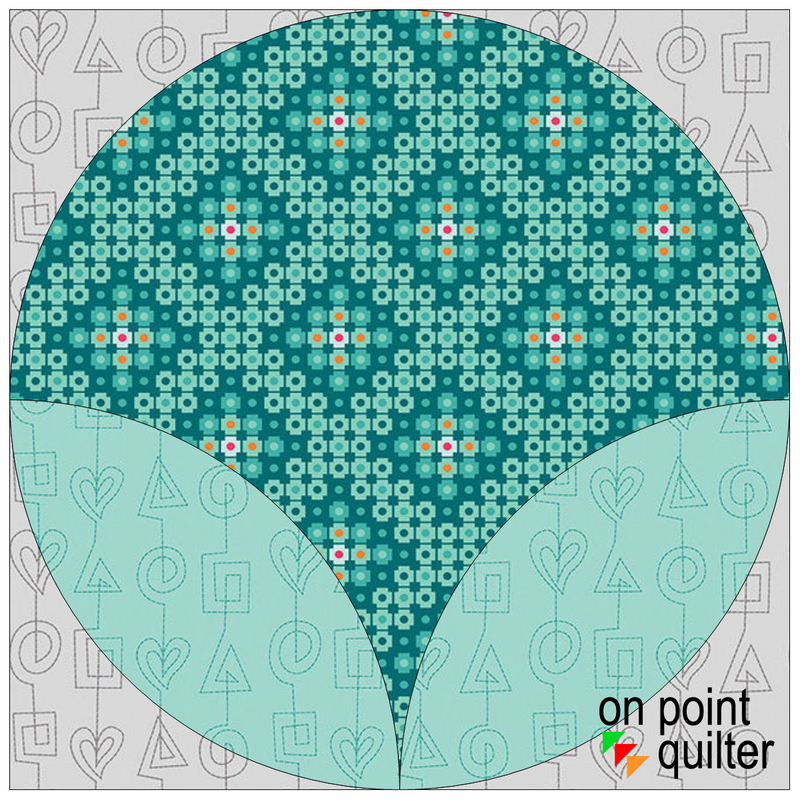
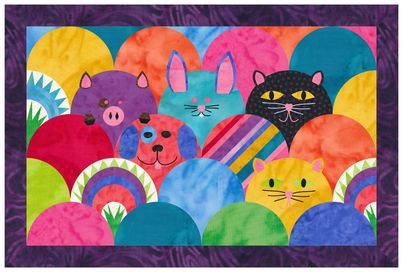
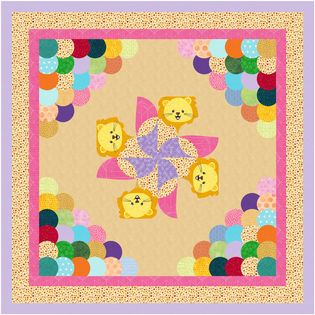
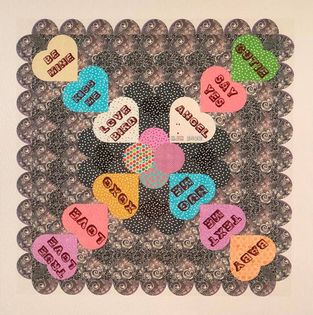
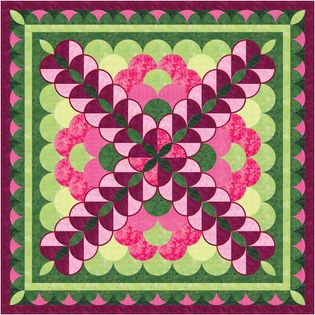
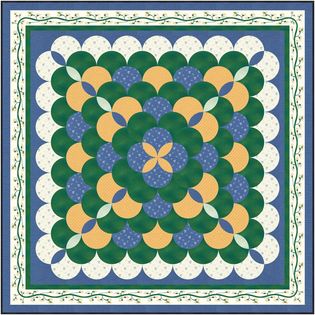
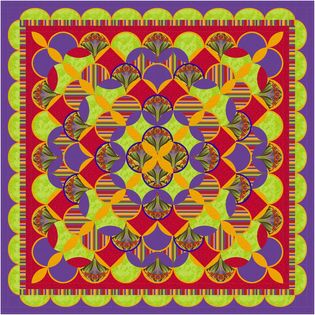
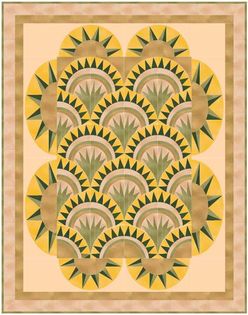
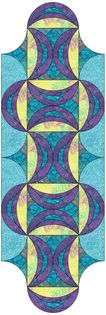
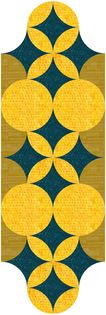
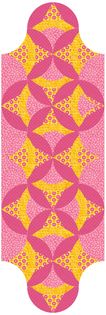
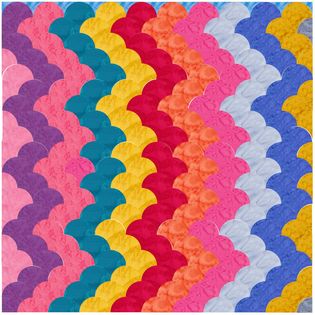
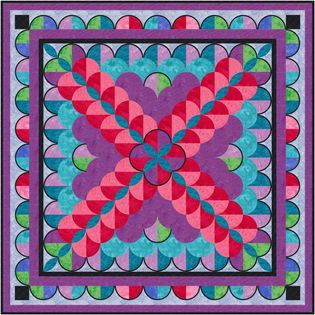
Notice that once you hide the quilt patch lines, you can see the alternate clamshells that appear in every other row.
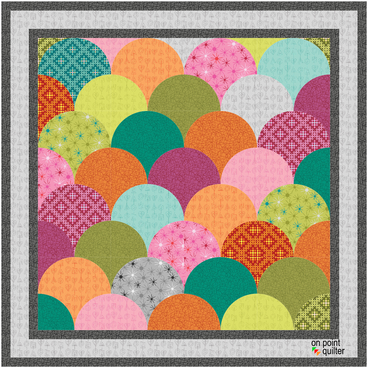
PictureClamshell Quilt 2
To create the illusion of full clamshells in the alternate spaces, make sure to uncheck the boxes to show quilt and block patch lines when exporting the image. 

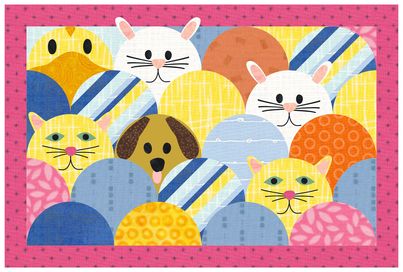
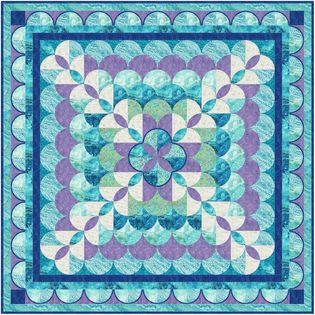
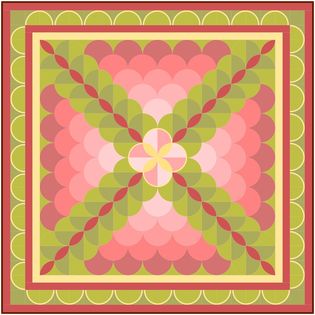
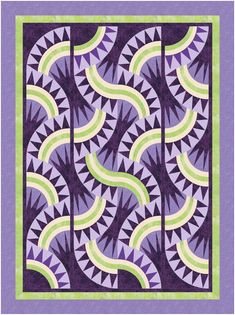
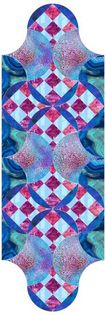
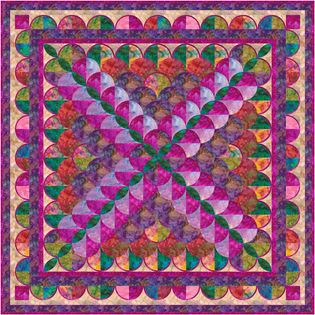
​When piecing this version of the quilt, you will want to use the center template from the block and ignore the corner pieces for those alternate clamshells.  

​You could also alter the basic block to obtain templates for the half blocks at the edges and top and bottom.
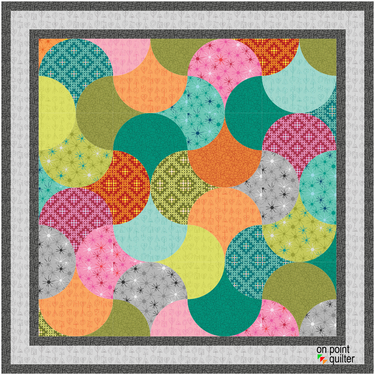
PictureClamshell Quilt 3
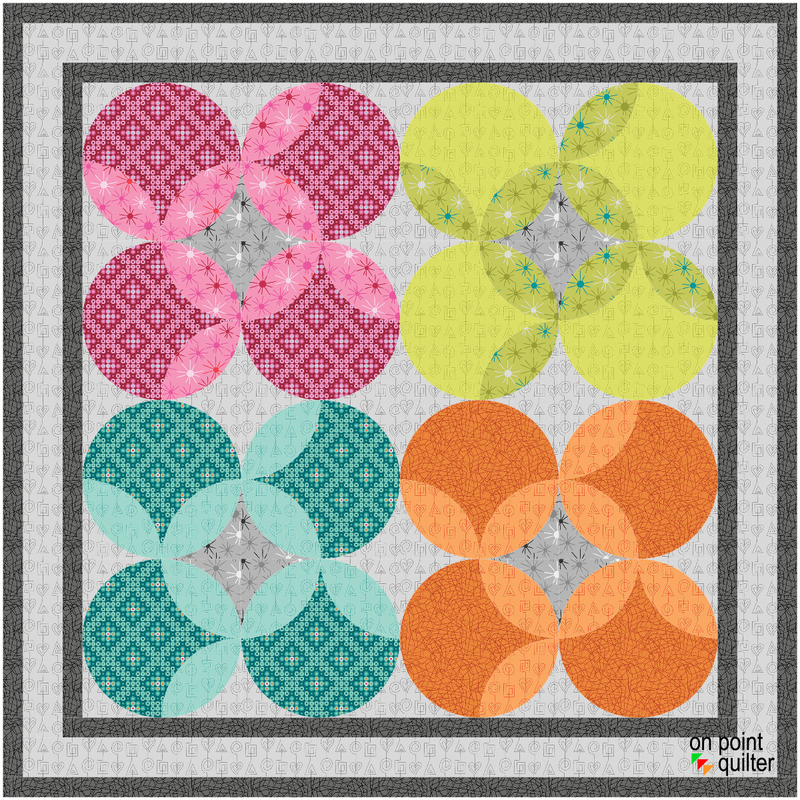
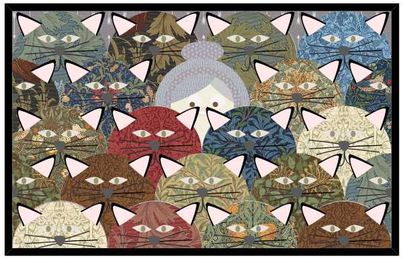
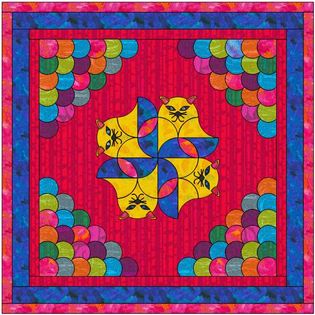
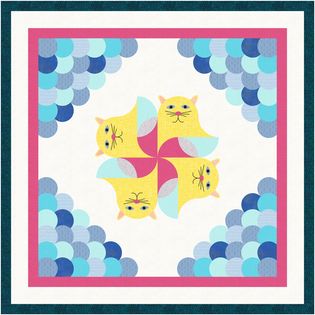
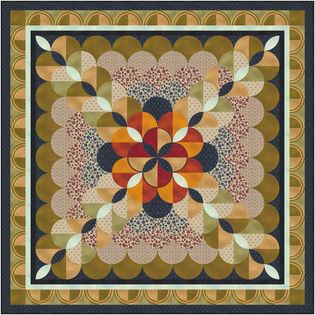
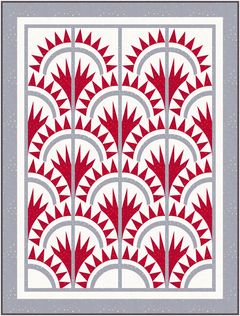
By playing with Symmetry you can create different arrangements of the block.  This particular arrangement also produces full clamshells.  However they are rotated when compared to the Clamshell Quilt 2.

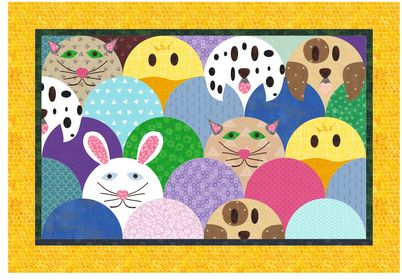
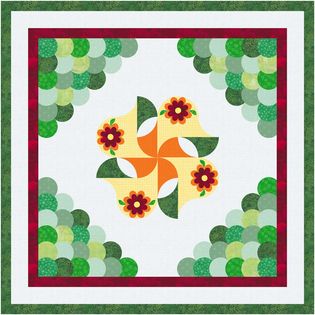
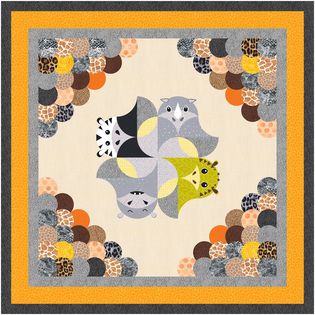
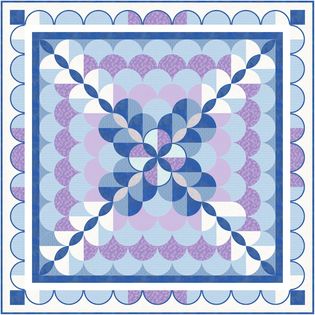
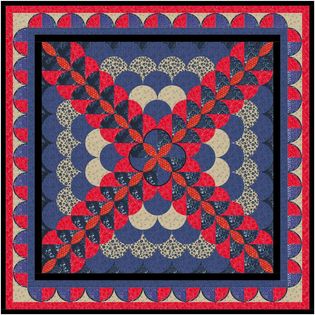
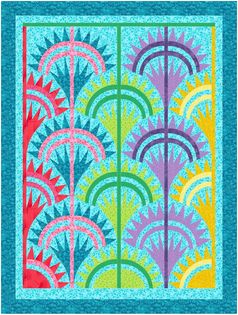
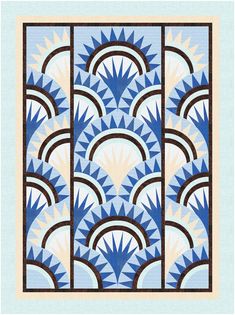
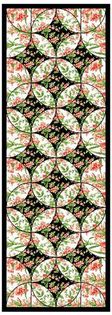
For quilts 4 and 5, I decided to create a block that used a orange peel unit in the alternate spaces.  To achieve that look, add the orange peel to the first block.  This is also a great option for playing with Symmetry in the Quilt worktable.
Picture
Clamshell Quilt 4
Picture
Clamshell Quilt 5
I am looking forward to seeing what you create with these two clamshell blocks.  There are so many more options that what I presented.
Learning EQ Facebook Post for Clamshell Quilts

But Wait -- There's More

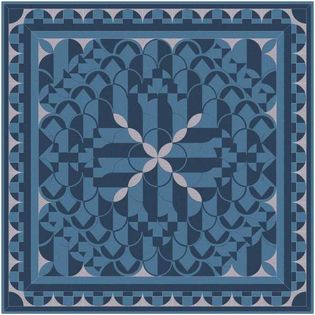
In Tech Know Quilters I cover a number of different ways to create and work with clamshells in your quilts.
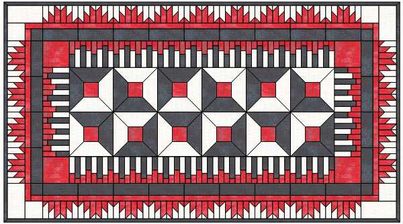
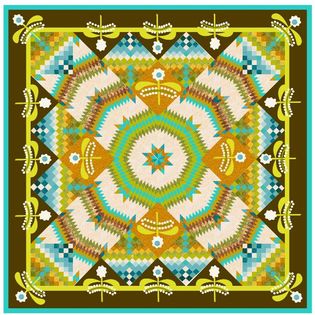
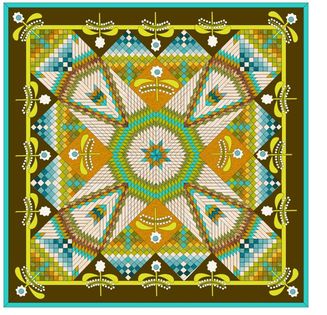
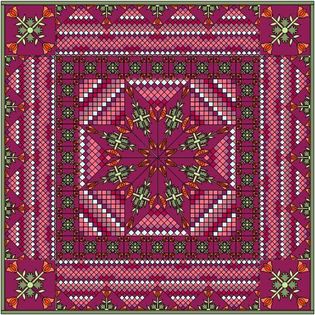
In the Tech Know Quilters Membership program, we first touch on creating clamshell blocks during the Mix and Match Medallion Borders class.  The clamshell border I included in the class was inspired by a number of medallion quilts I saw during Quilt Market in Houston many years ago.  One of the tricky parts in using a clamshell border in a rectangular quilt design is the potential need to include an inner borders to ensure the clamshell size stays the same on all four sides.

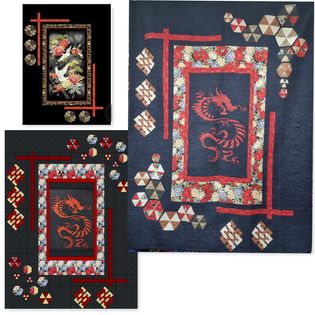
Here are a few examples of these clamshell borders from class participants.
Picture
Sara Edmonds Byman
Picture
Donna Harris
Picture
Nanne Panne
Picture
Shawn Spjut
After some encouragement from Tech Know Quilter Master's members,   I decided to create an entire class for them on clamshell quilts.  Tech Know Quilters members are eligible for the Masters program after completing 12 months of Tech Know Quilter classes.  Masters members receive fewer lessons each month, with more time to devote to their own projects and challenges.

​
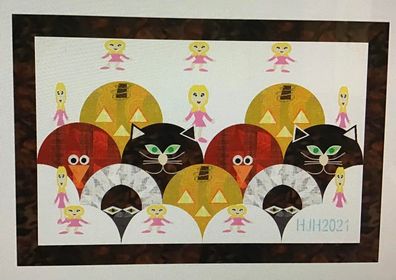
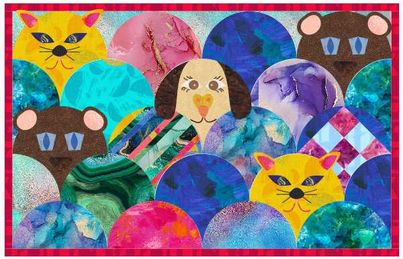
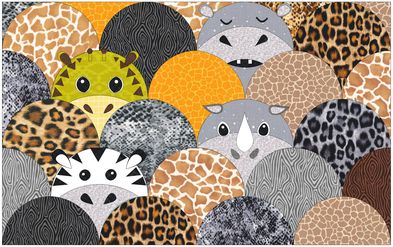
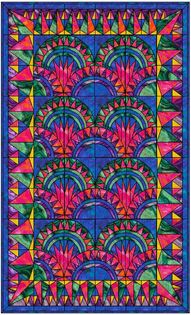
The group got very creative in applying the concepts from the class as you can see by the photos below.  They found it so much fun to move beyond traditional clamshell quilts.

And can I share a secret?  None of the clamshells in these quilts are EasyDraw blocks.
Picture
Mary Groesbeck
Picture
Holly Wilson
Picture
Helen Hicks
Picture
Pat Harkins
Picture
Linda Carlson
Picture
Edith Craig
Picture
Patricia Hansen
Picture
Becky Lees Belsaas
Picture
Lynne Maramieri
Picture
Julie Pedersen
Picture
Wanda Smith Hizer
Picture
Dorothee Ilgner
Picture
Edith Craig
Picture
Patricia Hansen
Picture
Helen Hicks
Picture
Beckie Lees Belsaas
Picture
Linda Carlson
Picture
Lynne Maramieri
Picture
Pat Harkins
Picture
Wanda Smith
Picture
Curryanne Hostetler
Picture
Julie Pedersen
Picture
Mary Groesbeck
Picture
Linda Carlson
Picture
Helen Hicks
Picture
Lisa Walker Wallace
Picture
Wanda Smith Hizer
Picture
Patricia Hansen
Picture
Pat Harkins
Picture
Kristy Goodin Soard
Picture
Holly Wilson
Picture
Edith Craig
Picture
Curryanne Hostetler
Picture
Curryanne Hostetler
Picture
Helen Hicks
Picture
Joyce Drenth
Picture
Julie Pedersen
Picture
Beckie Lees Belsaas
Picture
Nancy Messuri
Picture
Lisa Walker Wallace
Picture
Julie Pedersen
Picture
Curryanne Hostetler
Picture
Pat Harkins
Picture
Pat Harkins
Picture
Julie Pedersen
Picture
Lisa Walker Wallace
Picture
Linda Carlson
Picture
Irene Floyd
Picture
Edith Craig
Picture
Nancy Messuri
Picture
Holly Wilson
Picture
Curryanne Hostetler
Picture
Lynne Maramieri
Picture
Pat Harkins
Picture
Brigitte Lee
Picture
Helen Hicks
Picture
Brigitte Lee
Picture
Julie Pedersen
Picture
Dorothee Ilgner
Picture
Irene Floyd
Drop me a noteif you have completed over 12 months of Tech Know Quilters and are interested in learning more about the Masters program.
You can learn more about the regular Tech Know Quilters membership program and sign up for the wait list for the next open enrollment period here.
Picture
Happy quilting.

​Kari
​

Join the On Point Quilter weekly newsletter and receive regular tips and inspiration on using Electric Quilt 8 along with the  Free 12 Top Tips for EQ8 video guide.
Picture

Three Yard Quilts

7/16/2022


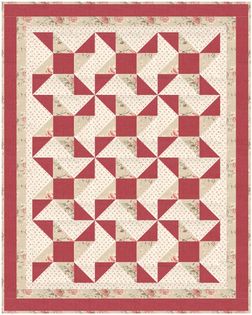
Drafting a Three Yard Quilt Using EQ8

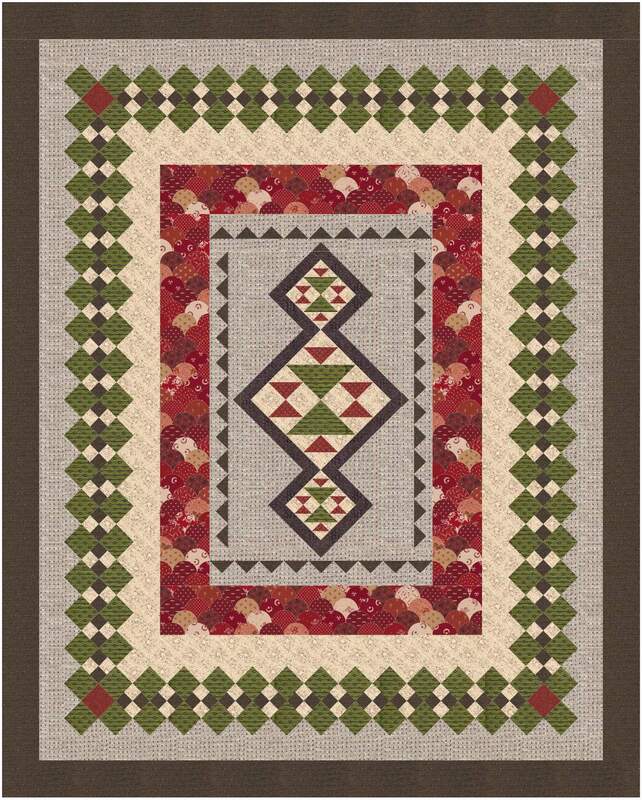
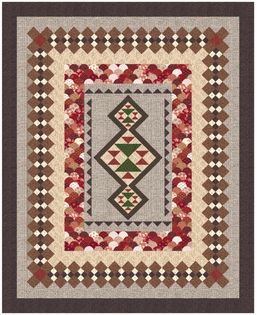
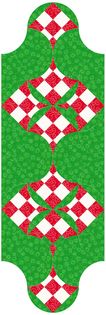
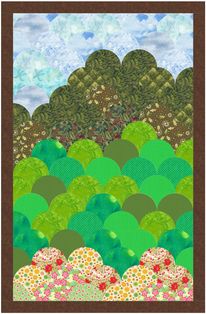
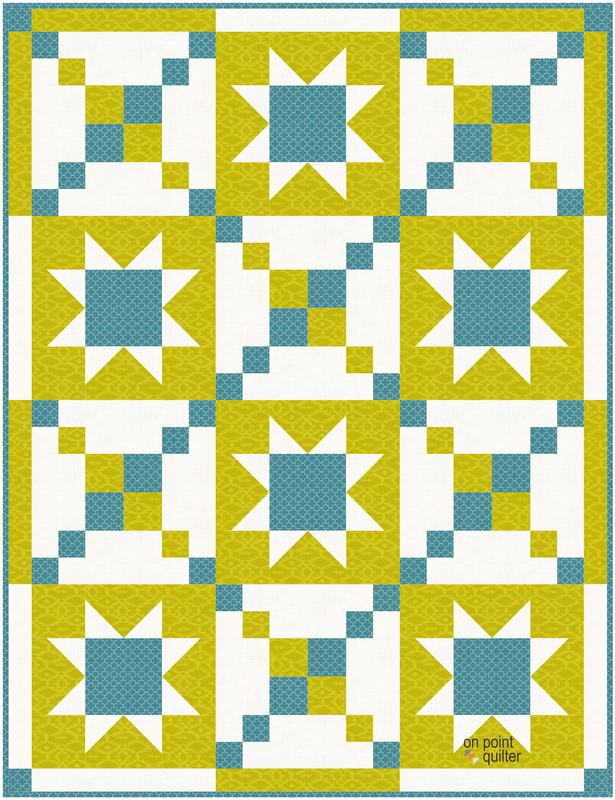
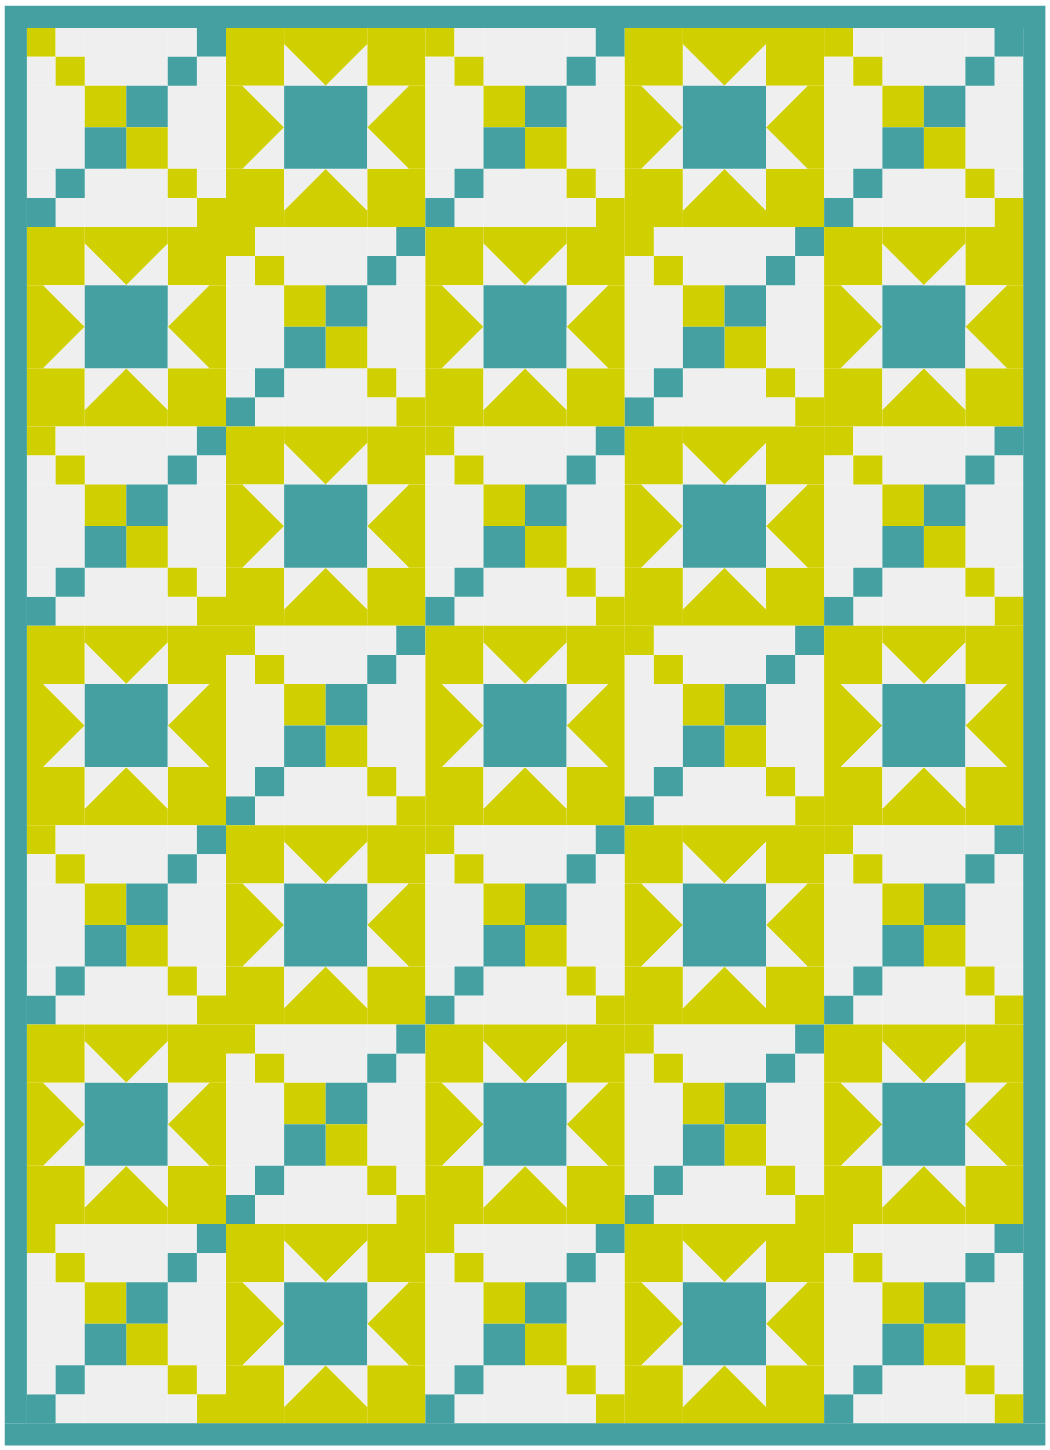
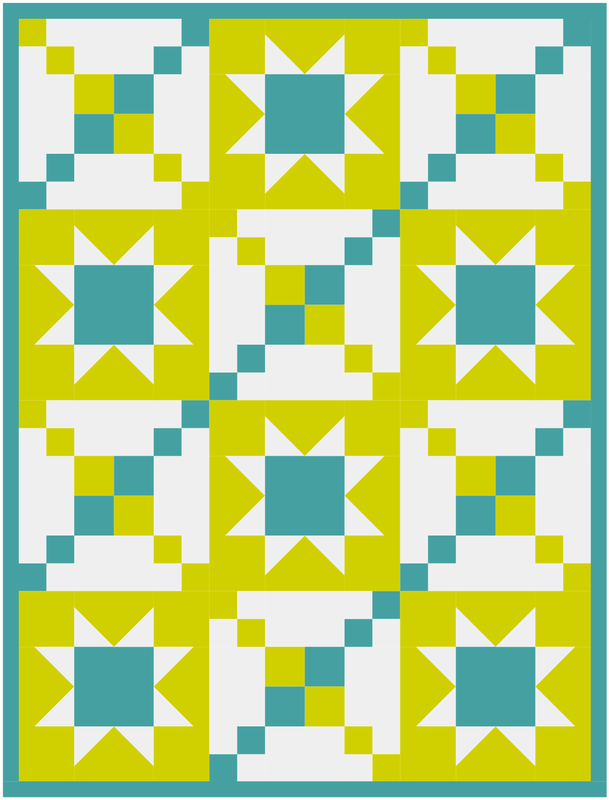
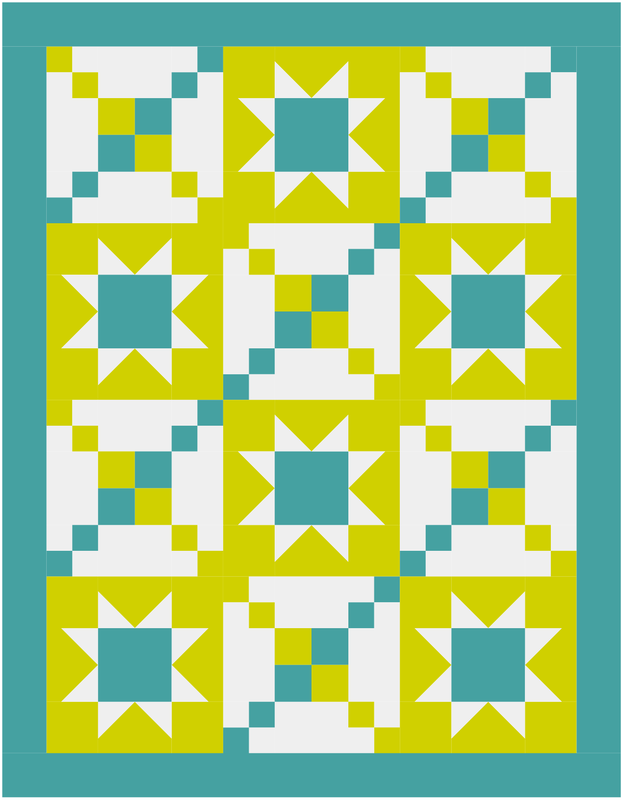
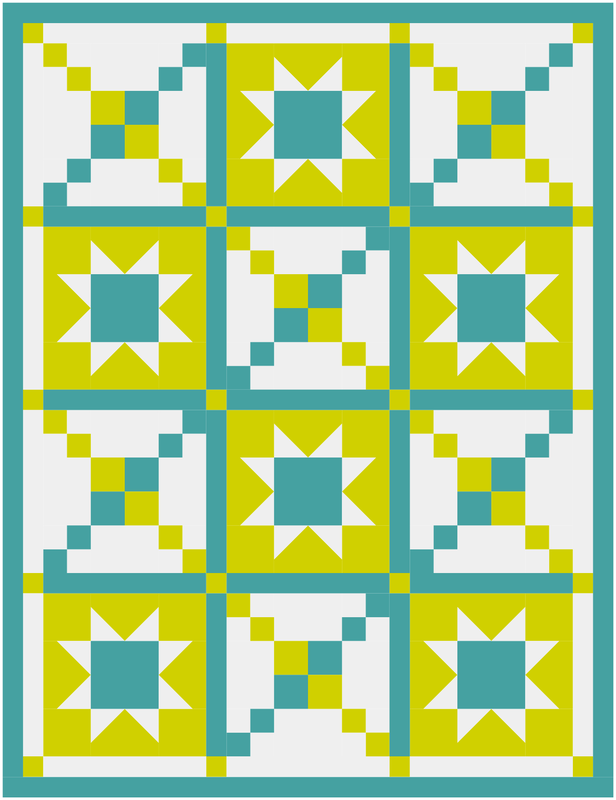
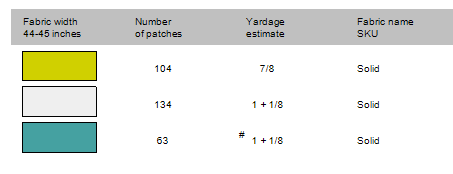
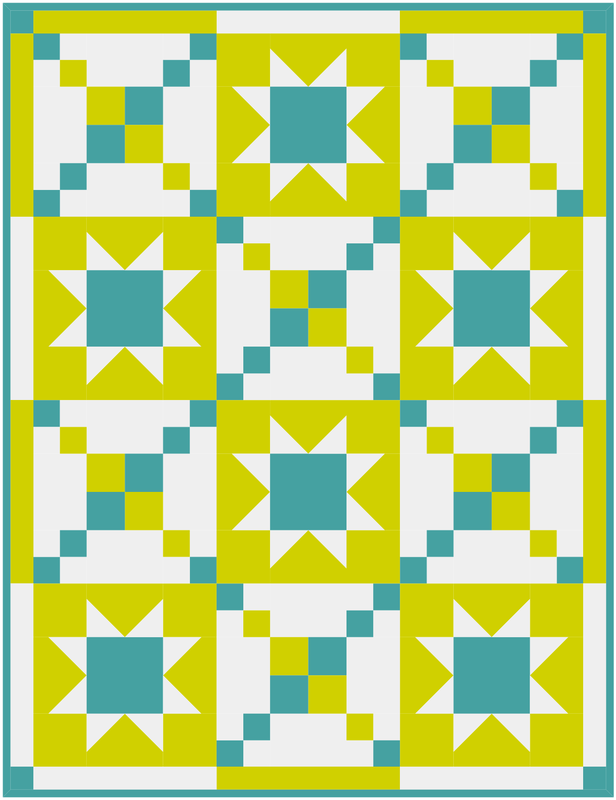
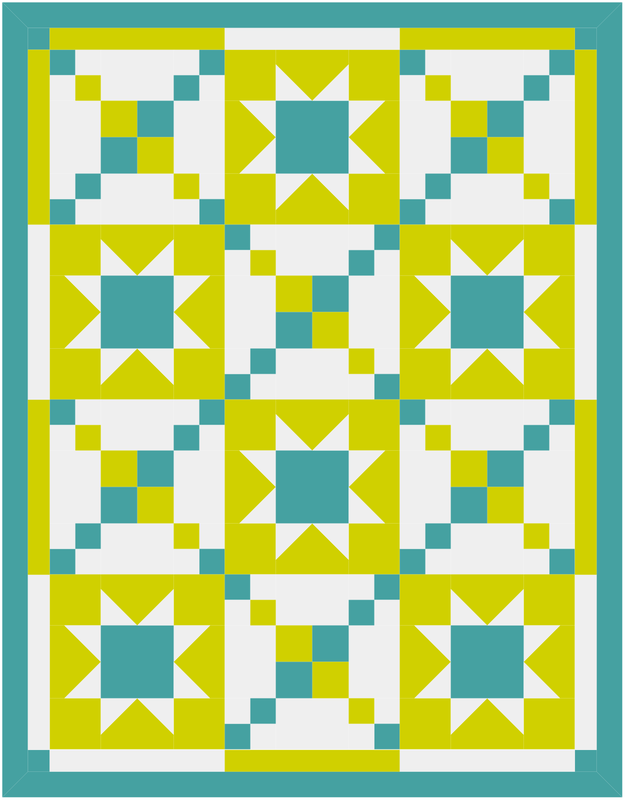
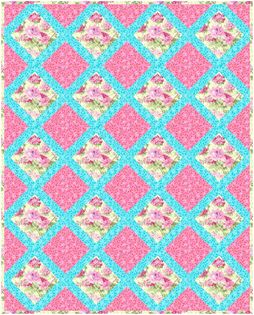
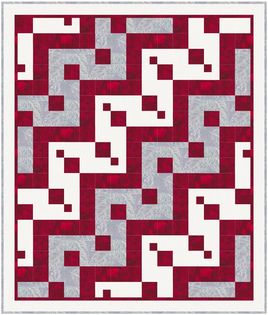
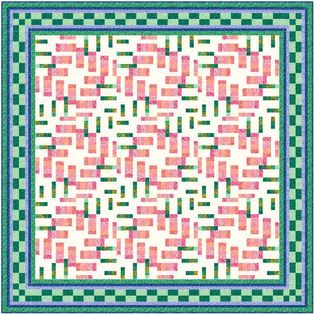
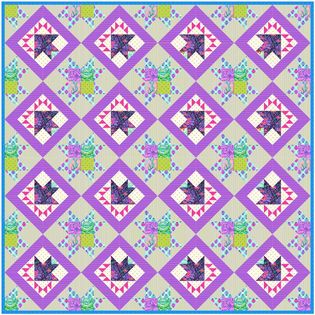
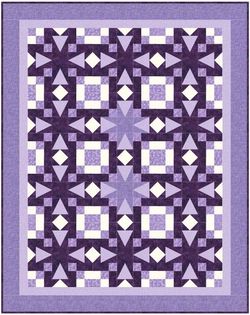
Do you need a quick and easy quilt?  This quilt designed in EQ8 can be pieced with three one yard cuts of fabrics.  The yardage even includes the binding.  

The quilt finishes 40" x 52" -- which is the perfect size for a quilt for a baby or a young toddler.  Or even a lap quilt.
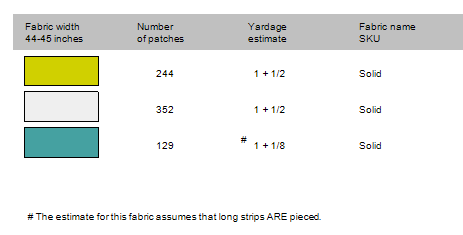
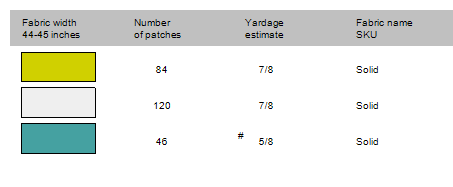
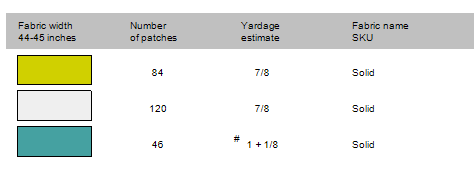
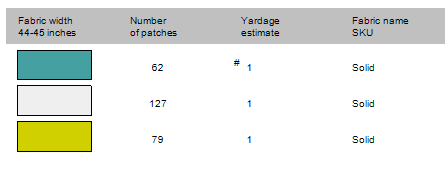
Did you like my technique to make sure we had sufficient yardage for the binding for the quilt?  Just subtract 1/2 inch from the cut size of your favorite binding.

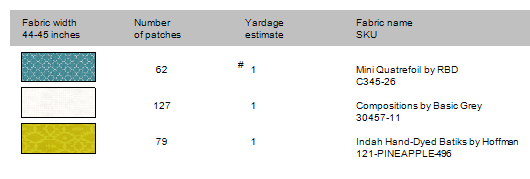
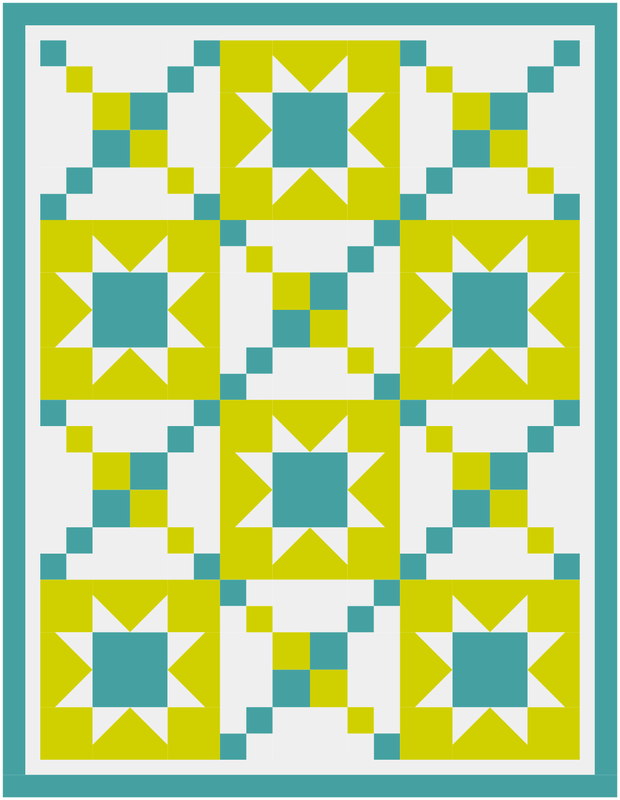
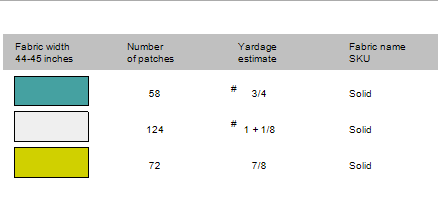
​Here is the quilt from the video, along with the yardage chart (from the version with the adjusted binding).
Picture
Picture
I would love to see what fabrics you choose to use with your 3 yard quilt.  Of course you could also swap out the blocks.  Just double check to make sure your quilt can still be pieced with three one yard cuts of fabric.

​Feel free to post pictures of your design on Facebook in the Learning EQ Facebook group.
3 Yard Quilt Learning EQ Facebook Post

Three Yard Quilt Design Process

When I share my how-to videos, I typically have already designed my blocks and quilts and am sharing with you how to recreate my project.  Just like I did in the above video.

​I though I would also share with you my design process.  This particular project had an added challenge in that I wanted my quilt to be able to be pieced with only 3 yards of fabric.
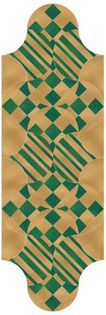
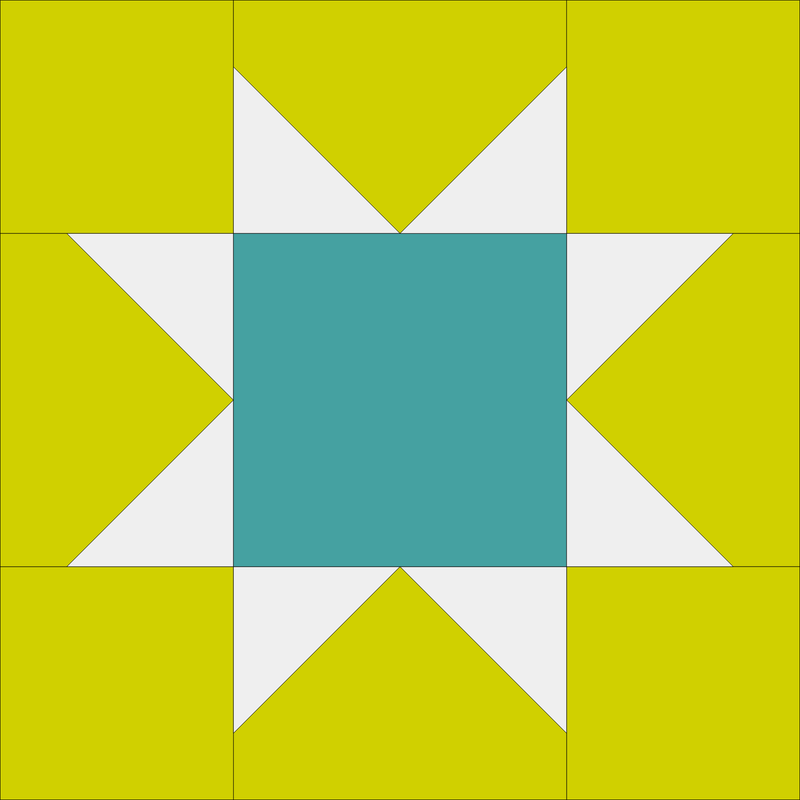
To get started, I found two blocks that I wanted to include in my 3-yard quilt.
Picture
LeMoyne Frayed Chain from EQ8 Block Library 01 Classic Pieced>Chains
Picture
Drafted variable star block variation
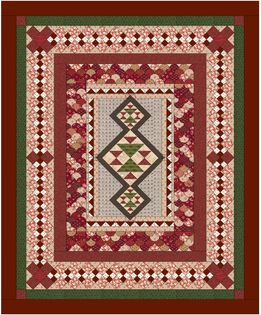
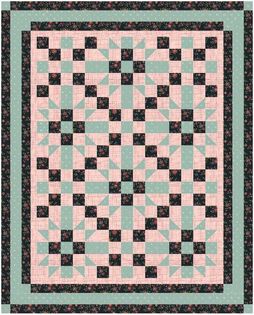
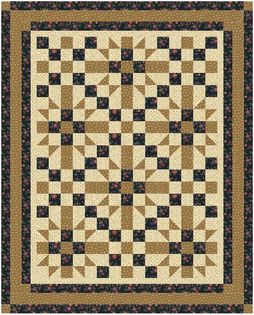
After deciding on my blocks, I started playing with the different setting options.

Option #1

Picture
I started by setting 9 inch blocks in a 5 x 7 horizontal layout.  Included a 1 inch horizontal border.

​Then ran a yardage chart and to see how much yardage was required.
Picture
Obviously -- too much.

Option #2

Picture
Changed to a 3 x 4 layout with a block size of 12".
Picture
Now -- too little.

Option #3

Picture
Changed the border to 3 inches
Picture

Option #4

Picture
Experimented with sashing (1-1/2") and adjusted the border to 1-1/2" for consistency.
Picture

Option #5

Picture
Took out the sashing.  Recolored a couple of squares in the chain block and added an inner border or 1".  
Picture

Option #6

Picture
Changed the inner border to 1-1/2" pieced (using the blocks option) and the outer border to binding (1/2").
Picture
I liked the look of this quilt -- but wanted to understand the impact of cutting 2-1/4" binding strips.

Option #7

Picture
I typically cut my binding strips 2-1/4".  In order to know the correct yardage for my binding, I adjusted the binding to 1-3/4".  With seam allowances that would be 2-1/4".
Picture
Success!
​

TKQ Masters 3 Yard Quilt Challenge Show

Tech Know Quilters members are eligible for the Masters program after completing 12 months of Tech Know Quilter classes.  Masters members receive fewer lessons each month, with more time to devote to their own projects and challenges.

During May Tech Know Quilters Masters members were challenged to create their own quilt that could be pieced with three one yard pieces of fabrics.


​I am so impressed with their designs.   I think you will agree that they are incredibly talented.
Picture
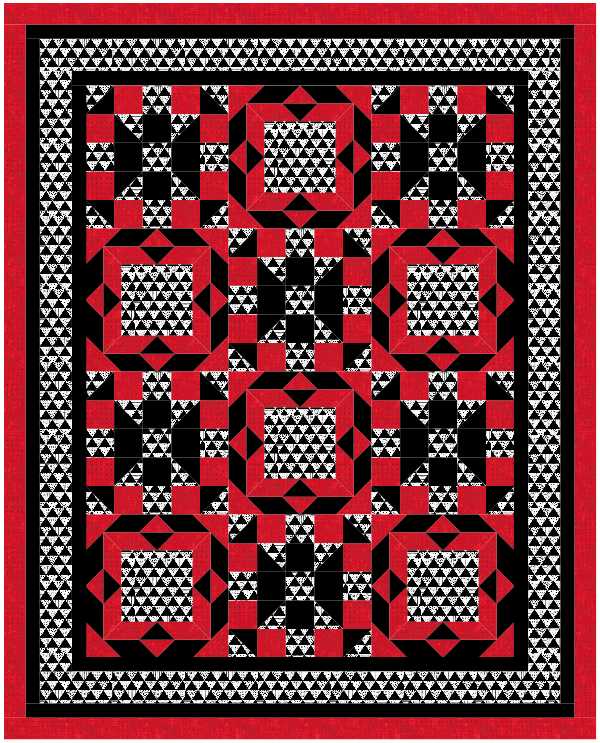
Mary Groesbeck  If I understand this week's challenge correctly...well...I feel like I'm cheating on this one. I love to buy "Yard Trios" from Pineapple Fabrics (3 1-yard matching fabrics). So I design these all the time. I sometimes add a solid (and sometimes they send me a free yard as a gift that I save to add to these kinds of things). I'm even in their Yard Trio Club, where they send me a mystery yard trio every month and I challenge myself to make something with it before the end of the month. Most of them don't have borders, so there are more blocks. 
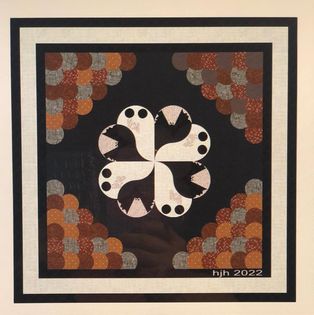
Picture
Rhonda Goss
Picture
Lynne Maramieri
Picture
Curryanne Hostetler Color 1
Picture
Curryanne Hostetler Color 2
Picture
Edith Craig
Picture
Julie Pedersen
Picture
Linda Carlson
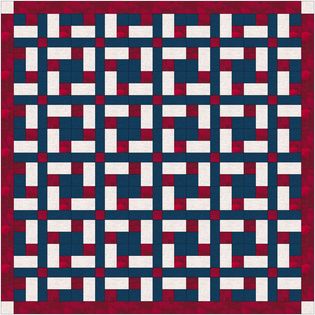
​My 3 yard challenge quilt, that's actually (3) different 3/4 yard pieces. It's my block featured on the back cover of the 3rd edition of B. Brackman's Encyclopedia of Pieced Quilt Patterns, #1408, traditionally named The Bat. The block is a 4 patch, hence the 2 row look even though the layout was 3 wide X 1 height.

Picture
Debbi Treusch I made this quilt for my 2 grandsons for Christmas. a few modifications to the blocks and fabrics turned it into a 3 yard quilt.
Picture
Lisa Walker Wallace
Picture
Patricia Hansen
Picture
Patricia Hansen Blocks
Picture
Dorothy Ilgner
Picture
Dorothee Ilgner
Picture
Dorothee Ilgner
Picture
Fran Heisey
You can learn more about Tech Know Quilters and sign up for the wait list for the next open enrollment period here.
Picture
Happy quilting.

​Kari
​

Join the On Point Quilter weekly newsletter and receive regular tips and inspiration on using Electric Quilt 8 along with the  Free 12 Top Tips for EQ8 video guide.
Picture

Modern Stars and Stripes Variations

7/8/2022

 
RIP Stars and Stripes Quilt  

Last week I shared how to create a Modern Stars and Stripes quilt using custom set.  Since it was Independence Day weekend, my quilt had a very patriotic look to it.
Picture
Watch the original stars and stripes quilt tutorial here.
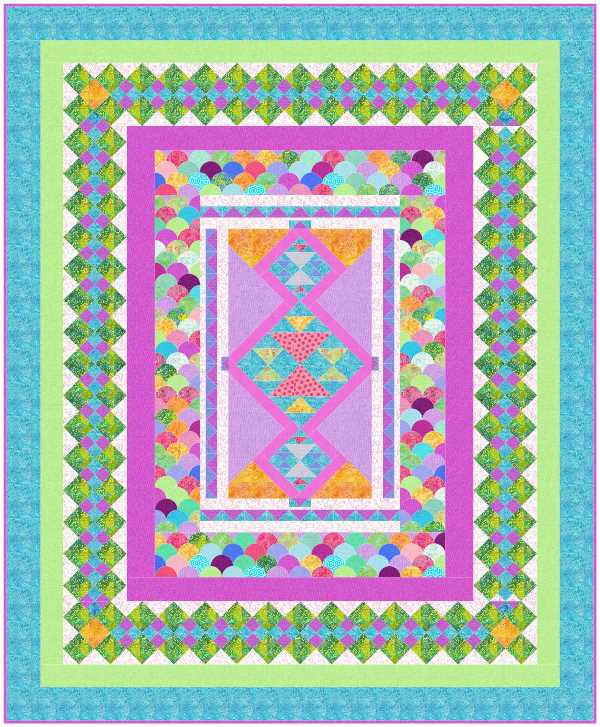
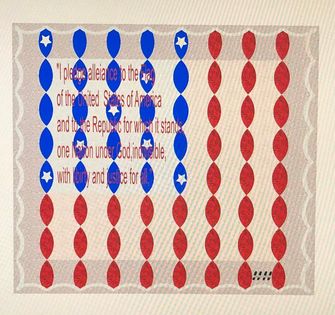
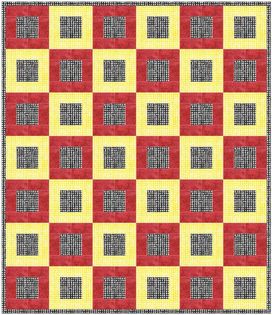
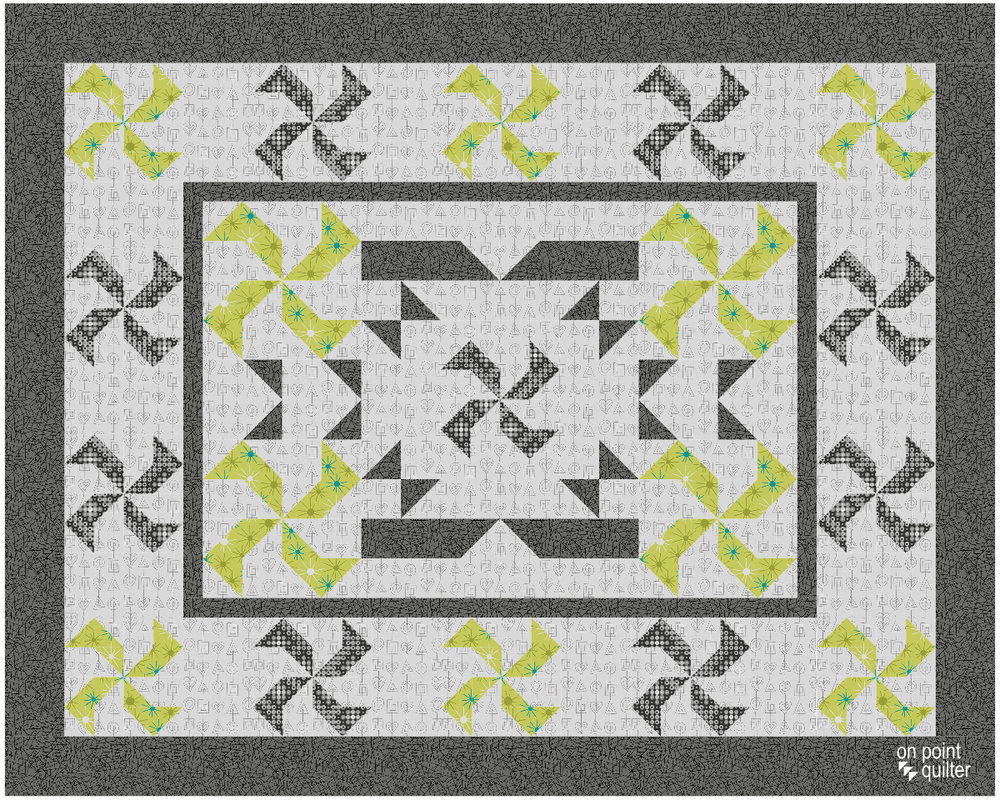
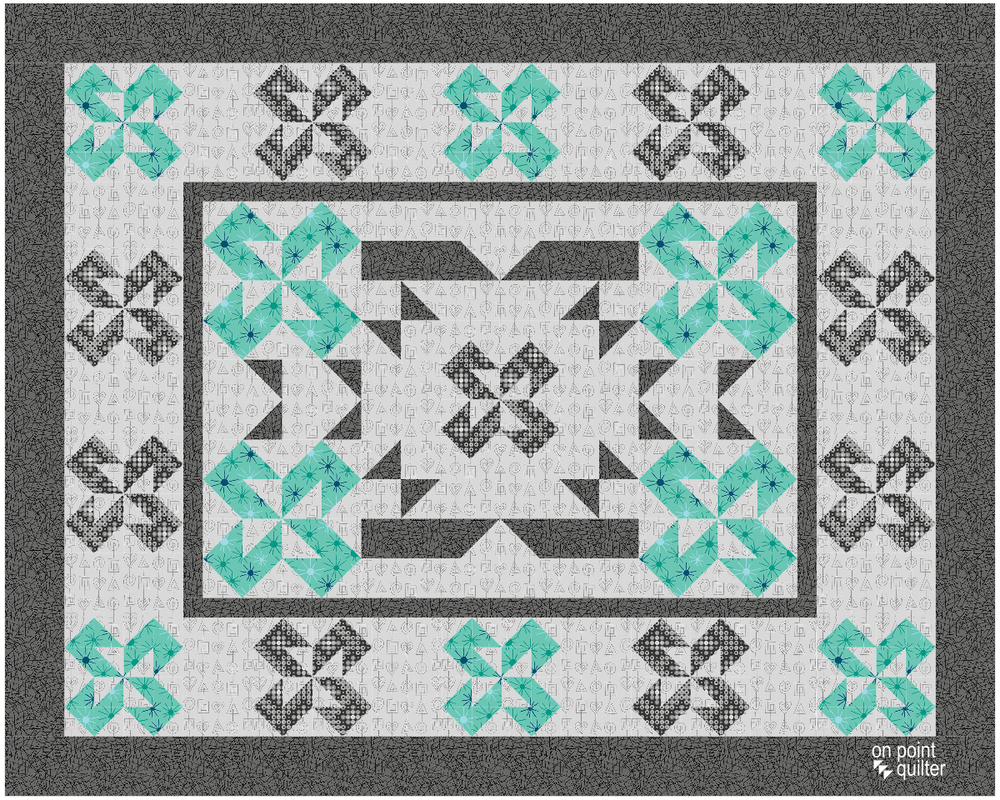
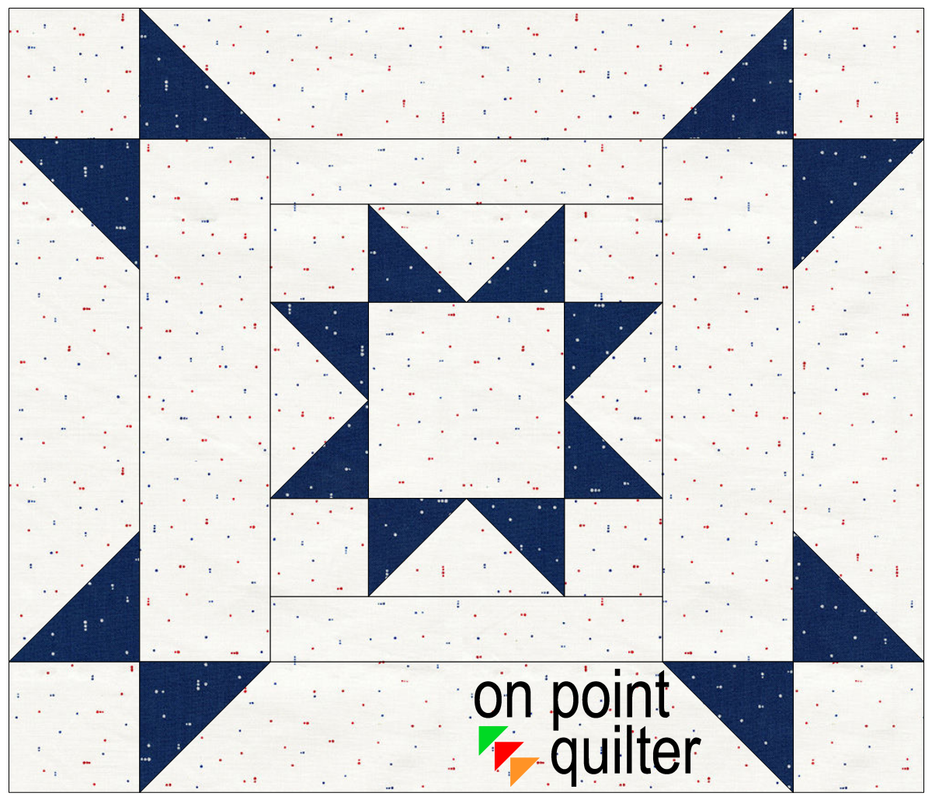
This week, I decided to focus on using the same layout -- but eliminate the stars and stripes.  For this tutorial, you will definitely want to start by watching the one from last week as you will need the layout and blocks as a starting point.

This time I chose to use a different fabric collection along with a couple of different four patch blocks.

The fabric collection I chose to work with was Stitchy.  The Benartex collection was designed by Christa Watson and has a very modern feel to it.  It is the free fabric download from Electric Quilt for July 2022.  You can access and download the free collection here.
Shop ElectricQuilt.com
Affiliate link for BB+
Incorporating Block Base+
In the video, you will note that the new blocks I used came from Block Base+.  I loved selecting from Block Base+ as they have a huge collection of four patch blocks -- most of which would work well in this layout.
Click here for a blog post review/tutorial  of Block Base +.
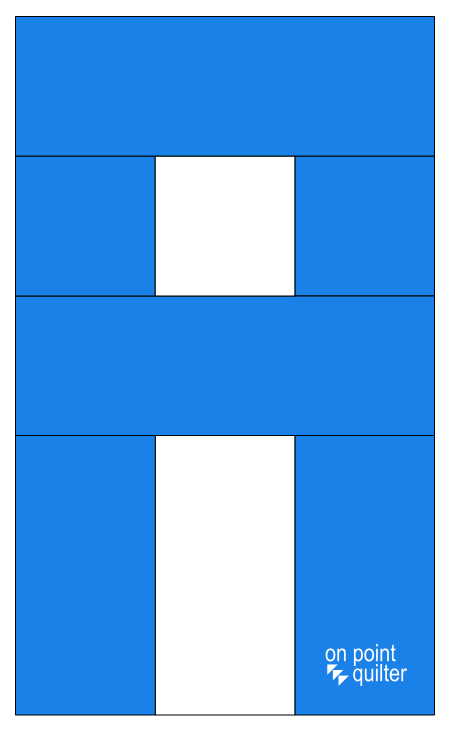
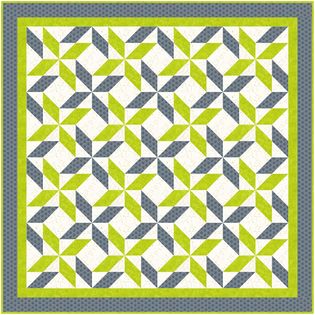
Here are the quilts from the video.  
Picture
Modern Stars and Stripes Variation 1 by Kari Schell
Picture
Modern Stars and Stripes Variation 2 by Kari Schell
I would love to see your variations of the Modern Stars and Stripes quilt.  Please feel free to share you variations in the Learning EQ Facebook group.

Tech Know Quilters Virtual Quilt Show

One thing I hear over and over again is -- I didn't know you could do "that" using Electric Quilt 8.  I have found that the main thing that holds us back from truly using Electric Quilt 8 is just not understanding that this versatile software can help you create any type of quilt.  I think you will be inspired by the quilts created by Tech Know Quilter members using Electric Quilt 8.
​
​
Tech Know Quilters is a membership program focused on mastery of EQ8.  We have members at all stages of their Electric Quilt journey.  

If you would like to join this amazing group of quilters, you can sign up for the wait list here.  

​Here are the quilts submitted in the last  "apply what you learned" challenge.
Picture
Curryanne Hostetler My favorite from the clamshells class.
Picture
Curryanne Hostetler While this one isn't clamshell, I am working on this one for may Granddaughter. The Middle Pink square my daughter using her Cricut to create a pin cupcake with Megan's name... Megan loves cupcakes and she is 4 in July
Picture
Lee Wiencki A modern bargello with a twist.
Picture
Kristy Goodin Soard Clamshell Rose
Picture
Summer Blog Quilt
Picture
Rhonda Goss I am in the Masters clamshells class. I don't know if I would make this quilt but it intrigues me.
Picture
Julie Pedersen I am in the Masters Clamshell class. This is from the last lesson of the month. I have learned so much. I love how you can take the same pattern and make it look so different with just color choices.
Picture
Julie Pedersen and colorway 2
Picture
Terry McCaskey Each TKQ class gives me the opportunity to play with design. Here is the final one from today.
Picture
Terry McCaskey I loved the Bargello class...lots of "favorites"...but will post this one which reminds me of southwestern bead work...
Picture
Lee Wiencki A bargello with applique.
Picture
Linda Carlson My Masters Clamshell challenge utilizes blocks I made during the lessons then put into a rectangular setting with an added auto border. It was a great class and I hope I retain how to make Easy Draw blocks into appliqué' motifs without background corners. Thanks Kari!
Picture
Lynne Maramieri I am having so much fun playing with colours on this Star Border quilt!
Picture
Brigitte Lee It's constant learning. This quilt is a result of many lessons. The top left is the inspirational quilt below the EQ8 version and the final hand-quilted quilt.
Picture
Joyce Drenth I enjoyed the final quilt created in the clamshell class.
Picture
Nancy Kiley I was part of the Intro to Easy Draw TKQ May class. I used Shrink/Flip and Frame Block to create my own block and then used Tula Pink Tiny Beasts fabric collection to color it. Had fun with the purple/pink and grey/yellow striped fabrics!
Picture
Dotty Smalley I am in the Clamshell class. This is my favorite design from this class. I may have to make it!☺
Picture
Zdenka Nemethová I am quite behind with my classes as I am now busy at work so didn't do any lesson in May. BUT couldn't resist to make a variation to Kari's tutorial Here Comes the Sun.
Picture
Shawn Spjut This quilt is from Medallion Borders. Since math isn't my strong suite, the math portion was a challenge. This is my most successful one. Still working on the others.
Picture
Edith Craig My basic class this month was Advanced Borders. Here is one that I designed using some of the techniques we worked with in class. Using multiple borders made this layout more interesting.
Picture
Edith Craig The Master's Class for this month was Clamshells. This was my favorite project from this class.
Picture
Dorothee Ilgner In May the Master's Class was about Clamshells. We learned how to transform an easydraw block into an applique shape and I experimented with tessilations. For this puzzle quilt I imported one of my fotos and added it as fabric.
Picture
Moira Hewitt I enjoyed speciality rulers class this month, I have drawn the pieces for most of my fabric dies. This is my favorite quilt.
Picture
Patricia Hansen I was in the clamshell class and just loved the animal lesson. My housemate, who just returned from a trip to the arctic, thought it was one of the cutest quilts she had ever seen.
Picture
Fran Heisey For some time I have been intrigued by ceramic tile patterns. The Masters Clamshell lessons that I took this month have shown me how to draft these shapes and how to place them in a quilt. The ogee patch in this quilt was inspired by a tile pattern. I did not realize until I watched the Masters help session that an ogee can be composed of 4 clamshells; although I think that is the more difficult way to draft an ogee. I have cheated a bit in drafting the quilt. The colored waves are formed by diagonal stripes in a block on Layer 1 peeping between the ogee patches on Layer 2. The help session also inspired me to consider how I would actually construct this quilt. I think that I would raw edge applique the ogee patches onto a striped block – so maybe I didn’t cheat.

TKQ Monthly Class Options

Tech Know Quilter members can choose from 29 different monthly classes.

Often members will start at the beginning to ensure they have the basics down and then pick and choose based on their quilting interests.  
Month 1:  Working with Fabric Collections
Month 2 (option 1):  Introduction to EasyDraw
Month 2 (option 2):  EasyDraw Kaleidoscopes
Month 3:  Mix and Match Medallion Centers
Month 4:  Mix and Match Medallion Borders
Month 5:  Bargello
Month 6:  Introduction to PolyDraw
Month 7:  Modern Quilts
Month 8:  Introduction to Applique
Month 9:  Hexagon Blocks and Settings
Month 10:Foundation Patterns
Month 11:Optical Illusion Quilts
Month 12: T Shirt and Panel Quilts 
Month 13:  Reproductions
Month 14:  Working with Precuts
​
Month 15:  Landscapes
Month 16:  Quilt Layouts
Month 17:  Advanced Border Design
​Month 18:  Modern Quilts 2

Month 19:  Advanced EasyDraw
Month 20:  Specialty Rulers and Dies

Month 21:  Adding Quilting and Embellishment
​Month 22:  Sampler Quilts
​Month 23:  Calendar Quilts
​Month 24:  From Design to Production
 
​
Month 25:  Star Quilts
Month 26:  More Optical Illusion Quilts
​Month 27:  Reproducing a Quilt from a Picture

​Month 28:  Quilt Embellishment
Learn More and Sign Up for the Tech Know Quilter Wait List
Picture
Happy quilting.

​Kari
​

Join the On Point Quilter weekly newsletter and receive regular tips and inspiration on using Electric Quilt 8 along with the  Free 12 Top Tips for EQ8 video guide.
Picture

Modern Stars and Stripes Custom Set Quilt

7/2/2022

 
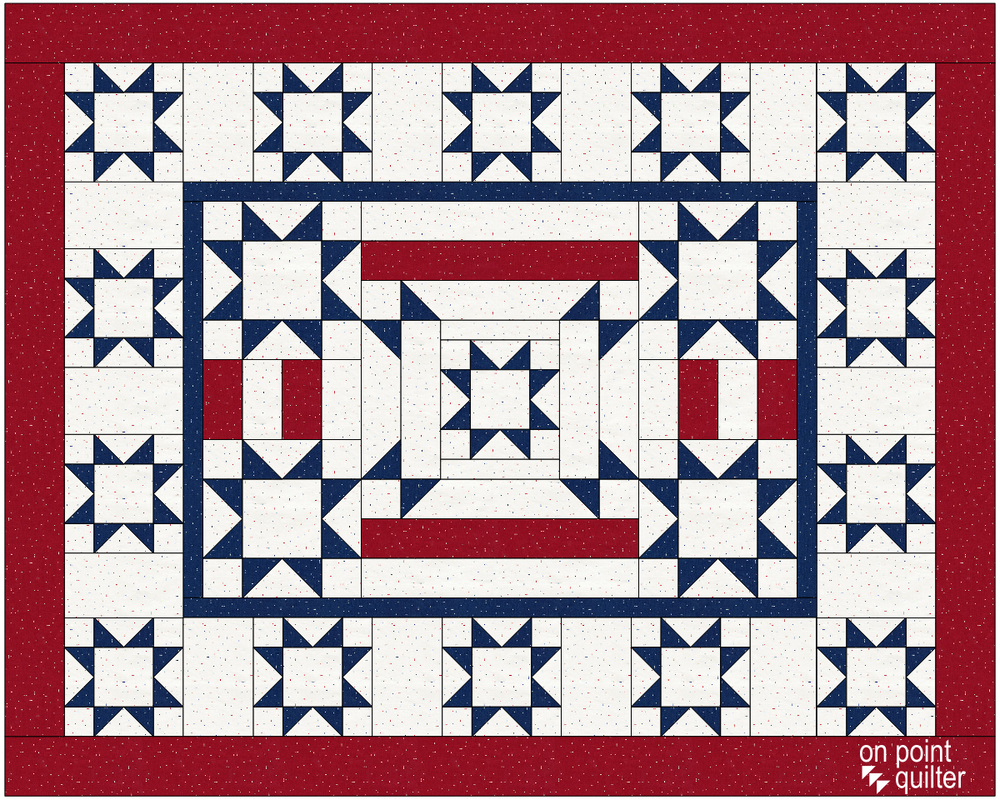
Learn the process of creating a custom set quilt by starting with a single block.

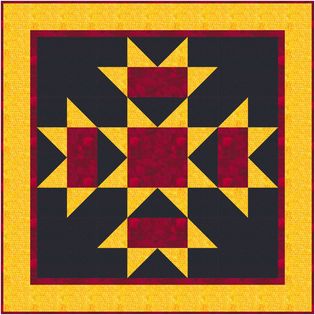
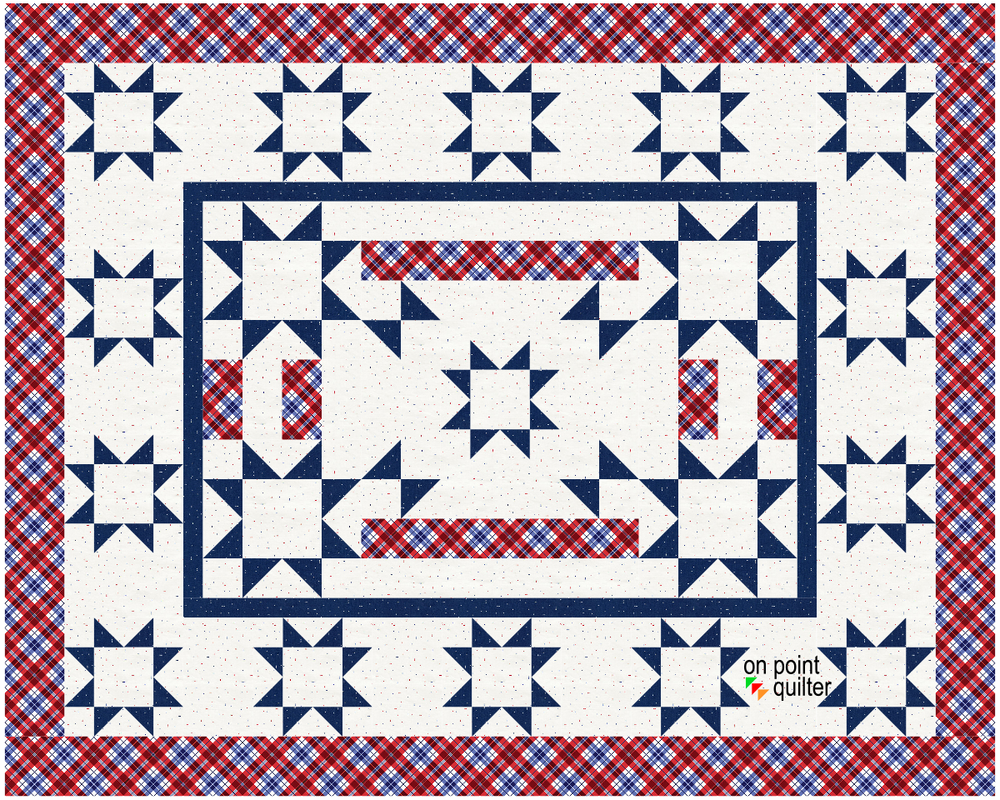
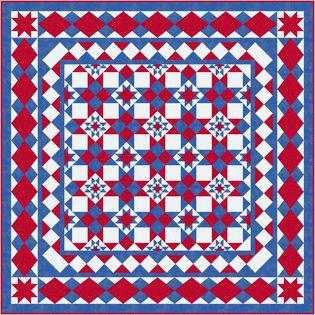
Often when designing, I am not sure where my design will take me.  One of the advantages of working with the Custom Set layout is that you have this large workspace that allows you to experiment not only with different blocks, but different sizes of blocks as well.

Once you have the quilt center nailed, you can add borders using a process similar to any of the quilt options.  One of my favorite border options is Spaced Squares.  Square blocks are typically the easiest to piece (particularly if they were designed with horizontal, vertical and diagonal lines).  And then EQ figures out the sizes for the spacers to make everything fit for each side of the border.  No math required.
Here is the center block from the video.  It was designed at a size of 14" x 12".

By including a square (with perfectly horizontal and vertical lines) the block is able to be used with the Serendipity>Merge block feature.
Picture
Picture
Here is the merged block.  You could definitely get creative and experiment with different centers for this block.
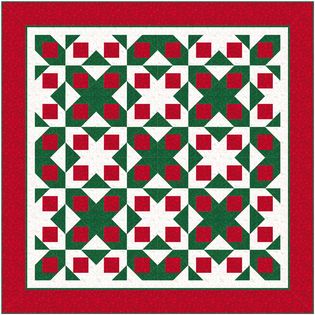
The fabric I chose to use in my quilt was Proud to be an American by Timeless Treasures.  This collection is part of the 2022 Stash Download 1 fabric collection available for purchase from the Electric Quilt Company.  I thought it was a perfect fabric collection for the July 4th weekend in the US. 

If you cannot purchase the Stash collection, you can locate individual fabric swatches on the Timeless Treasures website.

If you aren't into Patriotic quilts, select three different fabrics for your quilt.
I ended up coming up with two different versions of the quilt -- the first is more solid-like.  The second swaps the red for a plaid.  Which do you prefer?
Picture
Picture
Feel free to post pictures of any inspired quilts from this tutorial.  I've set up a post in the Learning EQ Facebook group.
Wishing those in the US, a safe and happy 4th!
Picture
Happy quilting.

​Kari
​

Join the On Point Quilter weekly newsletter and receive regular tips and inspiration on using Electric Quilt 8 along with the  Free 12 Top Tips for EQ8 video guide.
Picture
    Picture
    Picture
    Picture
    Free guide available for newsletter subscribers
    Picture
    Picture
    Picture

    Kari Schell

    Electric Quilt Expert and Educator and Pattern Designer.

    Categories

    All
    Art And Stitch
    Cricut Maker
    Dear Jane
    Electric Quilt 7
    Electric Quilt 8
    Goose Goose Duck Challenge
    Inkscape
    Longarm Quilting
    Patterns
    Silhouette Cameo
    Stampin Up
    Summer Games
    Tips And Techniques
    Tools And Rulers

    Archives

    January 2023
    December 2022
    November 2022
    October 2022
    September 2022
    August 2022
    July 2022
    June 2022
    May 2022
    April 2022
    March 2022
    February 2022
    January 2022
    December 2021
    November 2021
    October 2021
    September 2021
    August 2021
    July 2021
    June 2021
    May 2021
    April 2021
    March 2021
    February 2021
    January 2021
    December 2020
    November 2020
    October 2020
    September 2020
    August 2020
    July 2020
    June 2020
    May 2020
    April 2020
    March 2020
    February 2020
    January 2020
    December 2019
    November 2019
    October 2019
    September 2019
    August 2019
    July 2019
    June 2019
    May 2019
    April 2019
    March 2019
    February 2019
    January 2019
    December 2018
    November 2018
    October 2018
    September 2018
    August 2018
    July 2018
    June 2018
    May 2018
    April 2018
    March 2018
    February 2018
    January 2018
    December 2017
    November 2017
    October 2017
    September 2017
    August 2017
    July 2017
    June 2017
    May 2017
    April 2017
    March 2017
    February 2017
    January 2017
    December 2016
    November 2016
    October 2016
    September 2016
    August 2016
    July 2016
    June 2016
    May 2016
    April 2016
    March 2016
    February 2016
    January 2016
    December 2015
    November 2015
    October 2015
    September 2015
    August 2015
    July 2015
    June 2015
    May 2015
    April 2015
    March 2015
    February 2015
    January 2015
    December 2014
    November 2014
    October 2014
    September 2014
    July 2014
    June 2014
    May 2014
    April 2014
    March 2014
    February 2014
    January 2014
    December 2013
    November 2013
    October 2013
    September 2013
    August 2013

    RSS Feed

Contact:
On Point Quilter
e-mail:  onpointquilter@comcast.net
phone:  763-566-6536

GET MY NEWSLETTER FOR REGULAR EQ AWESOMENESS!

* indicates required
  • Blog
  • About
  • EQ Training
    • Tech Know Quilters Electric Quilt 8 Membership Training
    • Shoot for the Stars with EQ8
    • Electric Quilt 8 Sneak Peek
    • Scheduling a Workshop or Lecture
  • Store
  • Card Making
  • Contact
  • Free Stuff
    • Other Video Tutorials