• Blog
  • About
  • EQ Training
    • Tech Know Quilters Electric Quilt 8 Membership Training
    • Shoot for the Stars with EQ8
    • Electric Quilt 8 Sneak Peek
    • Scheduling a Workshop or Lecture
  • Store
  • Card Making
  • Contact
  • Free Stuff
    • Other Video Tutorials
Picture

Shamrocks from Design to Production

3/10/2023

2 Comments

 
Two things to cover today.  
  • Learn my process to utilize the information in Electric Quilt to go from "design" to "production".  Scroll down to learn more.
  • Registration has now opened for a free EQ8 webinar with options on March 26 or 27.  Pick the day and time that works for you.

Easter Egg Hunt Free EQ8 Live Webinar Registration Now Open

Create a Fabulous Easter Quilt with Foundation Piecing and A Bit of Appliqué

Picture
How many times have you wanted to create a new quilt, but struggled with your own drawing skills?  That blank piece of paper (or blank computer screen) can seem super intimidating.  And often those initial efforts can cause us to give up.

But what if you could get beyond bad drawing skills?
  • Design your own applique with simple shapes.
  • Let the fabric (rather than the drawing) add interest to your quilt.
And create a single block that could be pieced with just one foundation section as the starting point for a set of perfectly coordinated blocks.

Let me show you how to quickly get past the challenges of drawing both applique and foundation blocks using Electric Quilt 8.  
When you join my free Electric Quilt 8 webinar, I will take you step by step through the entire process to create your own Easter Egg Hunt quilt.  In this live webinar, you will learn how to: ​
Picture
Bonus for Attending Live

​Get a chance to win a kit that includes the fabric for the blocks and quilt drafted during the webinar.


One winner selected during each live webinar.  You must be present to win.
Picture
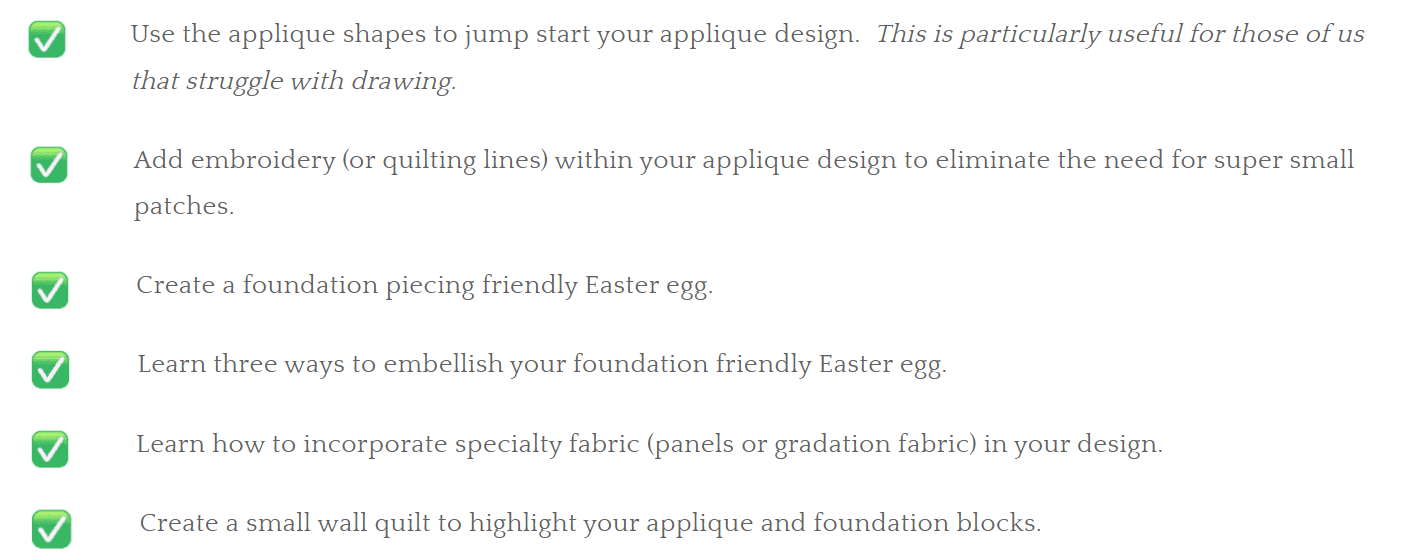
What are you waiting for? Join us today.

PLUS all participants will also receive a guidebook that you will be able to use as a reference both during and after the video.  This will provide you with all the steps (complete with illustrations) to ensure that you can draft the blocks and quilt from the webinar.
 
I am super excited to see your future Easter quilt (either the Electric Quilt version or the real quilt).

​Join us now. 
Free Webinar Registration Information

Choose the time that works the best below and register for this amazing fun webinar.  You won't be disappointed.

​For all those that attend live, I will be offering a special bonus offer as well.  Make sure to join me.  I can't wait to see you there.

A replay will be available for 48 hours if you cannot attend live.​
Date and Time
Registration Link
Local Time
Sunday, March 26
8 pm Central Time
Enroll
Time Zone Converter
Monday, March 27
10 am Central Time
Enroll
Time Zone Converter
Monday, March 27
3 pm Central Time
Enroll
Time Zone Converter

Shamrock Quilt - From Design to Production

Last week I shared how to draft one shamrock block along with two separate quilts using that block.

If you missed the post, you will want to go back and watch the video here.
Picture
8" Shamrock Block Designed in EQ8 by Kari Schell
Picture
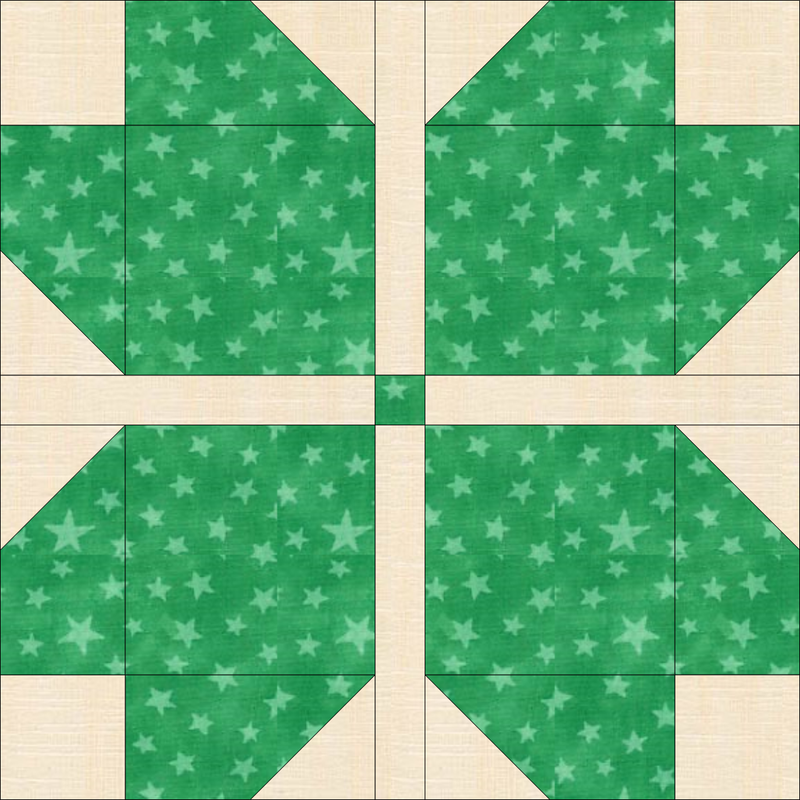
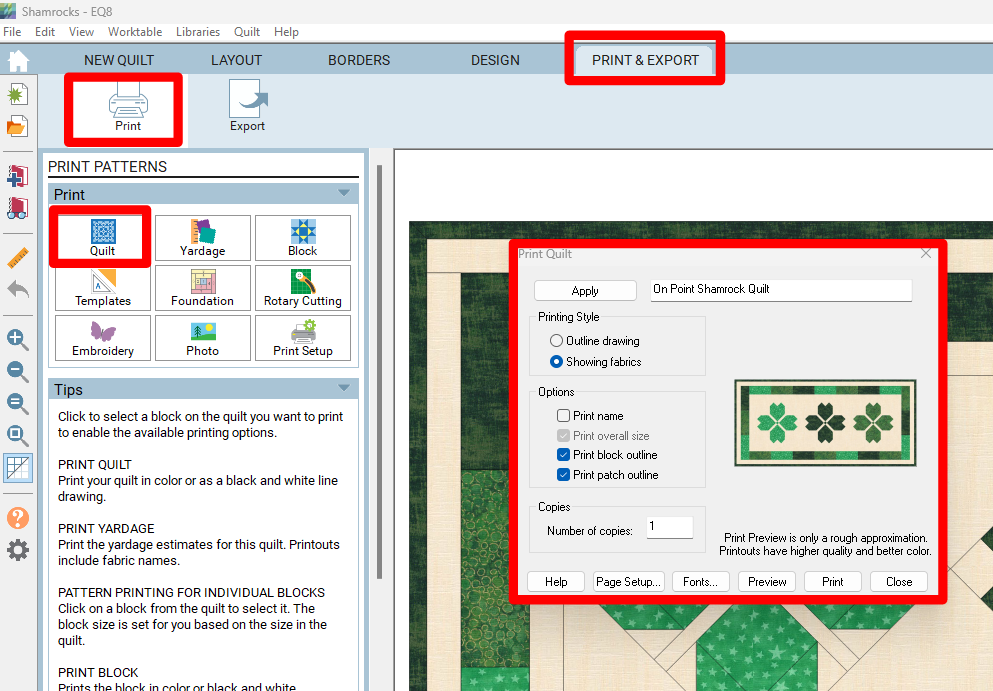
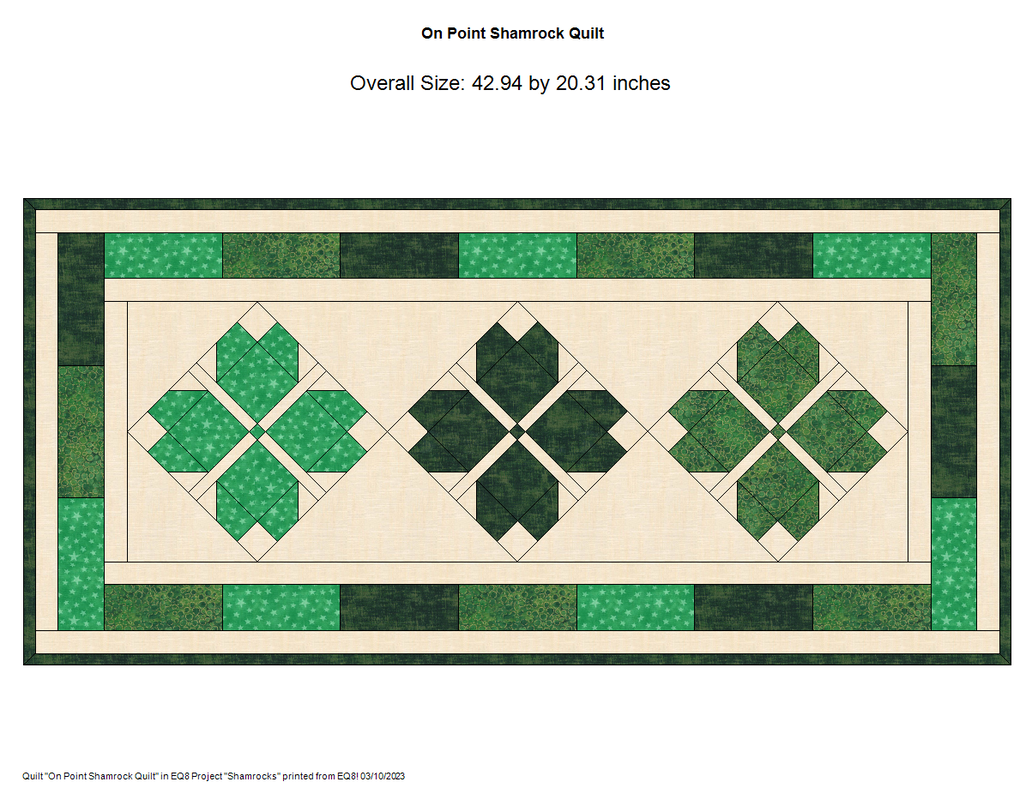
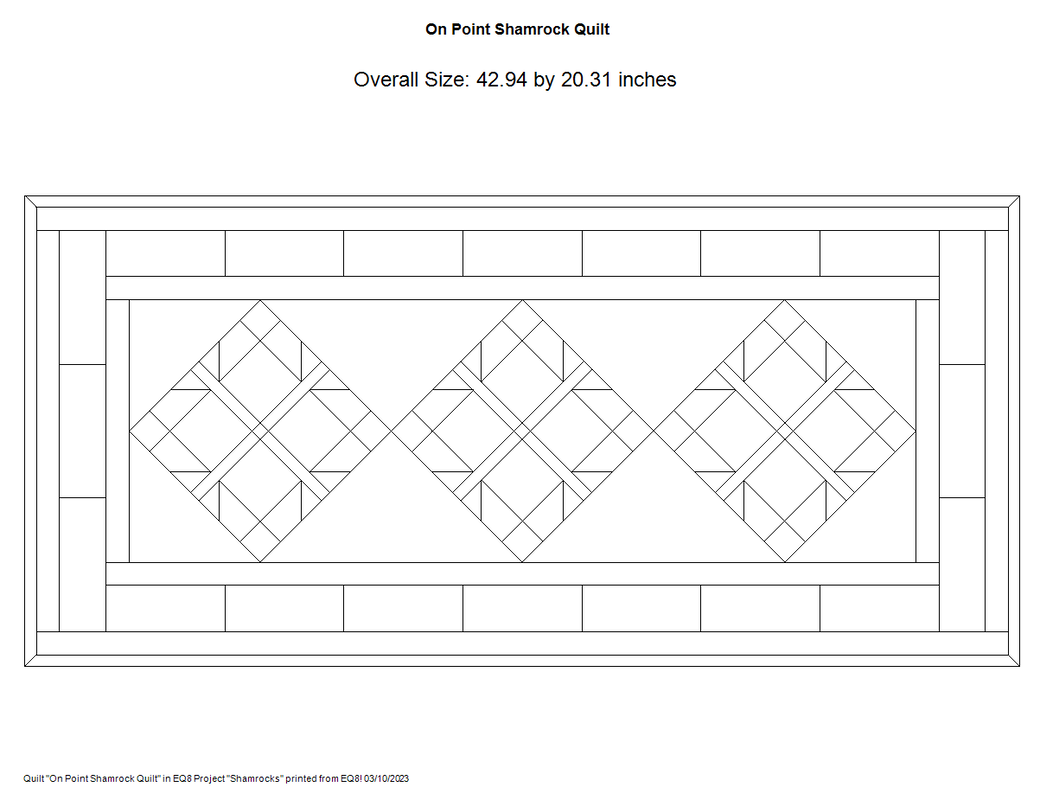
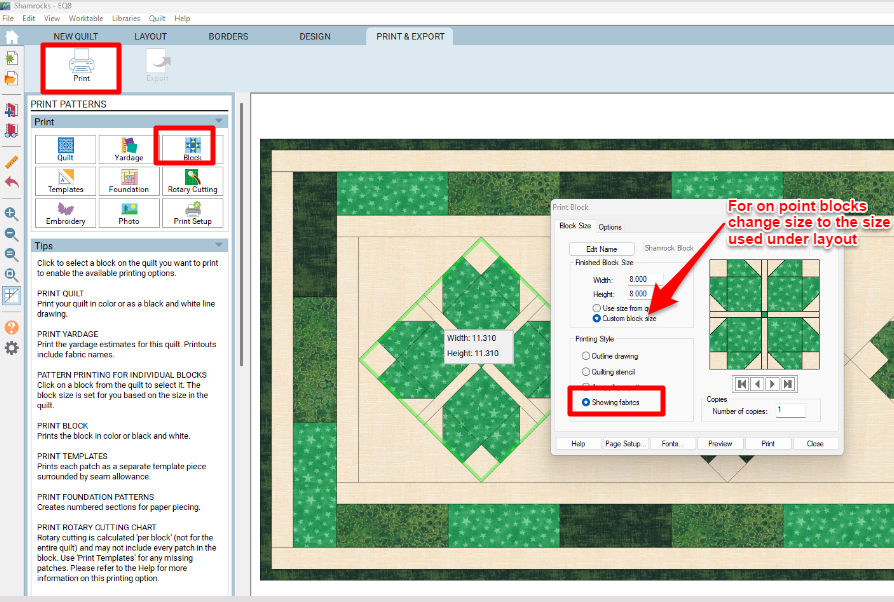
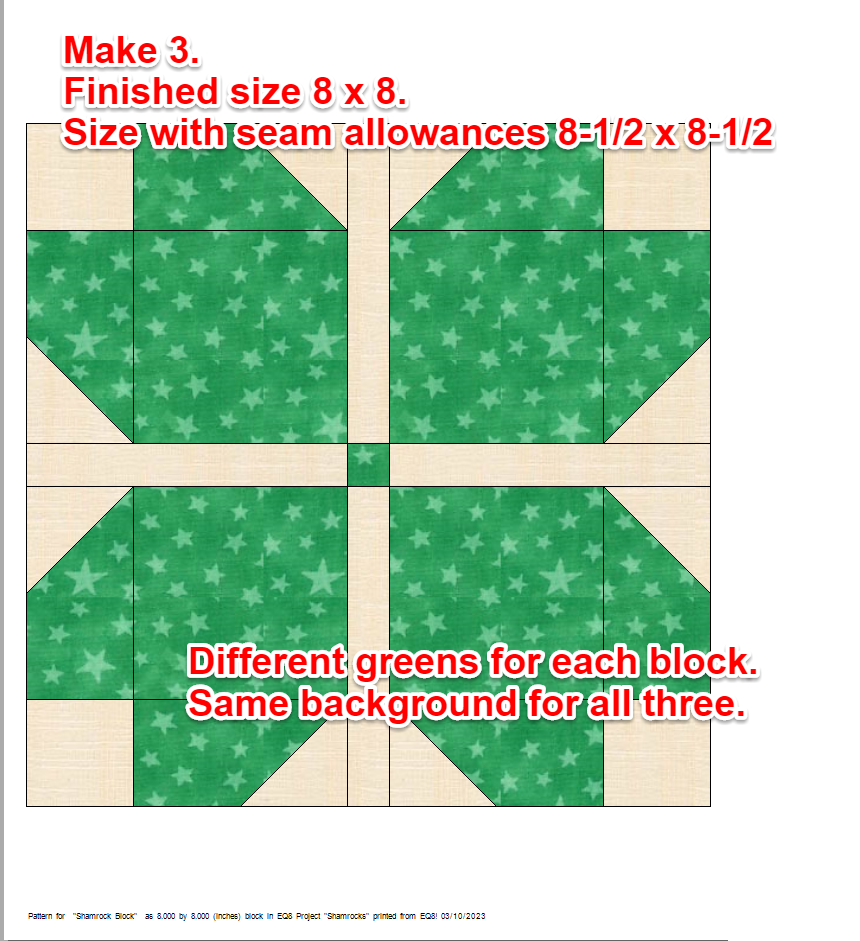
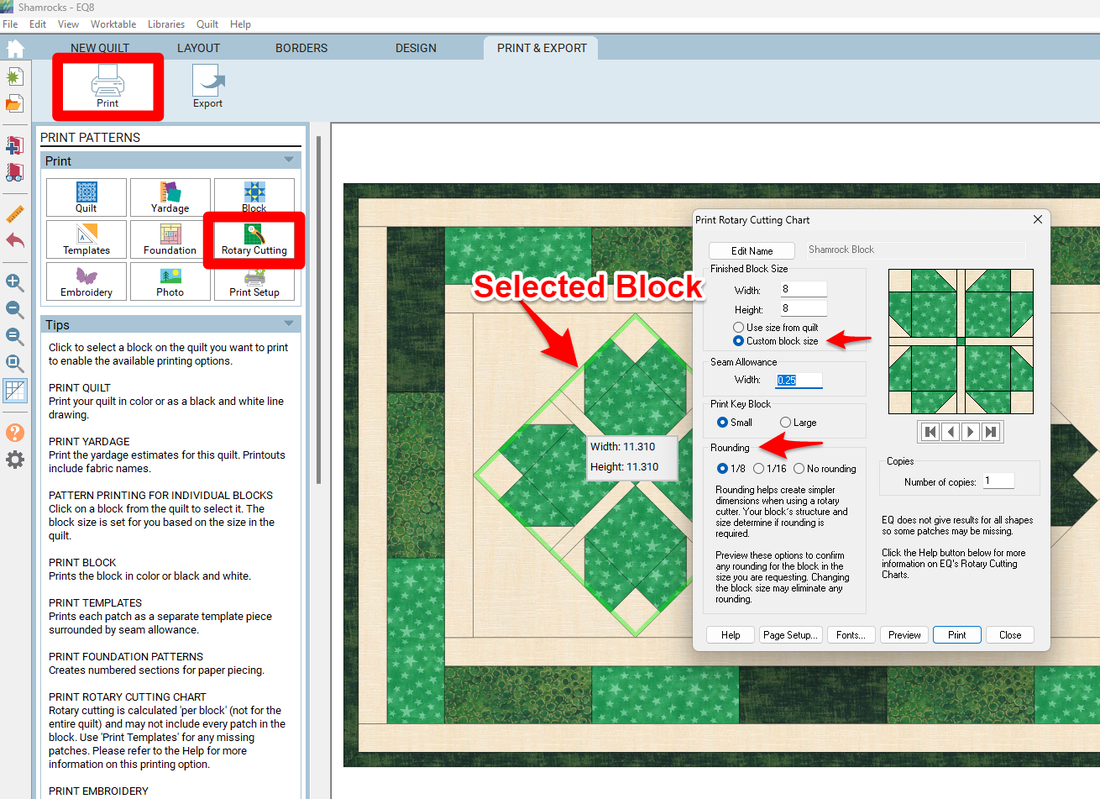
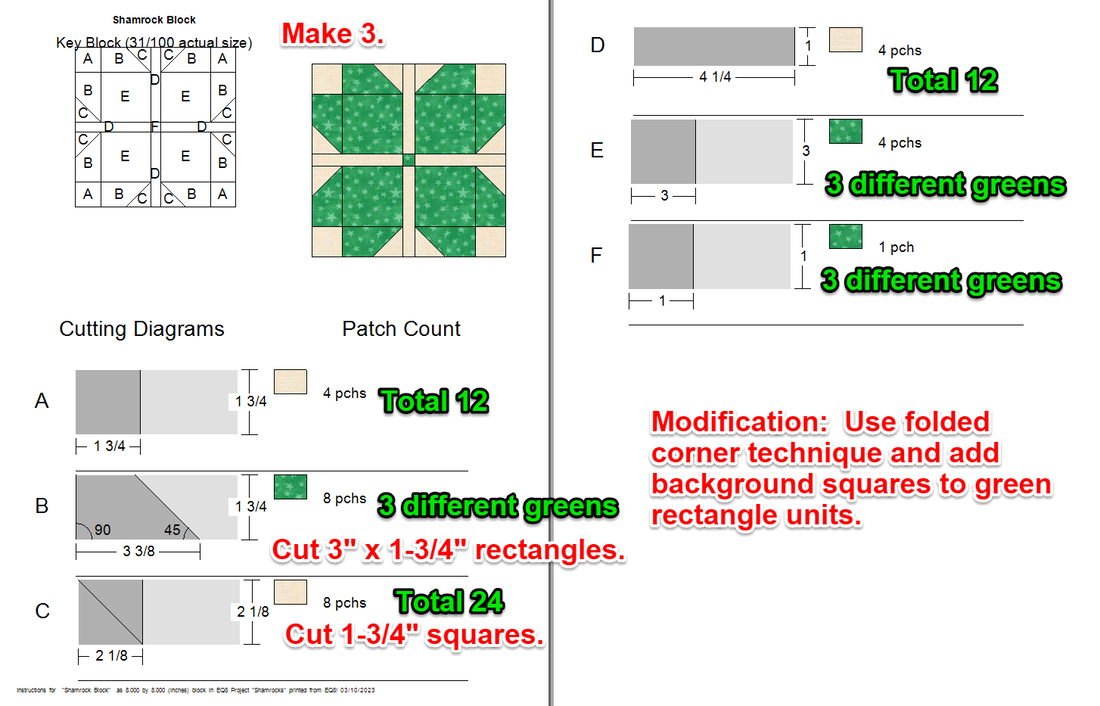
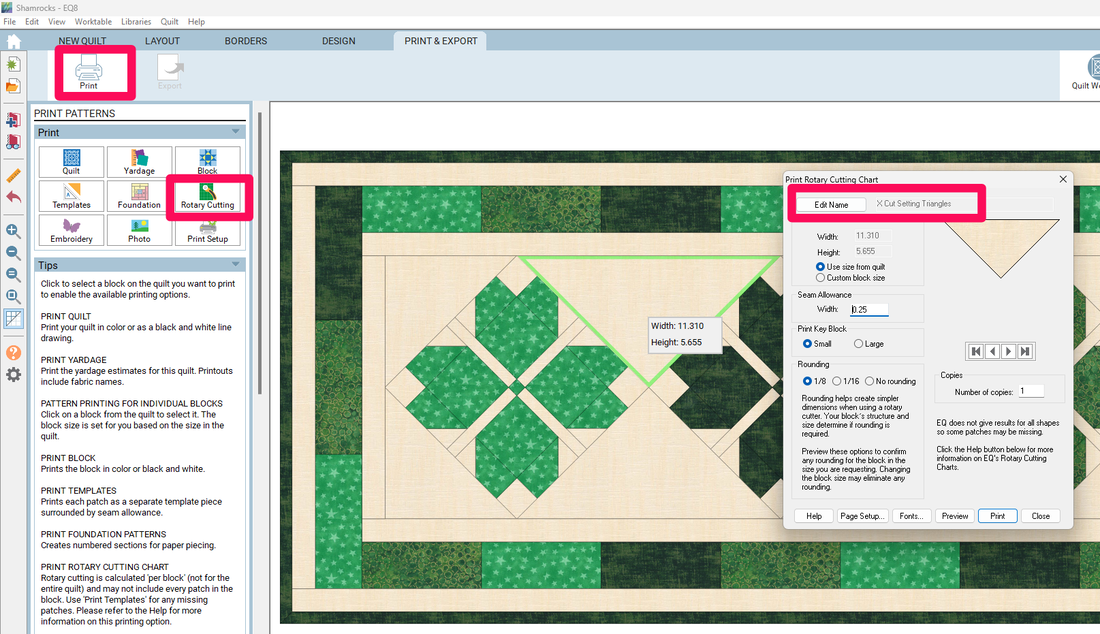
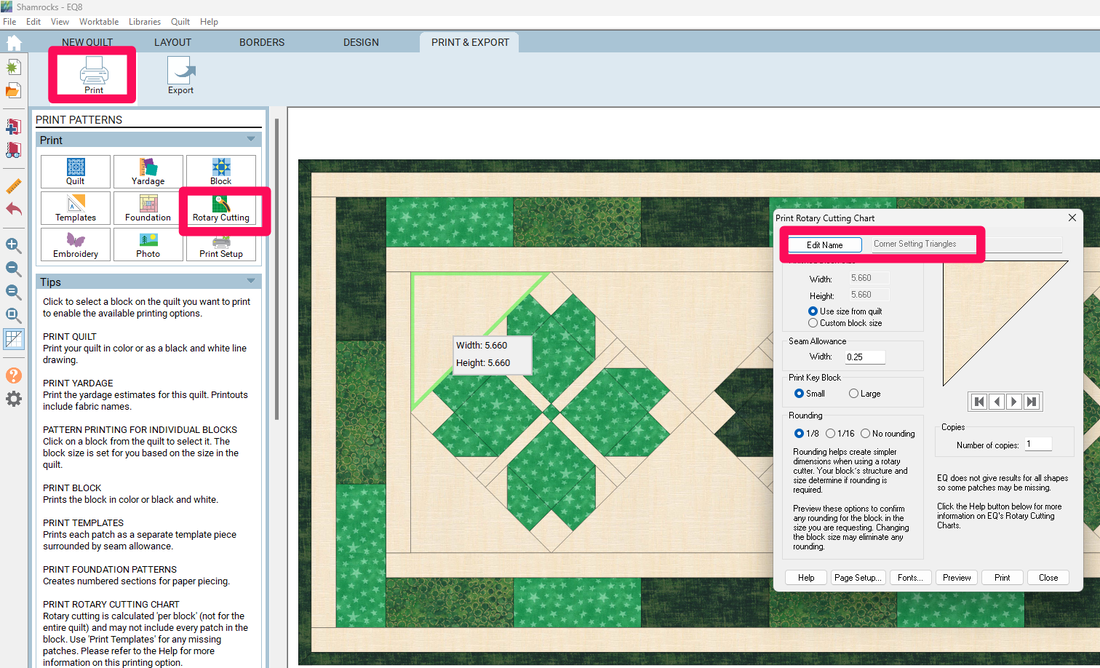
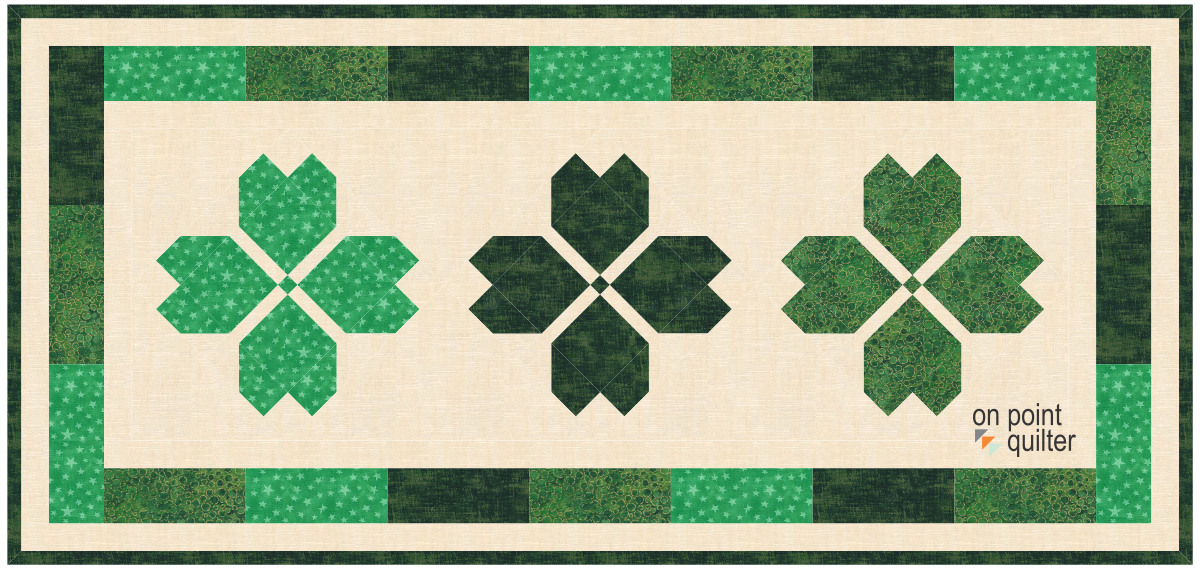
Shamrocks On Point Layout by Kari Schell Drawn in EQ8
Picture
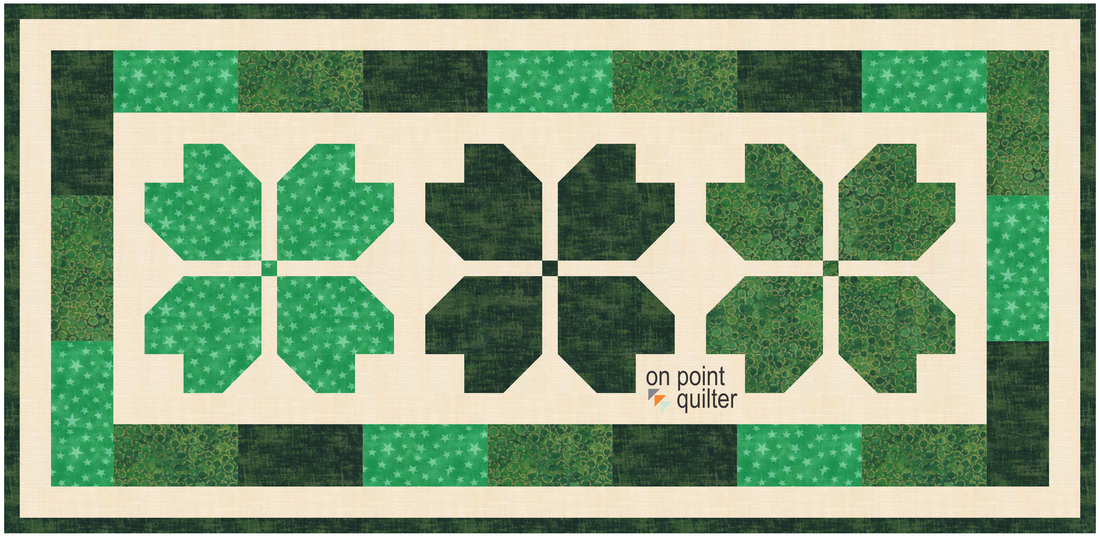
Horizontal Shamrock Quilt Drafted in EQ8 by Kari Schell
Once you design a quilt in Electric Quilt, the challenge I frequently hear is how to piece your quilt. 

Electric Quilt does not spit out "patterns" similar to what we purchase at the quilt shop.  But it does give us everything we need to make our quilts.

I will take you through my "production" process for the on point shamrock quilt above. 

​I've annotated this on my computer -- so you can easily read everything.  But if this is for personal use only, I will just jot my notes on the printed versions.  I will then keep everything together with my fabrics and whatever I have completed of the project.
Print Quilt
  • Select Print and Export
  • Select Print followed by Quilt
  • In the dialogue box type in the name and select Apply
  • Under options make sure both Print block outline and Print patch outline are turned on.
  • Under Printing Style, print one "Showing Fabrics".
  • Under Printing Style change to "Outline Drawing" and print a copy.
Picture
Print and Export - Print Quilt
Here are the two print exports I always produce for my quilts.  More on how I use the outline drawing below.
Picture
Print Quilt Output Showing Fabrics
Picture
Print Quilt Output Outline Drawing
Print Block
  • For any blocks in the quilt, select Print followed by Block.  Make sure to select the block first. 
  • Note that the size when the block is highlighted is the measurement from top to bottom and left to right.  Not the size of the edge of the block.
  • To conserve on paper, in the dialogue box, change to custom block size and use the block size from the Layout tab.  In this case 8 x 8.
  • Select showing fabrics.
  • This print out will allow you to do your own measuring if you decide to alter any cutting instructions.
Picture
Print and Export>Block with Shamrock block selected
Picture
Print Block Output for Shamrock Block
On the printed block page, I will note
  • How many to make. 
  • Size information.
  • Fabric information.
Print Rotary Cutting
  • Depending on my planned construction method, I will print either foundations, rotary cutting or templates.  You can even print all three.  For the shamrock block, I plan to rotary cut.
  • Select Print followed by Rotary Cutting.
  • Although it shows a different block size, the instructions will be the same as the horizontal version of the block.  For on point quilts I prefer to select custom block size and change to the size of the quilt from the Layout tab.  (8 x 8).
  • Select your rounding option.
  • Print.
Picture
Print and Export for Shamrock Block
Rotary Cutting Chart Annotation
  • On your printed rotary cutting chart note the number of blocks needed.  
  • For the patch counts, multiply the number of blocks times the number of patches to get the total required for each fabric.
  • If you plan to modify the cutting chart, note the changes to both sizes and quantities needed.  To avoid the "awkward" cuts for patch B, I decided to use the cheater corner or folded corner technique for my B/C combinations.
Picture
Shamrock Block Rotary Cutting Annotation
Tip  -- After cutting my fabrics, I will keep them with this page of the instructions and use the diagram as a guide for piecing the block.
Setting Triangles
  • Under Print and Export, select a setting triangle followed by rotary cutting.
  • Count the number of setting triangles in the quilt and add the information to the printed cutting chart.
  • As noted in the rotary cutting chart, these triangles are X-cut (four triangles from each square).  As a result, if you need four triangles, you need to cut only one square.
Picture
Setting Triangle Print and Export Screen
Picture
Setting Triangle Rotary Cutting
Corner Triangles
  • Select a corner triangle followed by rotary cutting.
  • Count the number of corner triangles in the quilt and add to cutting chart.
  • As noted in rotary cutting chart, these triangles are cut once on the diagonal (two triangles from each square).  As a result, if you need four triangles, you need two squares.
Picture
Setting Triangle Print and Export Screen
Picture
Corner Triangle Rotary Cutting
Border and Binding Instructions
  • For the remaining instructions, I will annotate the outline drawing of the quilt. For the border sizes, select each border and add 1/2 inch to horizontal/vertical measurements or preview the rotary cutting and jot down the sizes from that.  I find it really isn't necessary to print out the rotary cutting charts for each border piece.

  • For the binding I will add all the size of all four sides of the quilt.  Divide by the length of fabric (typically 40").  then round up for the number of strips required and use your favorite size for cutting binding strips.
Picture
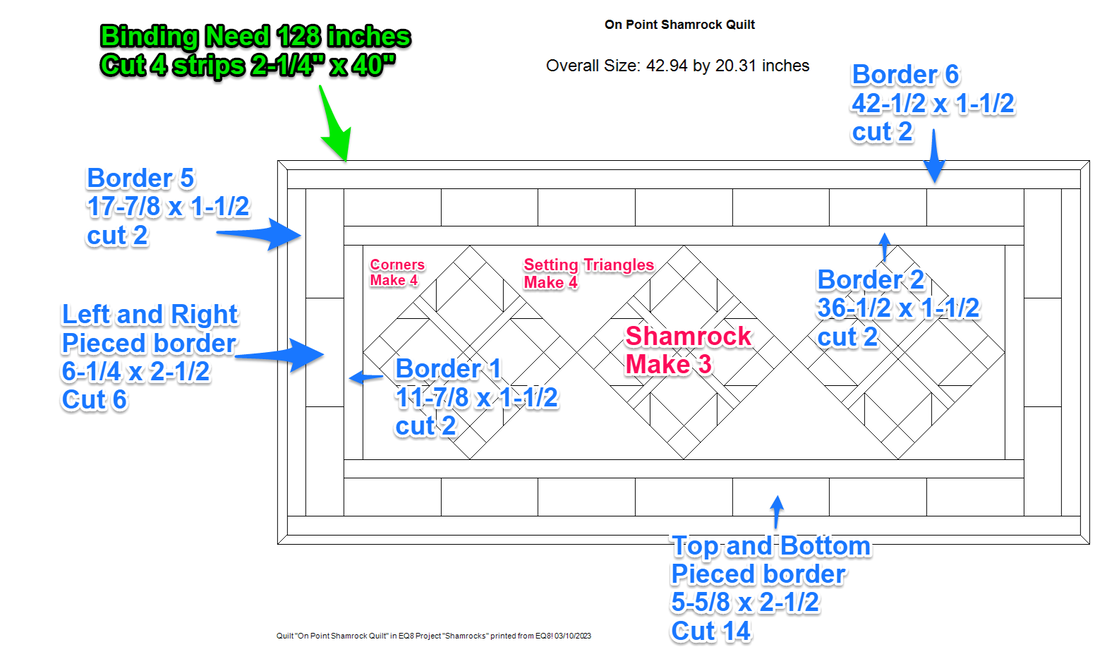
Quilt Outline Annotation for Quilt Construction
For those in Tech Know Quilters, there is an entire class on "From Design to Production".  I was on a call with some of the members this week; where a number stated that this particular class was one they continue to go back to.  Not only for the how to -- but the cheat sheets that are provided as well.

Send me a note if you would like this as an add-on class.  Either starting now or next month.

For those not in Tech Know Quilters -- I would love to have you join us.  There will be an opportunity to join at the end of the month.  Make sure you are on my mailing list to get information when enrollment opens.

Picture
Happy quilting.

​Kari

Join the On Point Quilter weekly newsletter and receive regular tips and inspiration on using Electric Quilt 8 along with the  Free 12 Top
Tips for EQ8 video guide.
​Happy quilting.
Picture
2 Comments
Connie Boulay
3/12/2023 09:06:50 am

Great information. Since I use my Accuquilt cutting system for lots of shapes, I also include that information on my cutting info printout (generally speaking a line drawing block printout) with the Qube information and the die number. I also note the finished size of the block, since it is often different than the printed size. I also use the line drawing to figure out pressing to minimize bulk. And I note if I can do 8 at a time HSTs, or not. Sometimes directional fabrics do not lend themselves to that method.

Reply
Kari Schell
3/12/2023 11:18:25 pm

Great suggestions. Good notes typically make for a successful project.

Reply


Leave a Reply.

    Picture
    Picture
    Picture
    Free guide available for newsletter subscribers
    Picture
    Picture
    Picture

    Kari Schell

    Electric Quilt Expert and Educator and Pattern Designer.

    Categories

    All
    Art And Stitch
    Cricut Maker
    Dear Jane
    Electric Quilt 7
    Electric Quilt 8
    Goose Goose Duck Challenge
    Inkscape
    Longarm Quilting
    Patterns
    Silhouette Cameo
    Stampin Up
    Summer Games
    Tips And Techniques
    Tools And Rulers

    Archives

    March 2023
    February 2023
    January 2023
    December 2022
    November 2022
    October 2022
    September 2022
    August 2022
    July 2022
    June 2022
    May 2022
    April 2022
    March 2022
    February 2022
    January 2022
    December 2021
    November 2021
    October 2021
    September 2021
    August 2021
    July 2021
    June 2021
    May 2021
    April 2021
    March 2021
    February 2021
    January 2021
    December 2020
    November 2020
    October 2020
    September 2020
    August 2020
    July 2020
    June 2020
    May 2020
    April 2020
    March 2020
    February 2020
    January 2020
    December 2019
    November 2019
    October 2019
    September 2019
    August 2019
    July 2019
    June 2019
    May 2019
    April 2019
    March 2019
    February 2019
    January 2019
    December 2018
    November 2018
    October 2018
    September 2018
    August 2018
    July 2018
    June 2018
    May 2018
    April 2018
    March 2018
    February 2018
    January 2018
    December 2017
    November 2017
    October 2017
    September 2017
    August 2017
    July 2017
    June 2017
    May 2017
    April 2017
    March 2017
    February 2017
    January 2017
    December 2016
    November 2016
    October 2016
    September 2016
    August 2016
    July 2016
    June 2016
    May 2016
    April 2016
    March 2016
    February 2016
    January 2016
    December 2015
    November 2015
    October 2015
    September 2015
    August 2015
    July 2015
    June 2015
    May 2015
    April 2015
    March 2015
    February 2015
    January 2015
    December 2014
    November 2014
    October 2014
    September 2014
    July 2014
    June 2014
    May 2014
    April 2014
    March 2014
    February 2014
    January 2014
    December 2013
    November 2013
    October 2013
    September 2013
    August 2013

    RSS Feed

Contact:
On Point Quilter
e-mail:  onpointquilter@comcast.net
phone:  763-566-6536

GET MY NEWSLETTER FOR REGULAR EQ AWESOMENESS!

* indicates required
  • Blog
  • About
  • EQ Training
    • Tech Know Quilters Electric Quilt 8 Membership Training
    • Shoot for the Stars with EQ8
    • Electric Quilt 8 Sneak Peek
    • Scheduling a Workshop or Lecture
  • Store
  • Card Making
  • Contact
  • Free Stuff
    • Other Video Tutorials