• Blog
  • About
  • EQ Training
    • Tech Know Quilters Electric Quilt 8 Membership Training
    • Shoot for the Stars with EQ8
    • Electric Quilt 8 Sneak Peek
    • Scheduling a Workshop or Lecture
  • Store
  • Card Making
  • Contact
  • Free Stuff
    • Other Video Tutorials
Picture

Log Cabin Crossing

6/3/2023

 
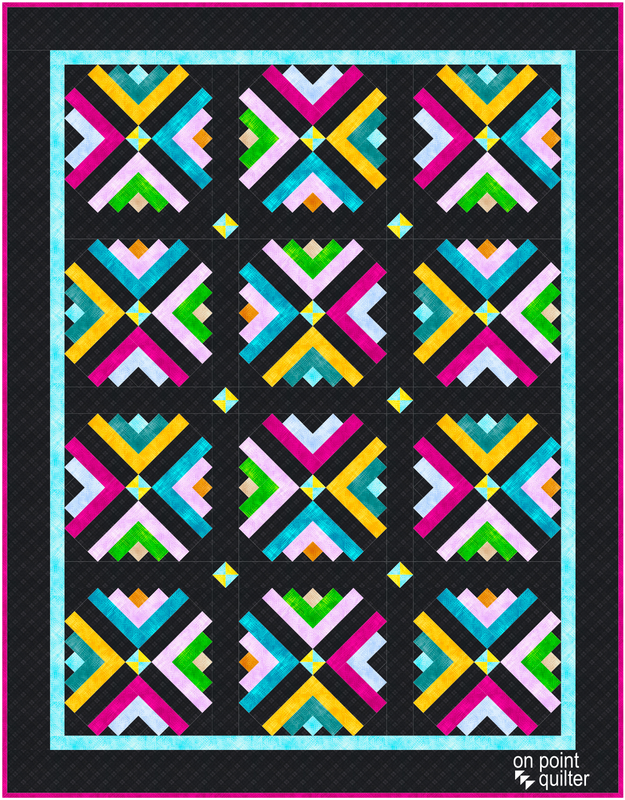
This block and quilt I am presenting today is an original design -- the result of some playing in Electric Quilt 8 the other day.  When playing I will often go through a number of iterations of a block or quilt.  It is a design that is scrap friendly and can use a collection of left-over 2" strips.

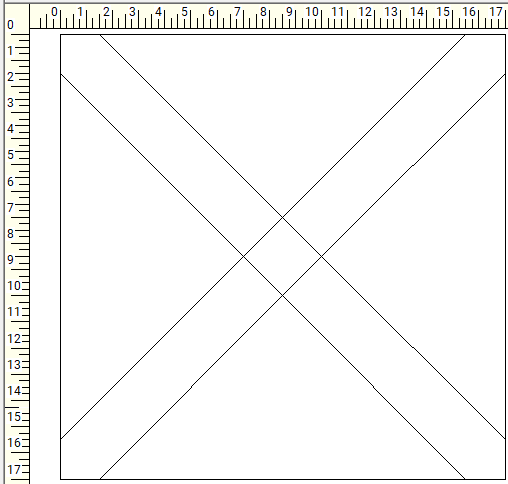
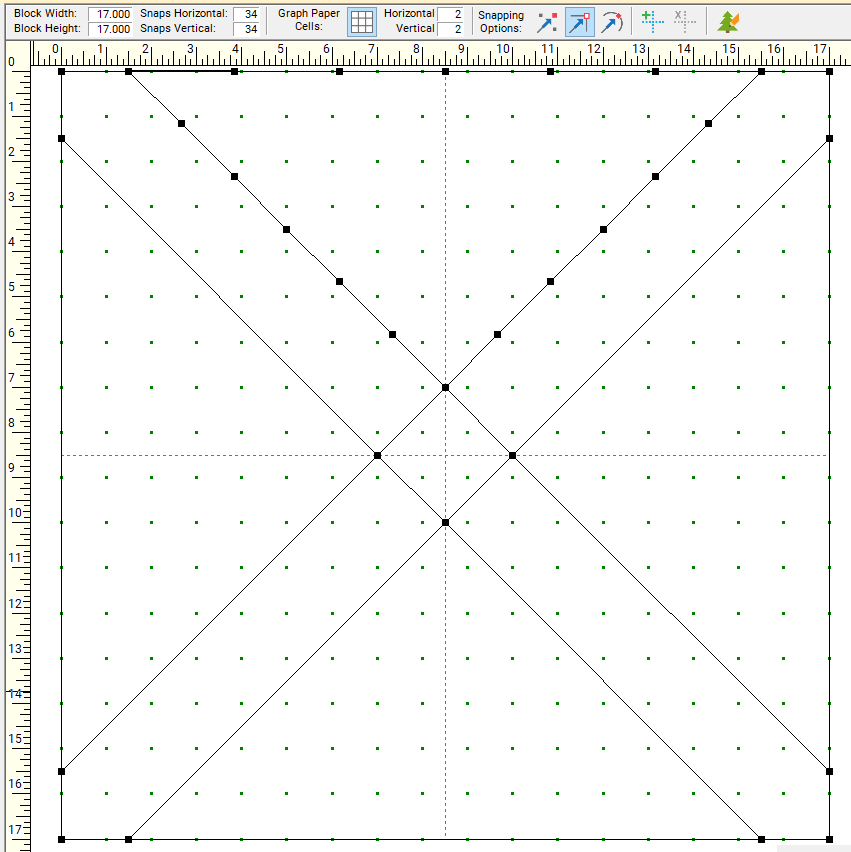
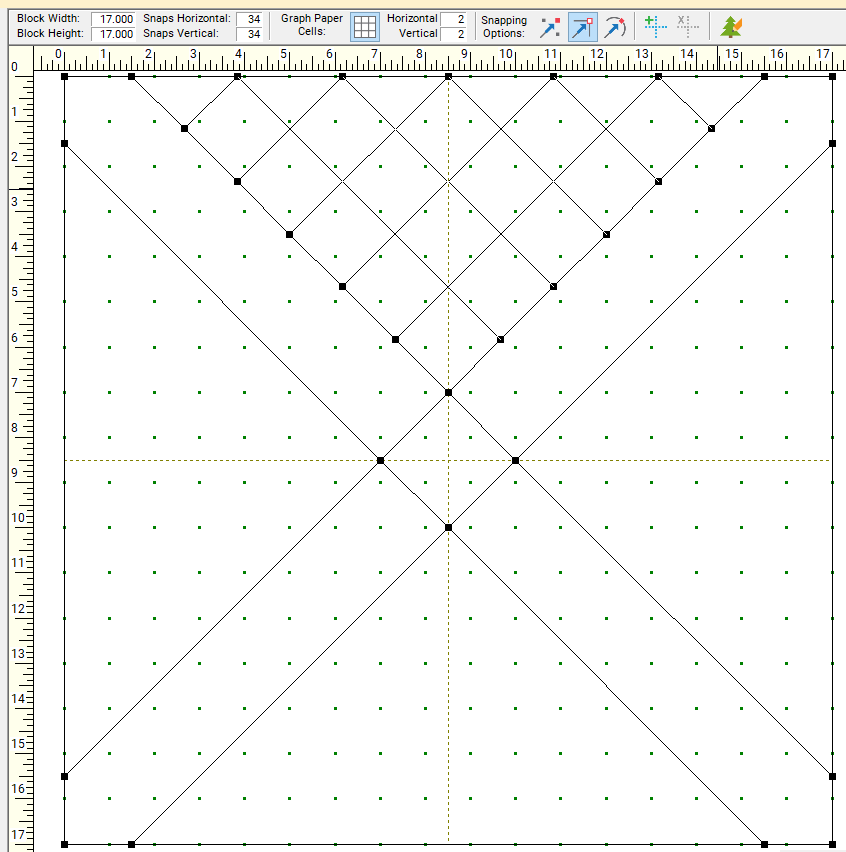
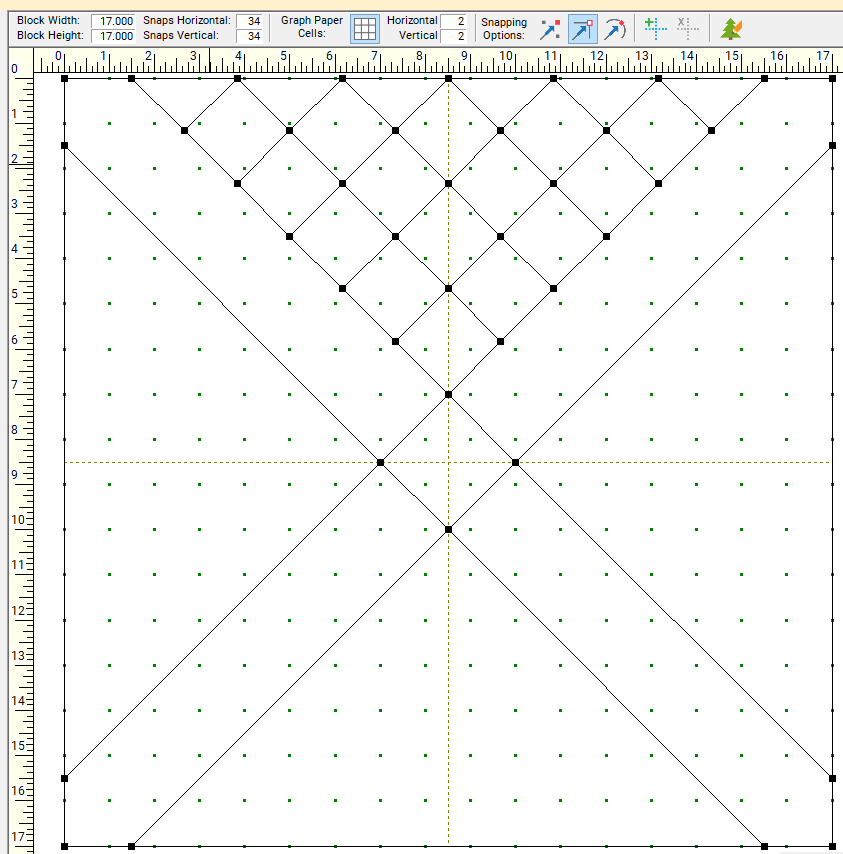
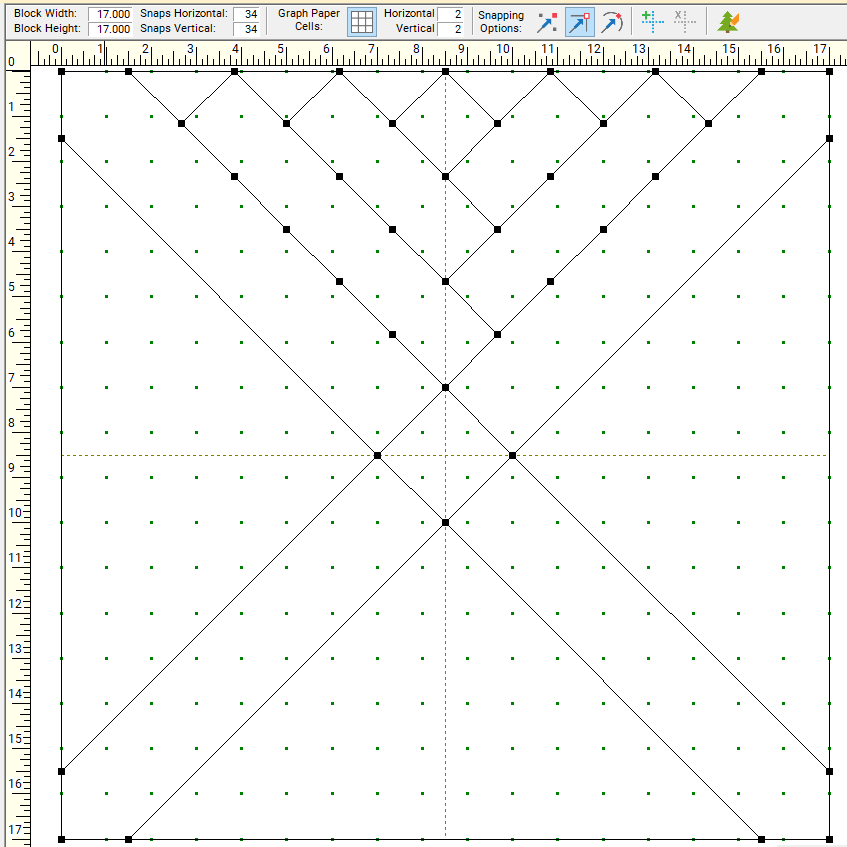
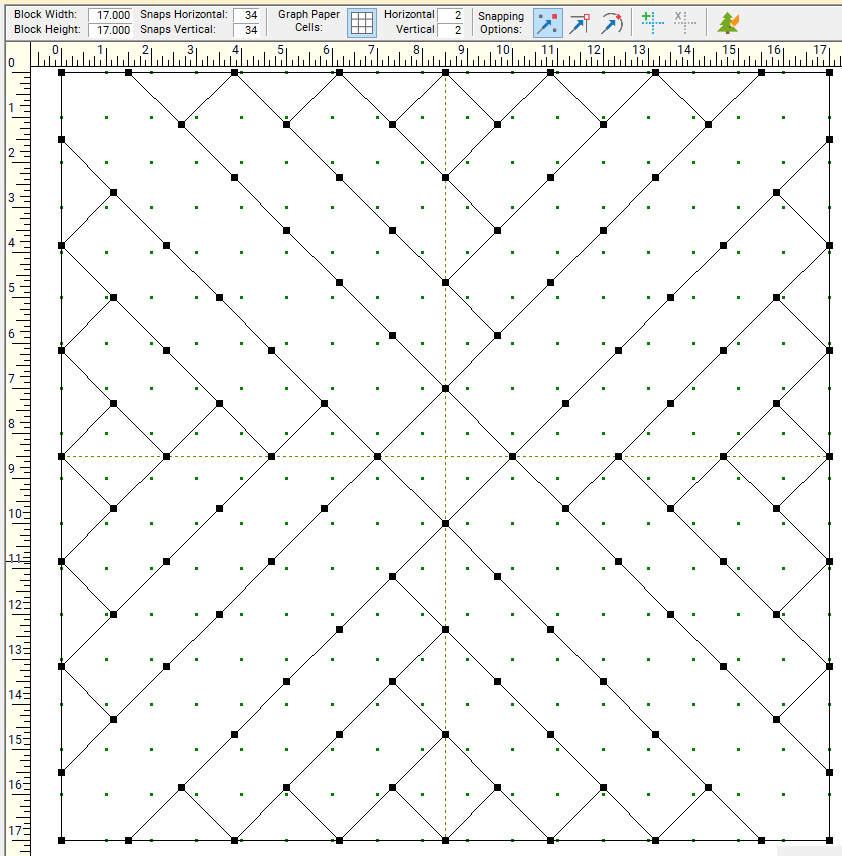
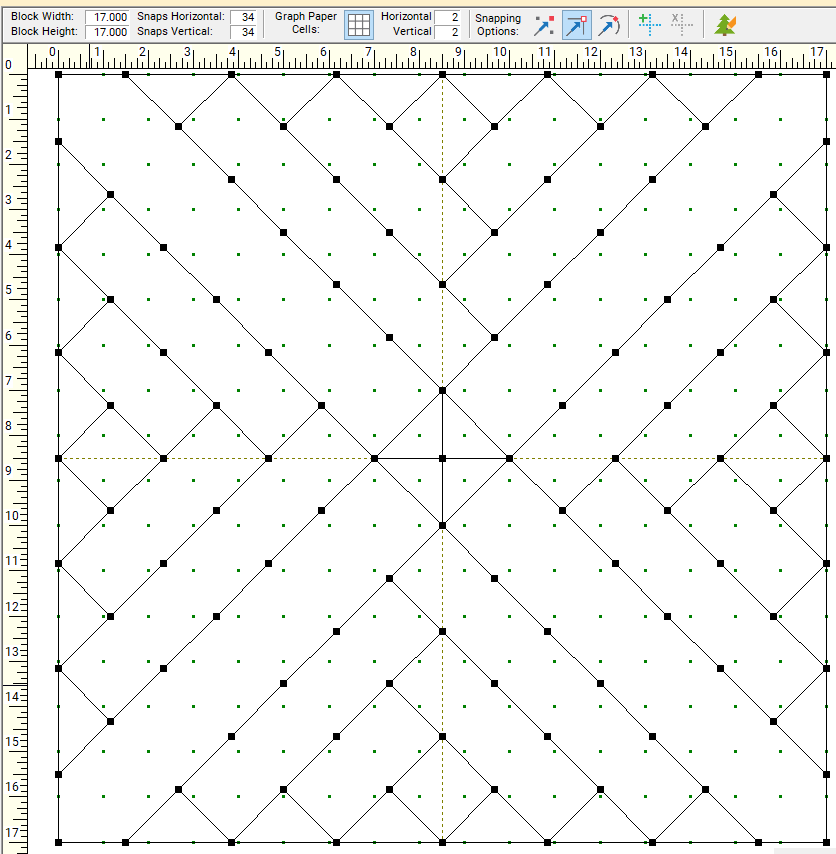
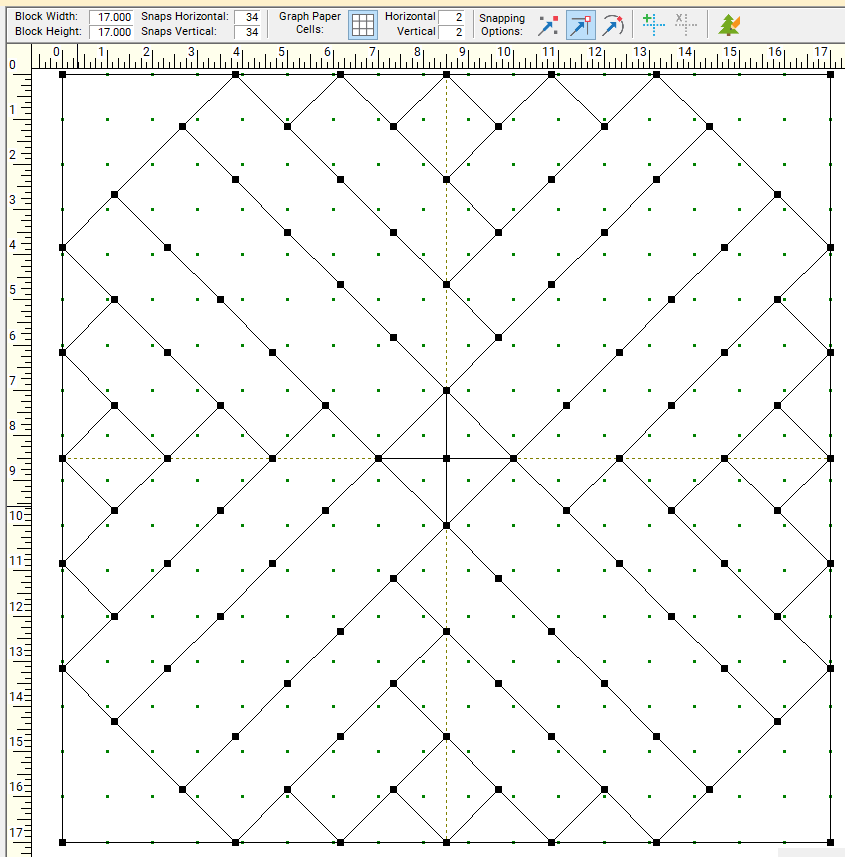
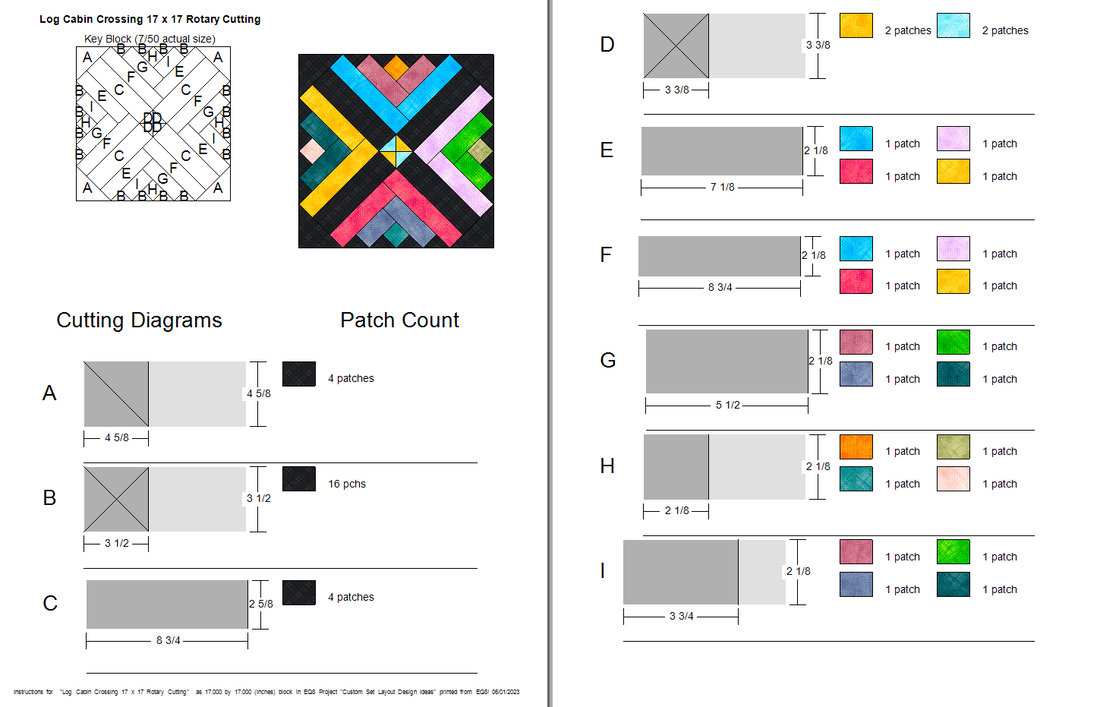
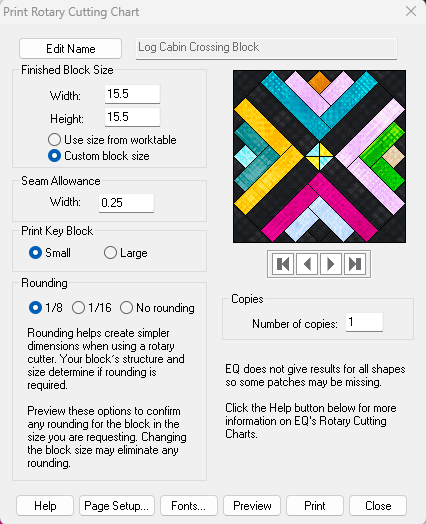
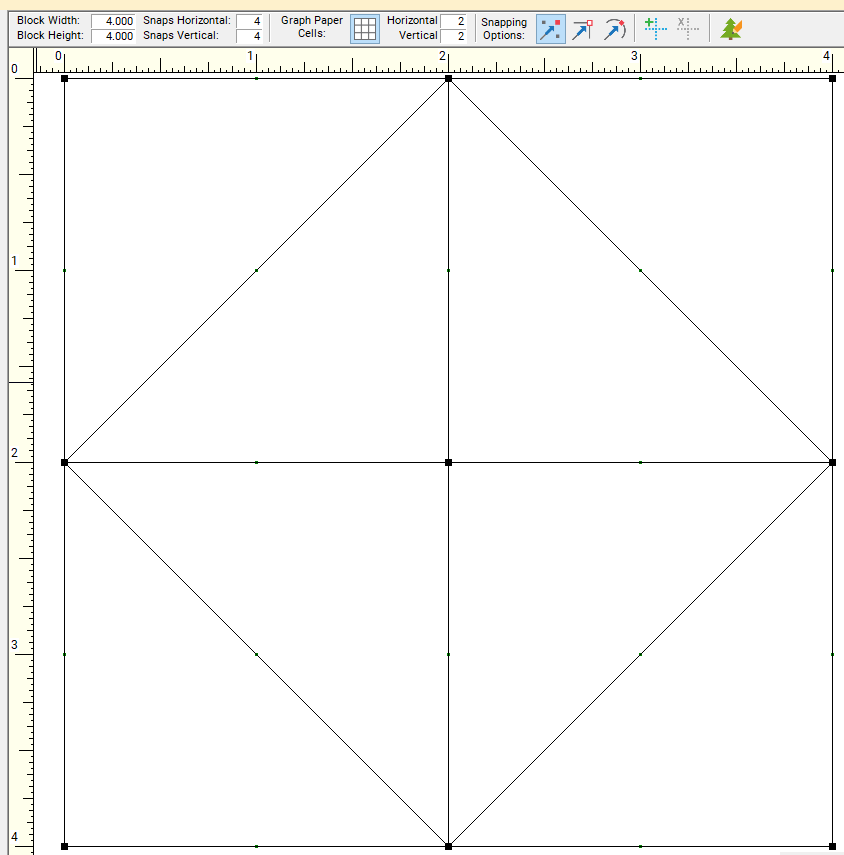
Tip -- always save multiple times as you draft your blocks and quilt.  Sometimes your additional playing does not yield better results and you may want to go back to an earlier version.

Designing the Log Cabin Crossing Block
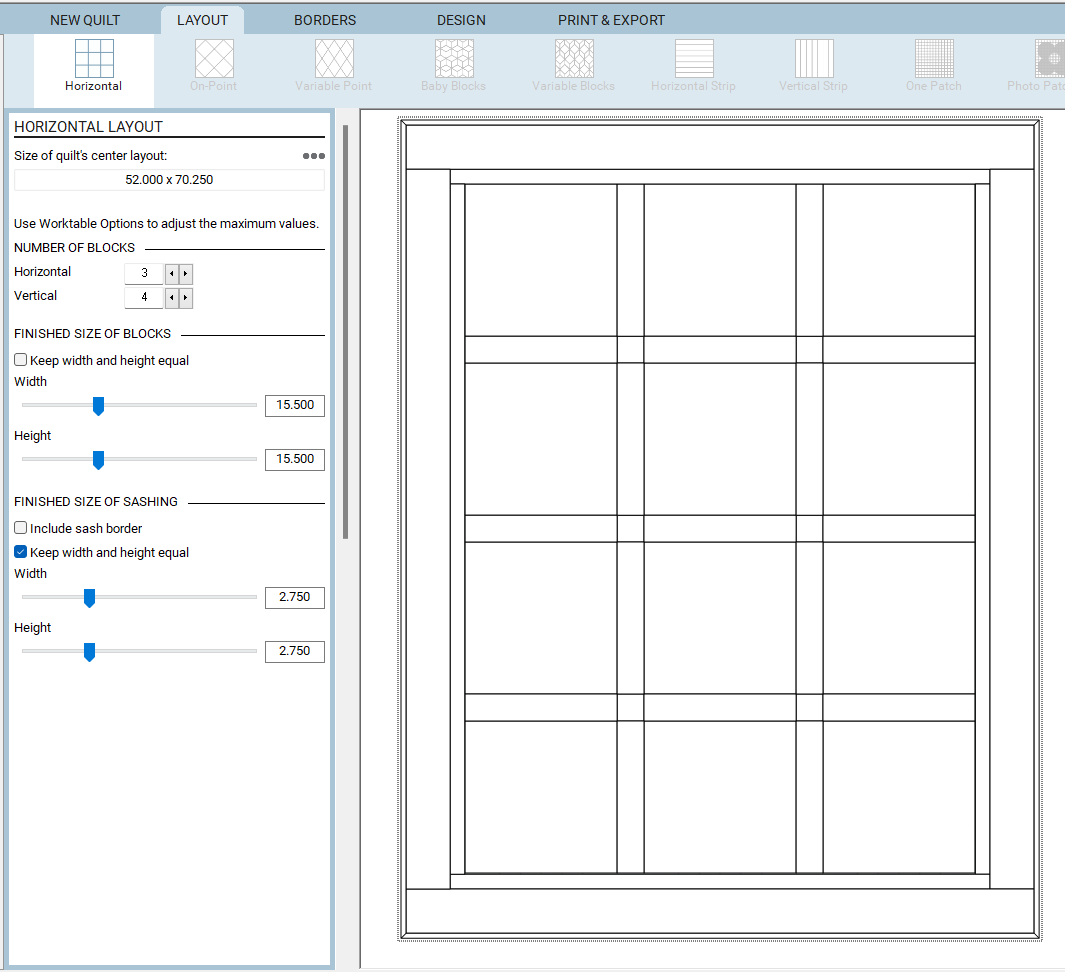
I started by drafting a very simple crossing block using EasyDraw.  I chose to make the block 17" x 17".  This is the size without added seam allowances. 

​The diagonal lines were drawn 1-1/2" in from each corner.  They cross to create an on point square in the center.  It also gave me some really large on triangles for additional designing.
Picture
Crossing Lines
When working with an on point segment in a block, the snaps horizontal and vertical won't always give you the precision you need to create perfect diagonal lines -- ones that produce squares and rectangles that are easy to cut.

Fortunately EasyDraw gives us the ability to partition lines.  Use a similar partition for all three edges of your big triangle.  I used Partition Segment - 6 for my design.  However, feel free to experiment with the concept with a different number of partitions.   Just remember that the more partitions you add the more piecing you will be doing. 
Picture
Partition Segment 6
Next it is time to draw your lines.

Make sure to switch to Snap to Nodes only under your snapping options.  If you also have Snap to Grid on, EQ will naturally gravitate to those snap points when they are close to a Node.  EQ has a much stronger magnet on grid points versus the nodes.

Draw a series of diagonal lines that are parallel to the long diagonal lines originally drafted.  This is super simple as all you need to do is connect the dots (or in this case nodes).
Picture
Draw Diagonal Parallel Lines
Go to Color and back to Draw.  The will split all your drawn lines at intersections.  So they are no more long diagonal lines but a series of small short lines instead. 

This is a design decision point. 

​You could piece your block with 15 squares in each of the larger triangles.  Or you could turn each of the squares into half squares triangles.  A great idea if you have a stash of extra half square triangle units from a previous project.  Maybe a set created from cheater corners.
Picture
Break lines at intersections
I chose to simplify my design and delete some of the small diagonal segments.  This will turn the squares into 5 rectangles.  Essentially creating log cabin pieces.

​Much faster to piece.
Picture
Delete some of the small diagonal segments to create log cabin rectangle pieces.
You could replicate the process and draw the same segments for the other three large triangle units.  

However, I chose to go with an easier approach.  I converted the longer lines to guides (this will assist in placement.  

Then cloned and rotated the log cabin pieces from the top and placed over the guidelines.  I found it was easiest to get everything to snap if I switched back to Snap to Grid.  Note that we have Horizontal and Vertical Grid snap points at all three corners of the large triangle.
Picture
Duplicate the top segments. Rotate and place on the other three edges of the block.
Just for fun I decided to create a small pieced unit in the on point square in the center.

Another design point.  Chose your own design for that on point square.

A simple quarter square triangle unit for me. 
Picture
Optional - Add some piecing to the on point square in the center.
After playing with my design in the quilt worktable, I realized I could simplify the construction process by making a slight modification to the corners. 

By eliminating two diagonal lines and adding a third one going the other direction, I've eliminated the awkward house shaped piece in the corner.  Instead I have an additional rectangle and a half square triangle for the corner.

​Now all the pieces will show up on the rotary cutting chart and it will be easier to cut and piece the entire block.
Picture
Modify the corners to improve construction.
Color the block using a variety of fabrics for a scrappy look.

​I used the latest free download from Do You EQ.  Vertex was designed by QT fabrics.  It has 84 fun fabrics to give your quilt a very scrappy look. 
Link to free Vertex download from Do You EQ
Picture
Colored block.

Designing the Quilt

When I pulled the rotary cutting chart for my 17" block, I realized that it wasn't quite as rotary cutting friendly as I hoped.

Each of the logs needed to be cut from 2-1/8" strips.  And the cross cuts had challenging measurements as well.

​
Picture
17" x 17" Rotary Cutting Chart
Fortunately in EQ, we don't have to create our quilts in the size we designed our blocks.  

I could tell you that I worked through the math and figured out the size of the block that resulted in easier to cut logs.  However, I wasn't feeling very brainy today -- so I cheated.  I just experimented with some different sizes. 

To do this, in the Rotary Cutting dialogue box, switch from "Use size from worktable" to "Custom Block size".

Type in a new size and select preview. 
Picture
Type in a custom block size to experiment with different rotary cutting results.
Notice how much better the rotary cutting chart is once the block size is changed to 15-1/2" x 15-1/2". 

​Now the logs can be cut from 2" strips of fabric.
Picture
15" x 15" Rotary Cutting Chart
On the Quilt Worktable, select New Quilt and select the Style Horizontal.

On the Layout tab, change the number of blocks to 3 horizontal and 4 vertical.

Change the size of the block to 15.5"

Change the sashing size to 2.75"

On the border tab, set up 3 borders:
Border #1 - 1" Long Horizontal
Border #2 - 4-1/2" Long Horizontal
​Border #3 - 1/2" Mitered (for the binding)
Picture
Horizontal Quilt - Layout Tab
On the Block worktable, create a block for the cornerstones.  This is optional -- but I thought it was a way to carry the concept of the center of my bocks into the cornerstone.

My cornerstone block was designed at four inches.  Make sure to turn on Snap to Grid before drawing the unit.

I created an on point square and then drew horizontal and vertical lines through the center.
Picture
Cornerstone Block
See the full video on creating your own blocks and quilt.
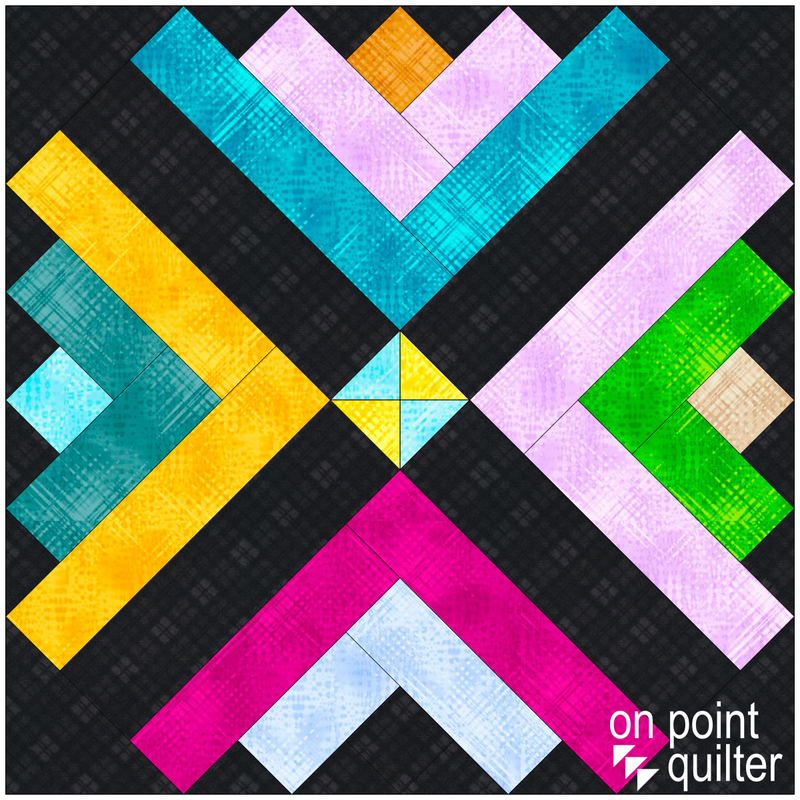
Here is my final quilt.  I love how the log cabin units stand out when using a black background.
Picture
I am curious what you choose to do with the design.  did you make any different design decisions.  Whether you did (or did not) I would love to see your final quilt.  Please feel free to share in the Learning EQ Facebook group post I have set up.
Learning Electric Quilt Facebook Group - Log Cabin Crossing Post

EasyDraw Class Options in Tech Know Quilters

Did you enjoy learning some new skills in working with EasyDraw?  If you are ready to enhance those skills, check out the three EasyDraw class options within the Tech Know Quilter membership.  
  • Introduction to EasyDraw (Beginner)
  • EasyDraw Kaleidoscopes (Intermediate)
  • Advanced EasyDraw (Advanced)
If you aren't sure which class makes the most sense, take a look at the blocks for each class in the slideshow below.  If you can draft most of the blocks for a particular class without assistance, select the next class on the list.

Not currently a member -- send me a note if you are interested in joining Tech Know Quilters -- and which class you would like to start with.

Current members, let me know if you would like any of these classes as an add-on to your current class for the month.  We will send you a an add-on coupon for your discounted price.
Email Kari
Picture
Join the On Point Quilter weekly newsletter and receive regular tips and inspiration on using Electric Quilt 8 along with the  Free 12 Top
Tips for EQ8 video guide.


Happy quilting.


​Kari
Picture
Mary Groesbeck
6/4/2023 08:45:02 am

What a fabulous new block! So many possibilities. And a great tutorial. Thank you.

Connie Bobcik
6/4/2023 10:53:29 am

Love your new creation! This is an awesome block! Thank you for sharing it with us!


Comments are closed.
    Picture
    Picture
    Picture
    Free guide available for newsletter subscribers
    Picture
    Picture
    Picture

    Kari Schell

    Electric Quilt Expert and Educator and Pattern Designer.

    Categories

    All
    Art And Stitch
    Cricut Maker
    Dear Jane
    Electric Quilt 7
    Electric Quilt 8
    Goose Goose Duck Challenge
    Inkscape
    Longarm Quilting
    Patterns
    Silhouette Cameo
    Stampin Up
    Summer Games
    Tips And Techniques
    Tools And Rulers

    Archives

    September 2023
    August 2023
    July 2023
    June 2023
    May 2023
    April 2023
    March 2023
    February 2023
    January 2023
    December 2022
    November 2022
    October 2022
    September 2022
    August 2022
    July 2022
    June 2022
    May 2022
    April 2022
    March 2022
    February 2022
    January 2022
    December 2021
    November 2021
    October 2021
    September 2021
    August 2021
    July 2021
    June 2021
    May 2021
    April 2021
    March 2021
    February 2021
    January 2021
    December 2020
    November 2020
    October 2020
    September 2020
    August 2020
    July 2020
    June 2020
    May 2020
    April 2020
    March 2020
    February 2020
    January 2020
    December 2019
    November 2019
    October 2019
    September 2019
    August 2019
    July 2019
    June 2019
    May 2019
    April 2019
    March 2019
    February 2019
    January 2019
    December 2018
    November 2018
    October 2018
    September 2018
    August 2018
    July 2018
    June 2018
    May 2018
    April 2018
    March 2018
    February 2018
    January 2018
    December 2017
    November 2017
    October 2017
    September 2017
    August 2017
    July 2017
    June 2017
    May 2017
    April 2017
    March 2017
    February 2017
    January 2017
    December 2016
    November 2016
    October 2016
    September 2016
    August 2016
    July 2016
    June 2016
    May 2016
    April 2016
    March 2016
    February 2016
    January 2016
    December 2015
    November 2015
    October 2015
    September 2015
    August 2015
    July 2015
    June 2015
    May 2015
    April 2015
    March 2015
    February 2015
    January 2015
    December 2014
    November 2014
    October 2014
    September 2014
    July 2014
    June 2014
    May 2014
    April 2014
    March 2014
    February 2014
    January 2014
    December 2013
    November 2013
    October 2013
    September 2013
    August 2013

    RSS Feed

Contact:
On Point Quilter
e-mail:  onpointquilter@comcast.net
phone:  763-566-6536

GET MY NEWSLETTER FOR REGULAR EQ AWESOMENESS!

* indicates required
  • Blog
  • About
  • EQ Training
    • Tech Know Quilters Electric Quilt 8 Membership Training
    • Shoot for the Stars with EQ8
    • Electric Quilt 8 Sneak Peek
    • Scheduling a Workshop or Lecture
  • Store
  • Card Making
  • Contact
  • Free Stuff
    • Other Video Tutorials