
|
Wow. What a fantastic week. I had so much fun seeing many of you on one of the transparency quilt webinars last Sunday and Monday. And then we moved into open enrollment for Tech Know Quilters. Which only happens a few times a year.
During the webinar, I shared how to use Inkscape to create a transparency image. But there actually are other really good uses for Inkscape. It is a great way to convert any of your EQ blocks to svg files. For those of you that have electronic cutting systems (Cricut, Silhouette or Brother Scan n Cut), you will then be able to cut your patches out using the svg files. Included in this weeks video is information on creating an svg file for a leaf wreath created in EQ.
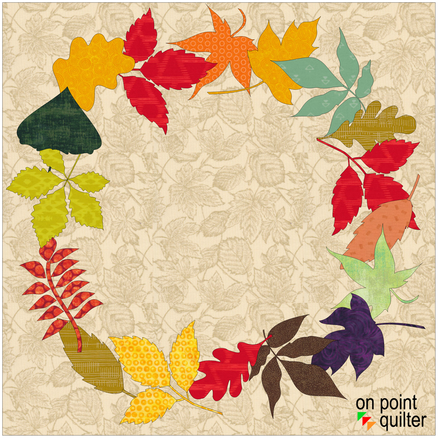
Even if you don't use an electronic cutting system, you are going to want to see how to make your own fall wreath. Fall Wreath using Electric Quilt 8
Learn how to create your own fall wreath using Electric Quilt 8.
In the video, you will learn how to combine motifs from multiple blocks into one block along with rotating and resizing the elements to draft the wreath.
As mentioned in the video:
From EQ8 to Your Cutting System
Once the wreath was drafted, I knew I didn't want to cut out all those applique shapes by hand. So I decided to use my electronic cutting system to cut out the leaves.
There were two challenges to overcome with my drawing. First, the block is 20 inches x 20 inches -- super big which means lots of tiled pages when setting the page size to letter. Since the applique patches are overlapping using the trace feature in my cutting system wasn't going to work. After a bit of experimenting, I found the solution was to print the block to a pdf writer that would allow me to set the paper size to 24 x 24. No -- I don't have that big of a printer. In the video I demonstrated the CUTEPDF writer, which is freeware available for PC users.
For my MAC lovers, Electric Quilt recommends that you use the RWTS PDFwriter. You can read more about downloading and using the printer here.
Since I don't have a MAC, I was unable to test whether you could create a 24 inch paper size. If there isn't an option, a workaround would be to change the size in EQ to 8 x 8 and then modify the size once you get it in Inkscape. Another difference is that on a Mac, there isn’t an option to name the file before saving; PDF files are stored in the directory /Users/Shared/PDFwriter/<your user name>. When following the video, note that you will need to modify your approach for those differences.
10/6 update -- Julie Bermel (a TKQ member) shared the problem with her husband who found a an article on changing the page size for a MAC. He was able to test it on his Mac book Pro.
I love our Tech Know Quilter community -- and thank you Julie.
Having the larger paper size allowed me to work with all the elements in a single file in Inkscape. Inscape is a vector graphics program that is free. There are versions for both MAC and PC. And it allows me to convert a pdf document into a svg file. You can read more about Inkscape and download a version here.
SVG files can be used by all the major cutting systems including Silhouette, Cricut, and Brother Scan n Cut. This means if you have any of those systems, you will be able to cut out your Electric Quilt applique fabric patches! No scissors required.
You are welcome to use my pdf export to explore working with Inkscape (regardless of you computer system).
We do explore some additional nuances in working with EQ and electronic cutting systems in the Tech Know Quilter class -- Specialty Rulers and Dies.
You can learn more about Tech Know Quilters here and sign up for the wait list for the next open enrollment period. Next Week
Next week I plan to share with you a quilt that you can make that features the 20 inch Fall is in the Air wreath.
Chris K.
10/5/2019 08:34:03 am
Thank you, that was very interesting. I had worked out something similar, but I separated the patches by printing templates in EQ8. I then colored them after I got them into Cricut Design Space. I couldn't figure out how to do very much in Inkscape.
Linda Paredez
10/5/2019 08:46:24 am
Thanks, Kari! I learned several new tricks and look forward to trying to cut my appliques on the Cricut Maker. I had the Explore Air 2, but it wasn't consistent in cutting fabric. I just upgraded and haven't gotten to use the Maker yet...it's on the schedule for this weekend! I appreciate you sharing so much information and skills on EQ!
Karen Kuranda
10/5/2019 09:44:54 am
THANKS! 10/6/2019 08:17:03 am
Kari this is a great technique. Thanks for sharing all your tips. I too have a Brother Scan N Cut DX225 which I love so plan to try this really soon. Comments are closed.
|


Free guide available for newsletter subscribers


Kari SchellElectric Quilt Expert and Educator and Pattern Designer. Categories
All
Archives
July 2024
|


 RSS Feed