ON POINT QUILTER
  • Blog
  • About
  • EQ8 Training
    • Tech Know Quilters Electric Quilt 8 Membership Training
    • EQ8 Made Easy
    • Electric Quilt 8 Sneak Peek
  • Store
  • Contact
Picture

Creating Quilt Labels using EQ8

5/4/2024

 
Quilt Show season is upon on.

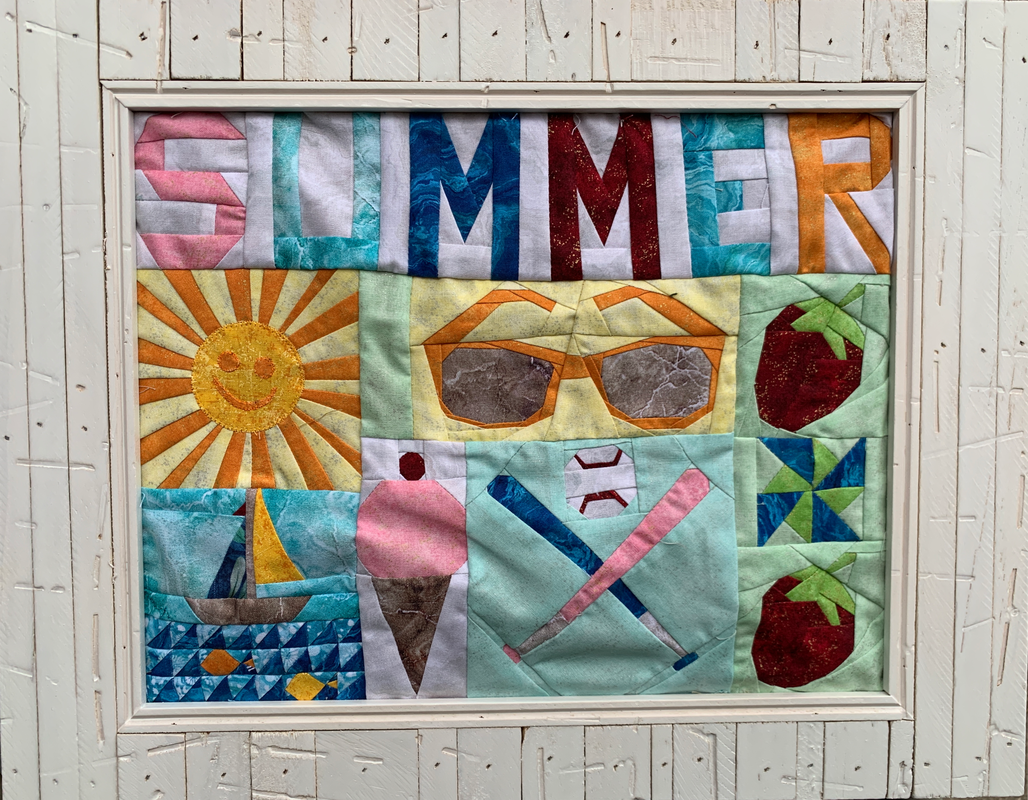
I've been enjoying the photos of award winning quilts from some of the national shows.  They are truly breathtaking.

My local quilt guild -- Maple Grove Quilters -- is having their show this weekend as well.  We have a great group of very talented quilters.  I also enjoy spending time enjoying their quilts.

During the last couple of months, I have been busy on the longarm finishing up my quilts for the show.  No custom quilting for me this year.  I was in production mode.

Two weekends ago, I was at a quilt retreat.  A good chunk of my time was trimming up the quilts and adding binding.

Last Sunday I was focused on creating and attaching labels for my quilts.

Quilt show is today (May 4th).  For those in the Twin Cities area, join me at the Maple Grove Community Center (from 9 am to 4 pm) to see a great collection of quilts created by Maple Grove Quilters.

​In this tutorial, I will share my quilts, their matching labels and walk you through my label process for one of my quilts.

Summertime EQ8 Quilt Label Tutorial

Back in 2022, I created a challenge for EQ8 users where I provided them videos on drafting a series of Summer themed blocks. 

The challenge concluded with a webinar where I presented a layout option for these blocks. 

​I had fun both designing and making the quilt which I framed and use as wall decor in my home.
Picture
Kari's Summertime Framed Quilt
For the label I started with my Summertime EQ8 file which included the blocks and designed layout for the quilt.  

If you participated in the Summertime EQ8 Challenge you are welcome to work with me using your Summertime project file.

If you didn't participate in the challenge, feel free to open one of your own EQ8 projects and use the concepts from this tutorial to design your own label.

Scroll down for additional ideas for creating your own labels from your EQ8 drafted quilts.
Picture
Summertime EQ8 Design by Kari Schell
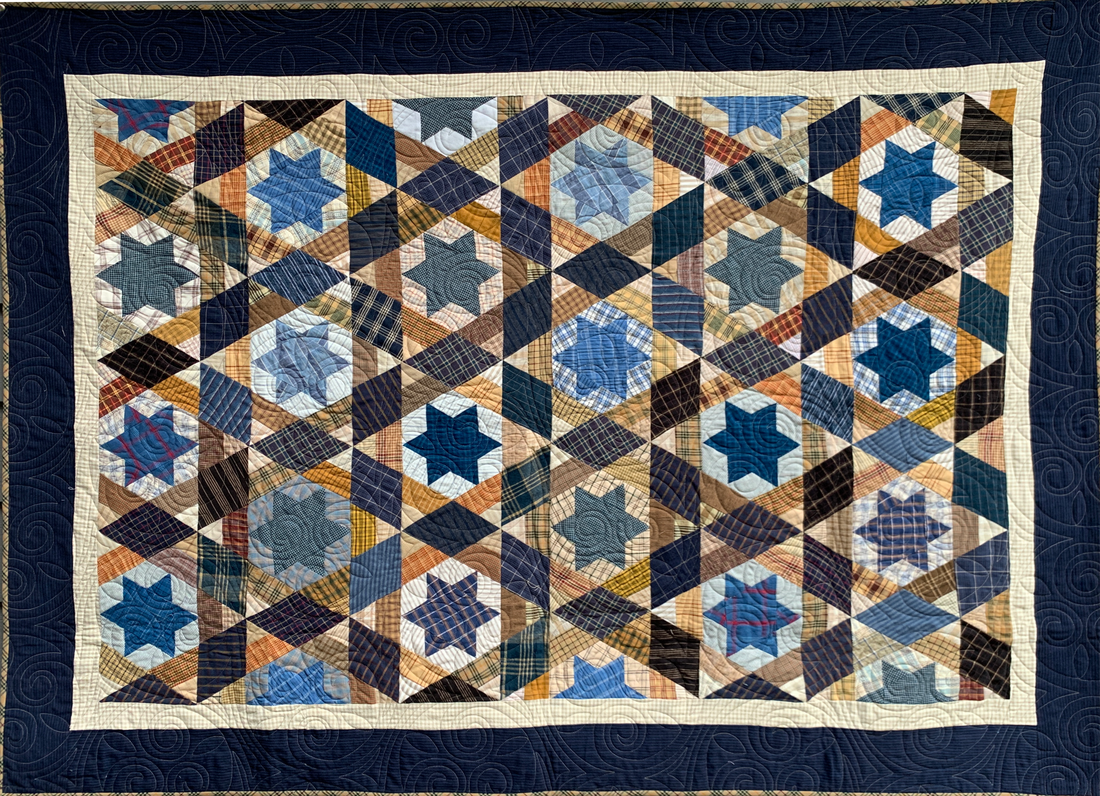
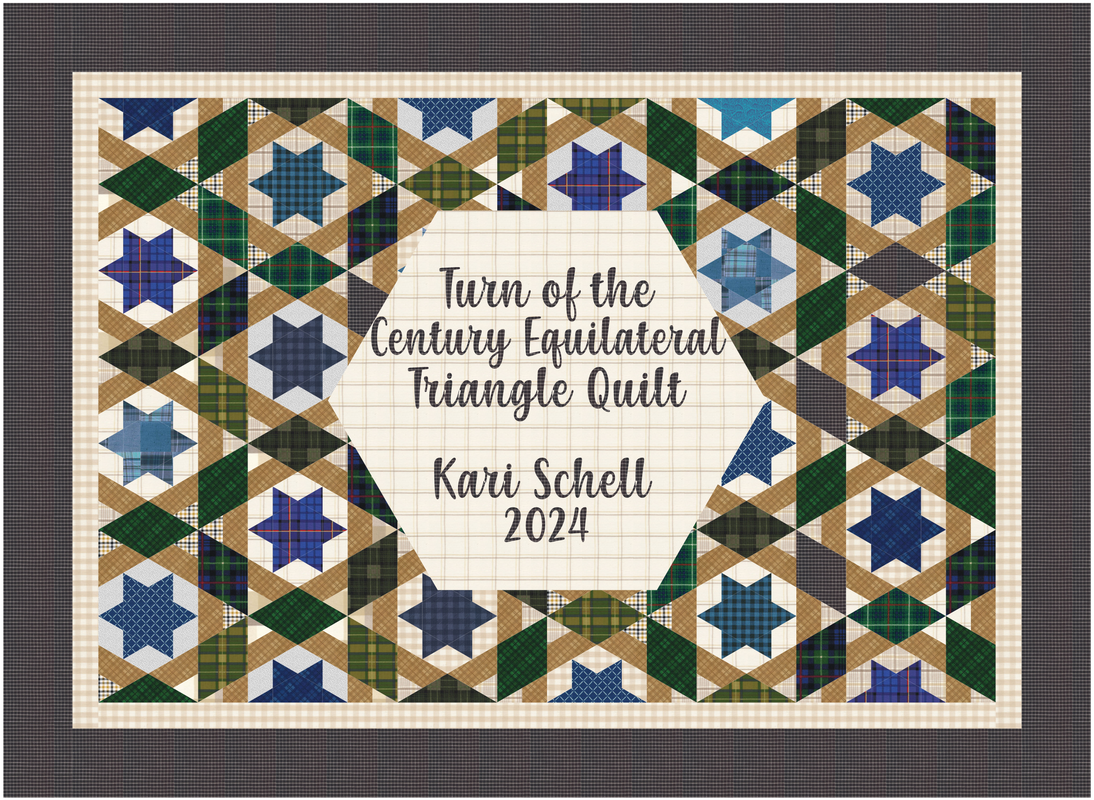
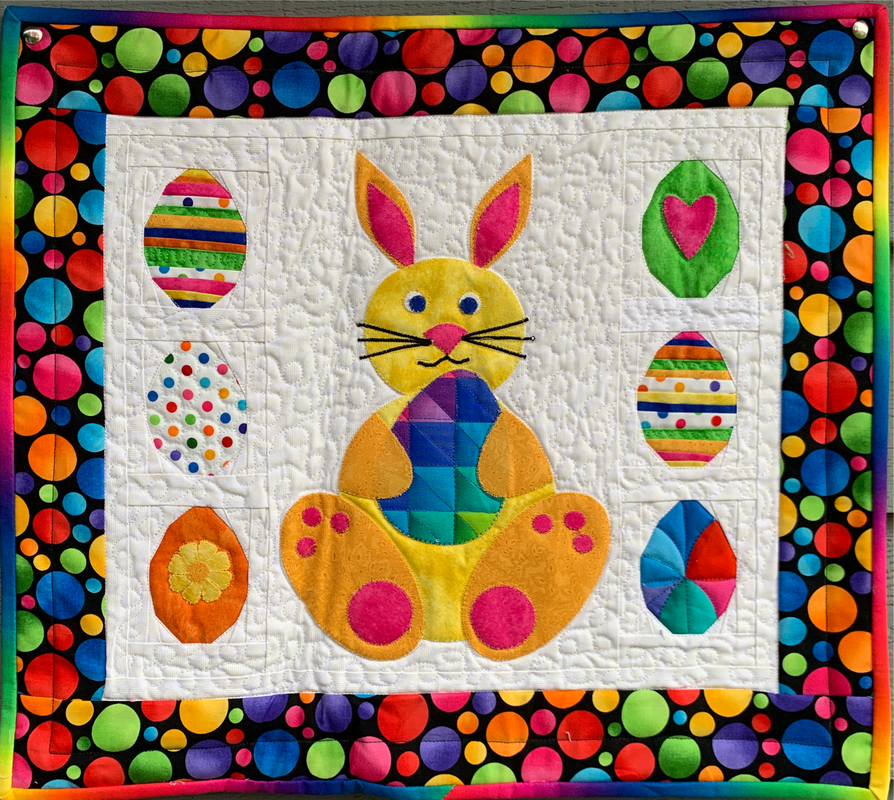
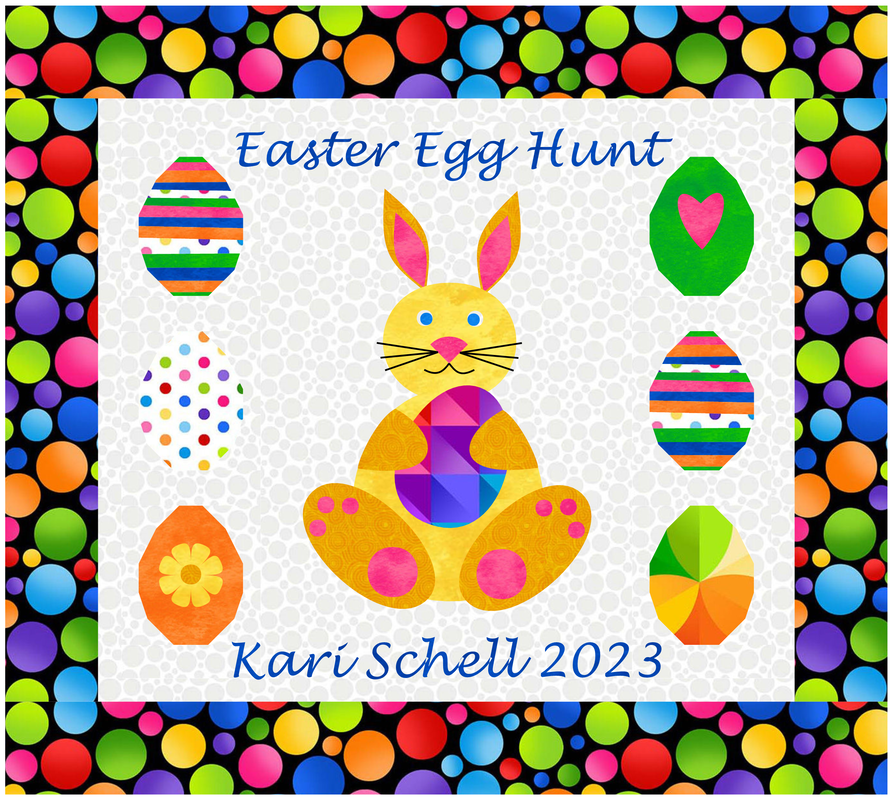
When trying to decide what to do for this label, I struggled with the fact that there was no natural place on the quilt top to add the label information. 

I didn't want to delete any of my blocks.   

So I decided to redesign the layout to include a plain block that was large enough to add my label information. 

​Check out the full process in this EQ8 video tutorial.

Printing Labels

Since I had seven labels to create, I decided to print multiple labels on a single sheet of EQ Printables. 

EQ Printables are made for printing images using an InkJet printer.  (More on that below.)

You can choose between:
  • Cotton Basic (200tc)
  • Cotton Lawn (240tc)
  • Cotton Satin (283tc)
Purchase EQ Printables from the Electric Quilt Company
Picture
EQ Printables Instructions
In a Word document, I inserted the label images exported from Electric Quilt 8.    I did a copy (Ctrl or Command Plus C) followed by paste (Ctrl or Command Plus V). 

​I then resized the images to fit on three pages.


Pro Tip:  Make sure to leave at least 1/2 inch between the quilts on each page to ensure a large enough seam allowance.  It is a good idea to print the document on regular paper -- before proceeding to the EQ Printables.
Picture
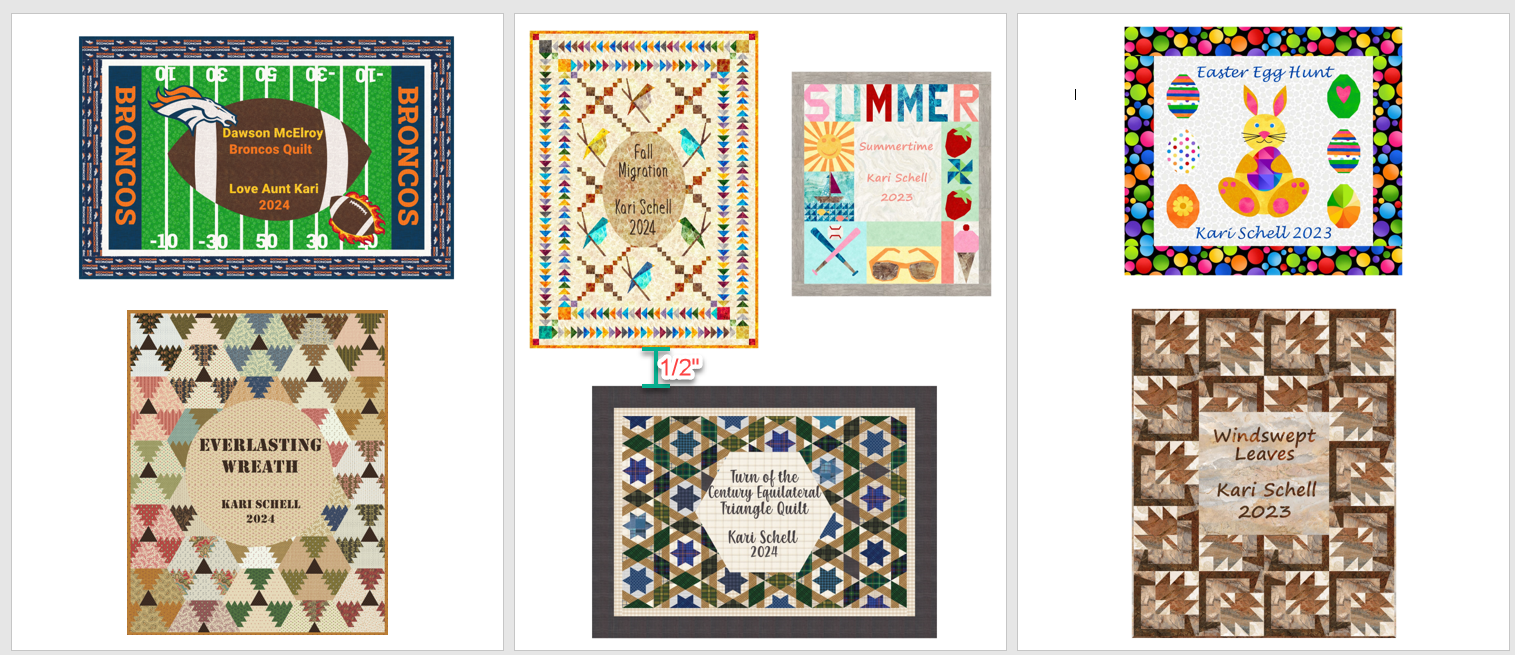
Word Document for seven different images exported from EQ8
What to Do if Your Ink Jet Printer isn't Working

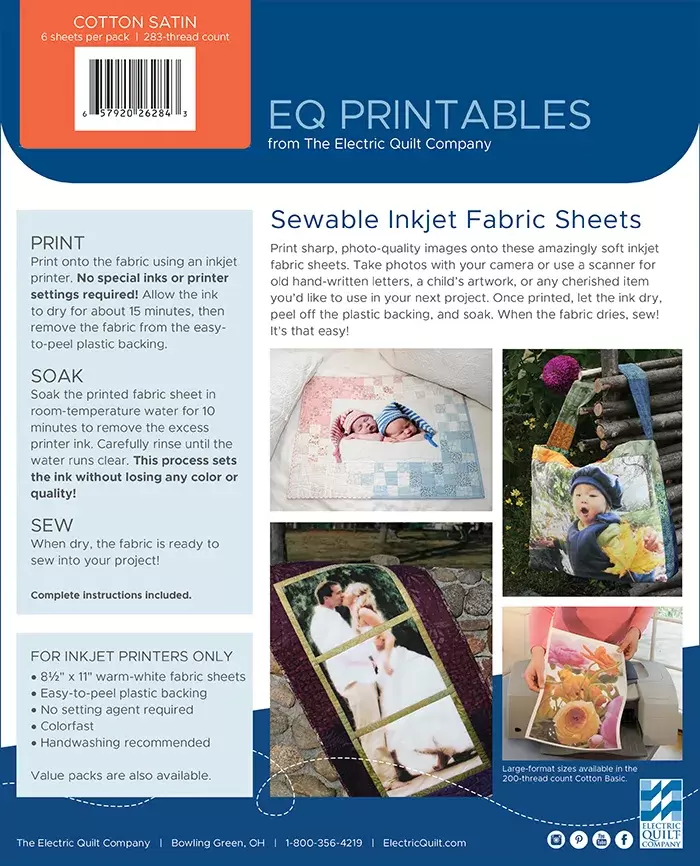
Electric Quilt recommends that you print your labels on an InkJet printer.  My InkJet printer was out of ink.  So I used my laser printer instead.  This is definitely not recommended.   

I printed one sheet at a time and let my printer cool down between pages.  I did not want to melt the plastic sheets which are attached to the EQ Printables fabric.. 

I did notice that there was some extra ink on the next couple of printouts (after finishing my labels).


Using a Laser printer is not recommended -- so use it at your own risk. 

​I did find that the ink sits on top of the fabric, making the label a bit stiff.  I am also not sure about the color fastness of the label -- so you may want to test this if you decide to user a laser printer. 
​
Picture
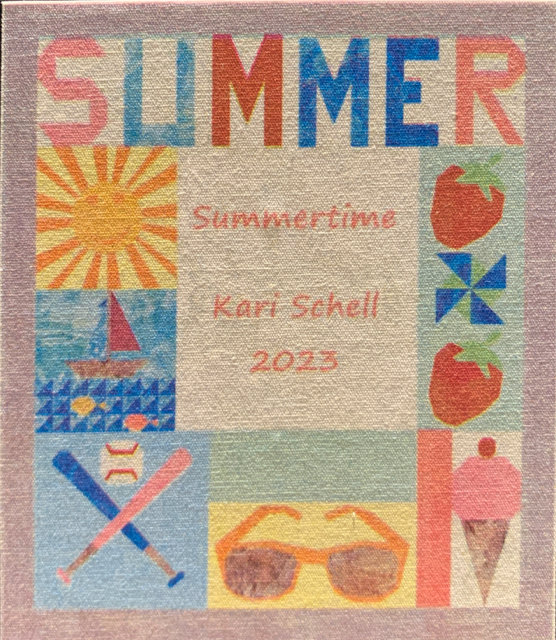
Summertime Label Printed on EQ Printables (Cotton Satin) using Laser Printer. Size was 3.5" x 4".
I would love to see pictures of your EQ designed labels.  Feel free to share in the Learning EQ Facebook group.
Learning EQ Facebook Group Post on Designing Labels using EQ8

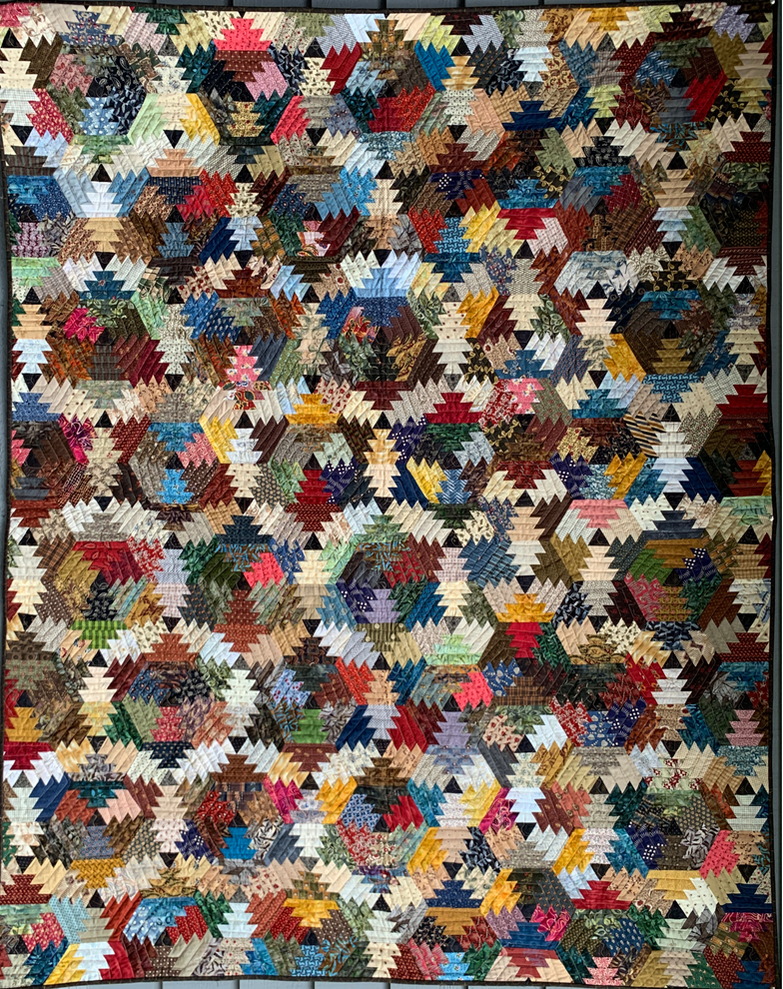
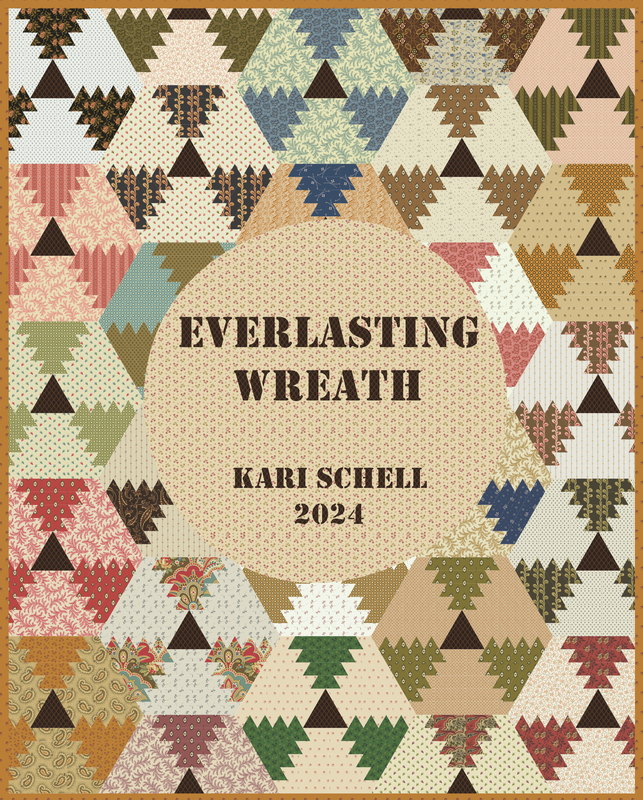
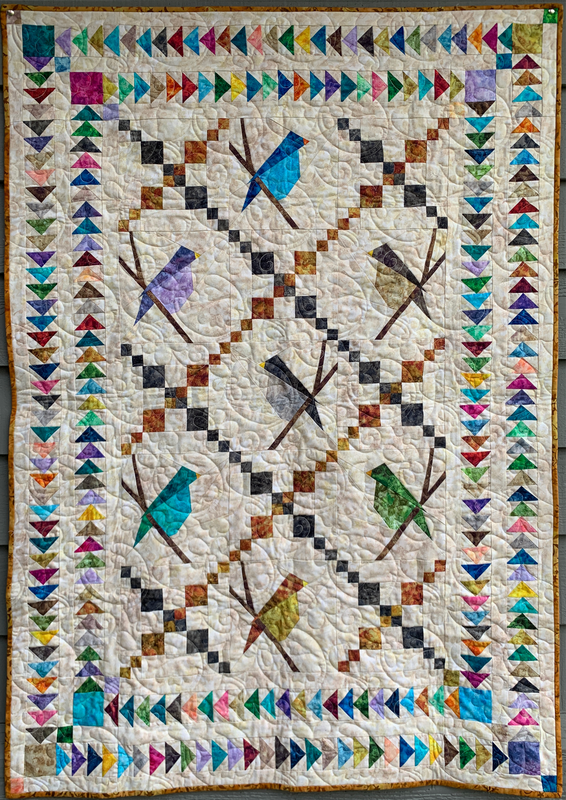
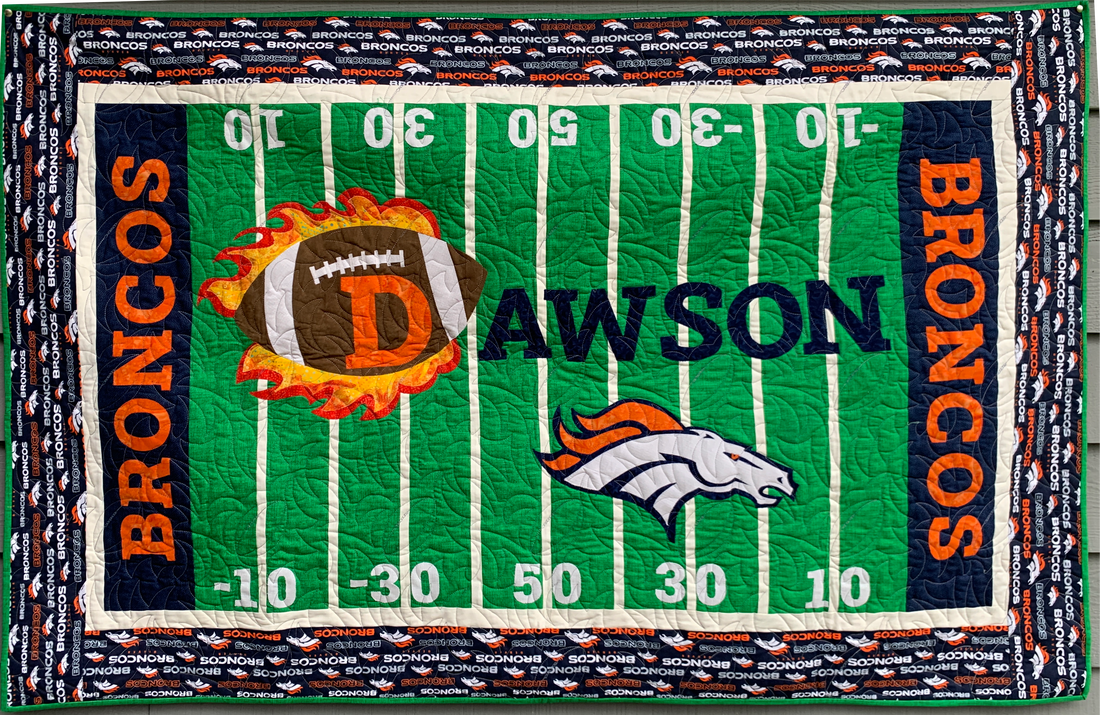
Quilts and Matching Labels

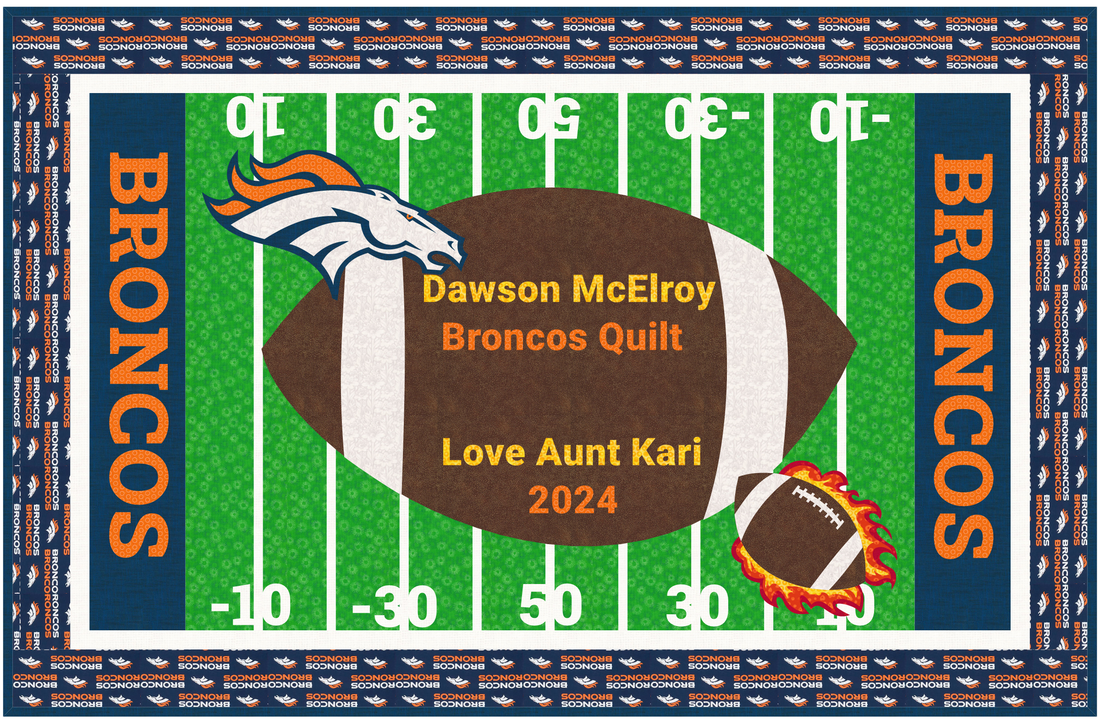
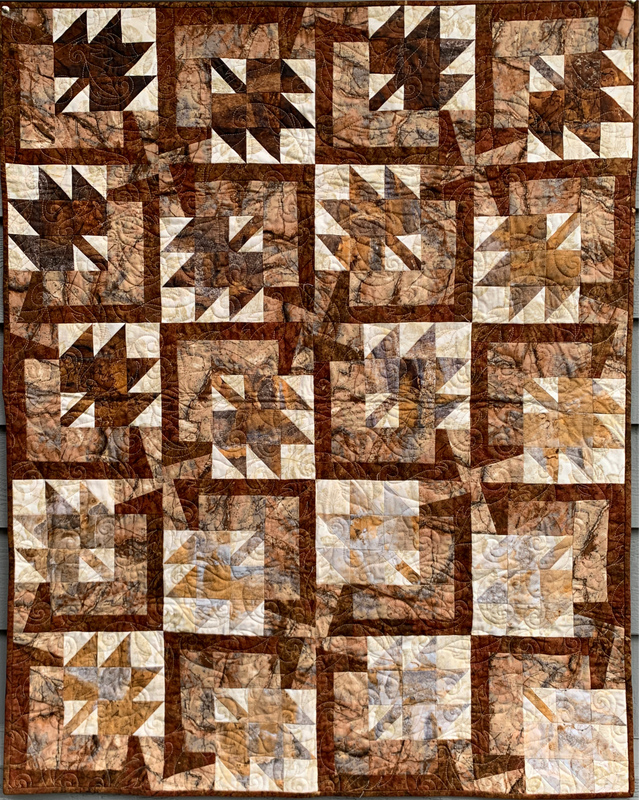
Here are the other quilts for my show along with the label (designed in EQ8).  For each label I included an explanation of how I modified the quilt when creating the label.
Turn of the Century Equilateral Triangle Quilt
Picture
I designed this quilt in EQ4 in 1999 and began this quilt around the turn of the century -- during my plaid phase. 

Pieces were relegated to a shoe box and stored in a closet for a couple of decades. 

After "discovering the shoe box" in 2022, I reworked the project (a much smaller size than my original design). 

Quilted in 2024.

​Can you figure out the blocks?  

Check out how to draft the quilt in this blog post.
Turn of the Century Equilateral Triangle Label
Picture
Created an applique motif using the hexagon under the shapes tool. 

Added the shape to Layer 2 on the quilt worktable and colored with a background plaid. 

​Added text using the Text Tools on Layer 2.
Summertime Framed Quilt
Picture
This design was created and delivered as a challenge in June 2022 for my blog and newsletter EQ8 community. 

The miniature blocks are foundation friendly.

The entire quilt measures 11" x 14" - suitable for a standard frame.

​The tutorials became an exclusive benefit to TKQ members in July 2022.
Summertime Label
Picture
To create a space for adding label information, I moved the blocks in Custom Set on the Quilt Worktable.
​
Spacers were added to the quilt -- including one in the center that was colored with a background fabric.

Text was added via the Text Tool on Layer 2.
Easter Egg Hunt Quilt
Picture
The design was created for a webinar delivered in March 2023.

Participants learned how to use Applique shapes to jump start an applique design, create foundation friendly Easter eggs and incorporate specialty fabric (panels or gradation fabric) in a design.

The webinar became an exclusive benefit to TKQ members in April 2023.
Easter Egg Hunt Quilt
Picture
The Easter Bunny had been added to the quilt as an applique motif on Layer 2.

The motif was shrunk and centered in the quilt -- creating additional white space above and below the bunny.

​Text was added on Layer 2 using the text tool.
Everlasting Wreath Quilt
Picture
Design by Laundry Basket Quilts. 

This quilt has taken me a decade (or more to complete). 

It has been my back-up project for many quilt retreats. 

​Loved combining my extensive collection of both civil war and batik fabrics in the same quilt.
Everlasting Wreath Label
Picture
The block and quilt were drafted in Electric Quilt. 

It is not an exact replica of the quilt pattern by Laundry Basket Quilts as I decided to include additional logs in each block for my design.  I also changed up the size of the equilateral triangle in the center.

The circle was created as a applique motif and added to Layer 2.

Text was added using the Text Tool on Layer 2.
Fall Migration Quilt
Picture
This quilt is a variation on the raffle quilt I designed for Maple Grove Quilters. 

​I used this design for a free webinar I offered on drafting blocks and quilts using Electric Quilt 8 in September 2023.

​The design became an exclusive benefit for Tech Know Quilter members in October 2023.
Fall Migration Label
Picture
The circle was created as a applique motif and added to Layer 2.

Text was added using the Text Tool on Layer 2.
Broncos Quilt for Dawson
Picture
​Dawson is my first great-nephew - born in April 2024. 

His father is a huge Broncos fan, so I decided to encourage continuing the tradition with a Broncos quilt. 

​I designed the quilt using Electric Quilt 8 with some of the images obtained using AI which were then traced in Electric Quilt.
Broncos Quilt for Dawson Label
Picture
For the quilt label, I simplified the football motif.  The motif was resized and placed on Layer 2. 

​The other motifs were shrunk and repositioned on Layer 2.

Text was added using the Text Tool on Layer 2.

And yes -- I did forget to rotate the Broncos text on the left side of the quilt label to match the finished quilt.  :)
Windswept Leaves Quilt
Picture
The setting was inspired by pattern by Maple Island Quilts. 

I reworked the design to work with a maple leaf block. 

​I used a single gradated fabric for the leaves.  It took a bit of organizing to cut and sort the fabric from light to dark.
Windswept Leaves Label
Picture
A plain block was added on Layer 2 and colored with a background fabric.

​Text was added using the Text Tool on Layer 2.
Picture
Happy quilting.

​Kari

Join the On Point Quilter weekly newsletter and receive regular tips and inspiration on using Electric Quilt 8 along with the  Free 12 Top
Tips for EQ8 video guide.
Picture
JoAnne Anderson
5/4/2024 08:37:43 am

I would love to receive your newsletter

Mary Lincoln
5/4/2024 08:58:24 am

I have really enjoyed the EQ 8 program. The free webinars are great! I am progressing slowly with the program. So much to learn!

EyeQuilt n Sew
5/4/2024 03:33:31 pm

Kari, your quilts are stunning! The creative quilt labels add such a fine finish! Thanks for sharing your talents and vast knowledge.

Lisa Pratte
5/5/2024 11:40:21 am

I like smaller labels for my quilts. I type up my label in word and use freezer paper and my fabric and print. I do set the label in water to set the print so it does not run when washing.


Comments are closed.
    Picture
    Picture
    Picture
    Free guide available for newsletter subscribers
    Picture
    Picture
    Picture

    Kari Schell

    Electric Quilt Expert and Educator and Pattern Designer.

    Categories

    All
    Art And Stitch
    Cricut Maker
    Dear Jane
    Electric Quilt 7
    Electric Quilt 8
    Goose Goose Duck Challenge
    Inkscape
    Patterns
    Silhouette Cameo
    Stampin Up
    Tips And Techniques
    Tools And Rulers

    Archives

    April 2025
    March 2025
    February 2025
    January 2025
    December 2024
    November 2024
    October 2024
    September 2024
    August 2024
    July 2024
    June 2024
    May 2024
    April 2024
    March 2024
    February 2024
    January 2024
    December 2023
    November 2023
    October 2023
    September 2023
    August 2023
    July 2023
    June 2023
    May 2023
    April 2023
    March 2023
    February 2023
    January 2023
    December 2022
    November 2022
    October 2022
    September 2022
    August 2022
    July 2022
    June 2022
    May 2022
    April 2022
    March 2022
    February 2022
    January 2022
    December 2021
    November 2021
    October 2021
    September 2021
    August 2021
    July 2021
    June 2021
    May 2021
    April 2021
    March 2021
    February 2021
    January 2021
    December 2020
    November 2020
    October 2020
    September 2020
    August 2020
    July 2020
    June 2020
    May 2020
    April 2020
    March 2020
    February 2020
    January 2020
    December 2019
    November 2019
    October 2019
    September 2019
    August 2019
    July 2019
    June 2019
    May 2019
    April 2019
    March 2019
    February 2019
    January 2019
    December 2018
    November 2018
    October 2018
    September 2018
    August 2018
    July 2018
    June 2018
    May 2018
    April 2018
    March 2018
    February 2018
    January 2018
    December 2017
    November 2017
    October 2017
    September 2017
    August 2017
    July 2017
    June 2017
    May 2017
    April 2017
    March 2017
    February 2017
    January 2017
    December 2016
    November 2016
    October 2016
    September 2016
    July 2016
    June 2016
    May 2016
    April 2016
    March 2016
    February 2016
    January 2016
    December 2015
    November 2015
    October 2015
    September 2015
    August 2015
    July 2015
    June 2015
    May 2015
    April 2015
    March 2015
    February 2015
    January 2015
    December 2014
    November 2014
    October 2014
    September 2014
    July 2014
    June 2014
    May 2014
    April 2014
    March 2014
    February 2014
    January 2014
    December 2013
    November 2013
    October 2013
    September 2013
    August 2013

    RSS Feed

Contact:
On Point Quilter
e-mail:  [email protected]
phone:  763-566-6536

GET MY NEWSLETTER FOR REGULAR EQ AWESOMENESS!

* indicates required
  • Blog
  • About
  • EQ8 Training
    • Tech Know Quilters Electric Quilt 8 Membership Training
    • EQ8 Made Easy
    • Electric Quilt 8 Sneak Peek
  • Store
  • Contact